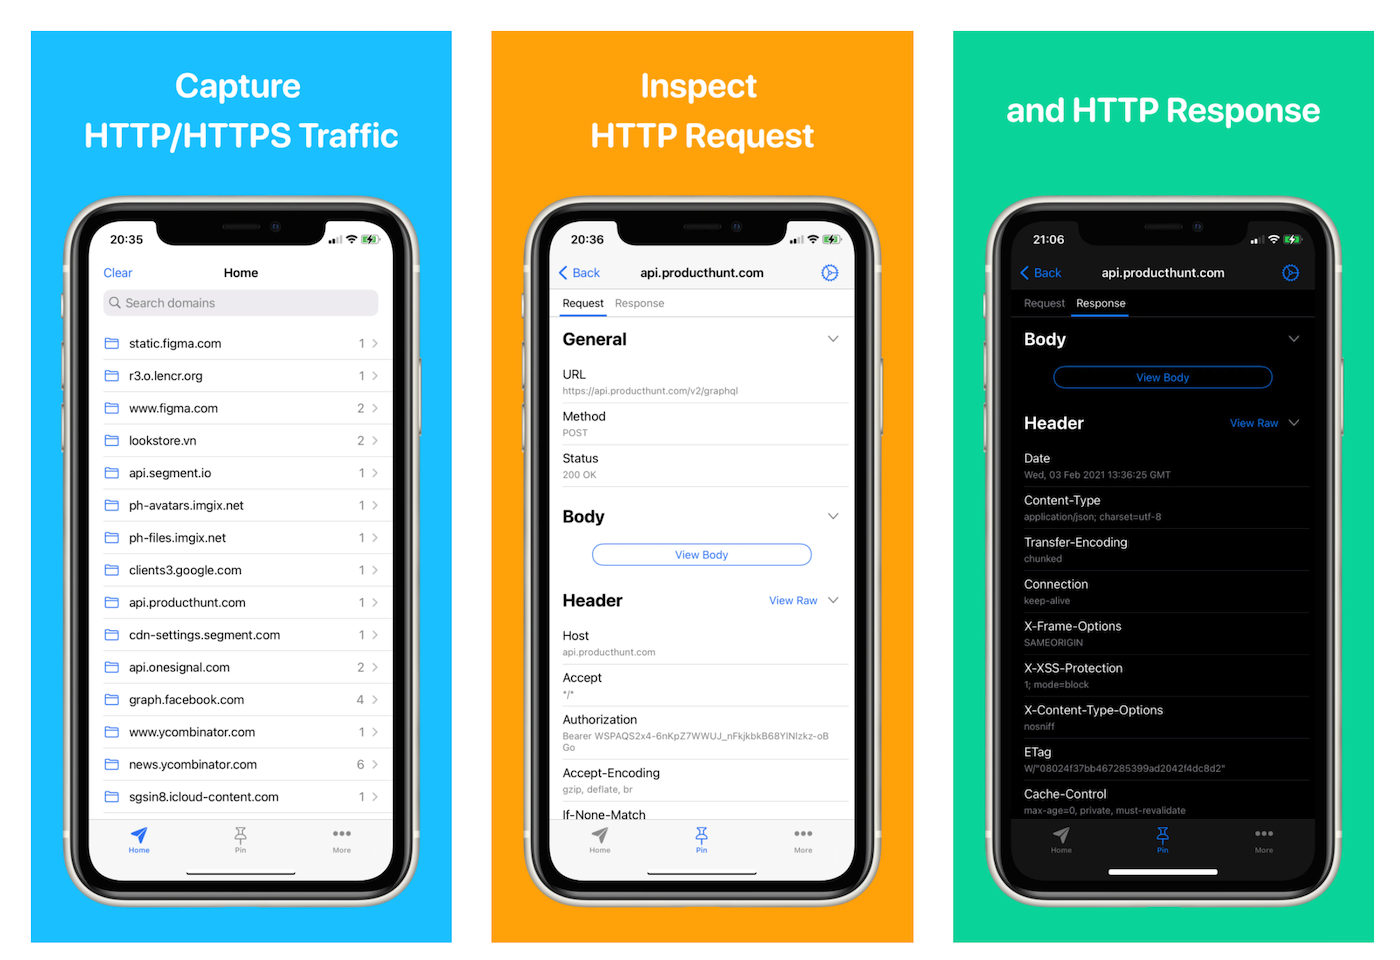
Capture and inspect HTTPs traffic from iPhone
This mini tutorial would demonstrate how to set up and intercept network traffic from iOS devices with Proxyman for iOS.
Proxyman for iOS
Before going to the detail, here is a brief on what Proxyman is:
Proxyman for iOS is exclusively built for iOS platforms, which have some special features:
- Act as a Man-in-the-middle to monitor and decrypt all incoming/outgoing HTTP/HTTPS traffic from your iOS device.
- A standalone iOS app, work works independently with Proxyman for macOS.
- Designed for iPad with multiple column layouts
- Protect sensitive data with Touch ID and FaceID.
- Share log to Proxyman for macOS.
- Support iOS 18 and iPad OS 18 or later.
This tutorial will cover the following:
- How to set up Proxyman for iOS on your iPhone/iPad
- How to intercept network traffic with Proxyman for iOS
- How to filter traffic with the Search Bar
- How to inspect and manipulate HTTP/HTTPS traffic
- How to share log to Proxyman for macOS
1. Download from AppStore
If you haven't installed Proxyman for iOS, please download it from the official AppStore.
As soon as you open the Proxyman app, please click on the "Start intercept HTTPS Traffic" button on the Home Screen.
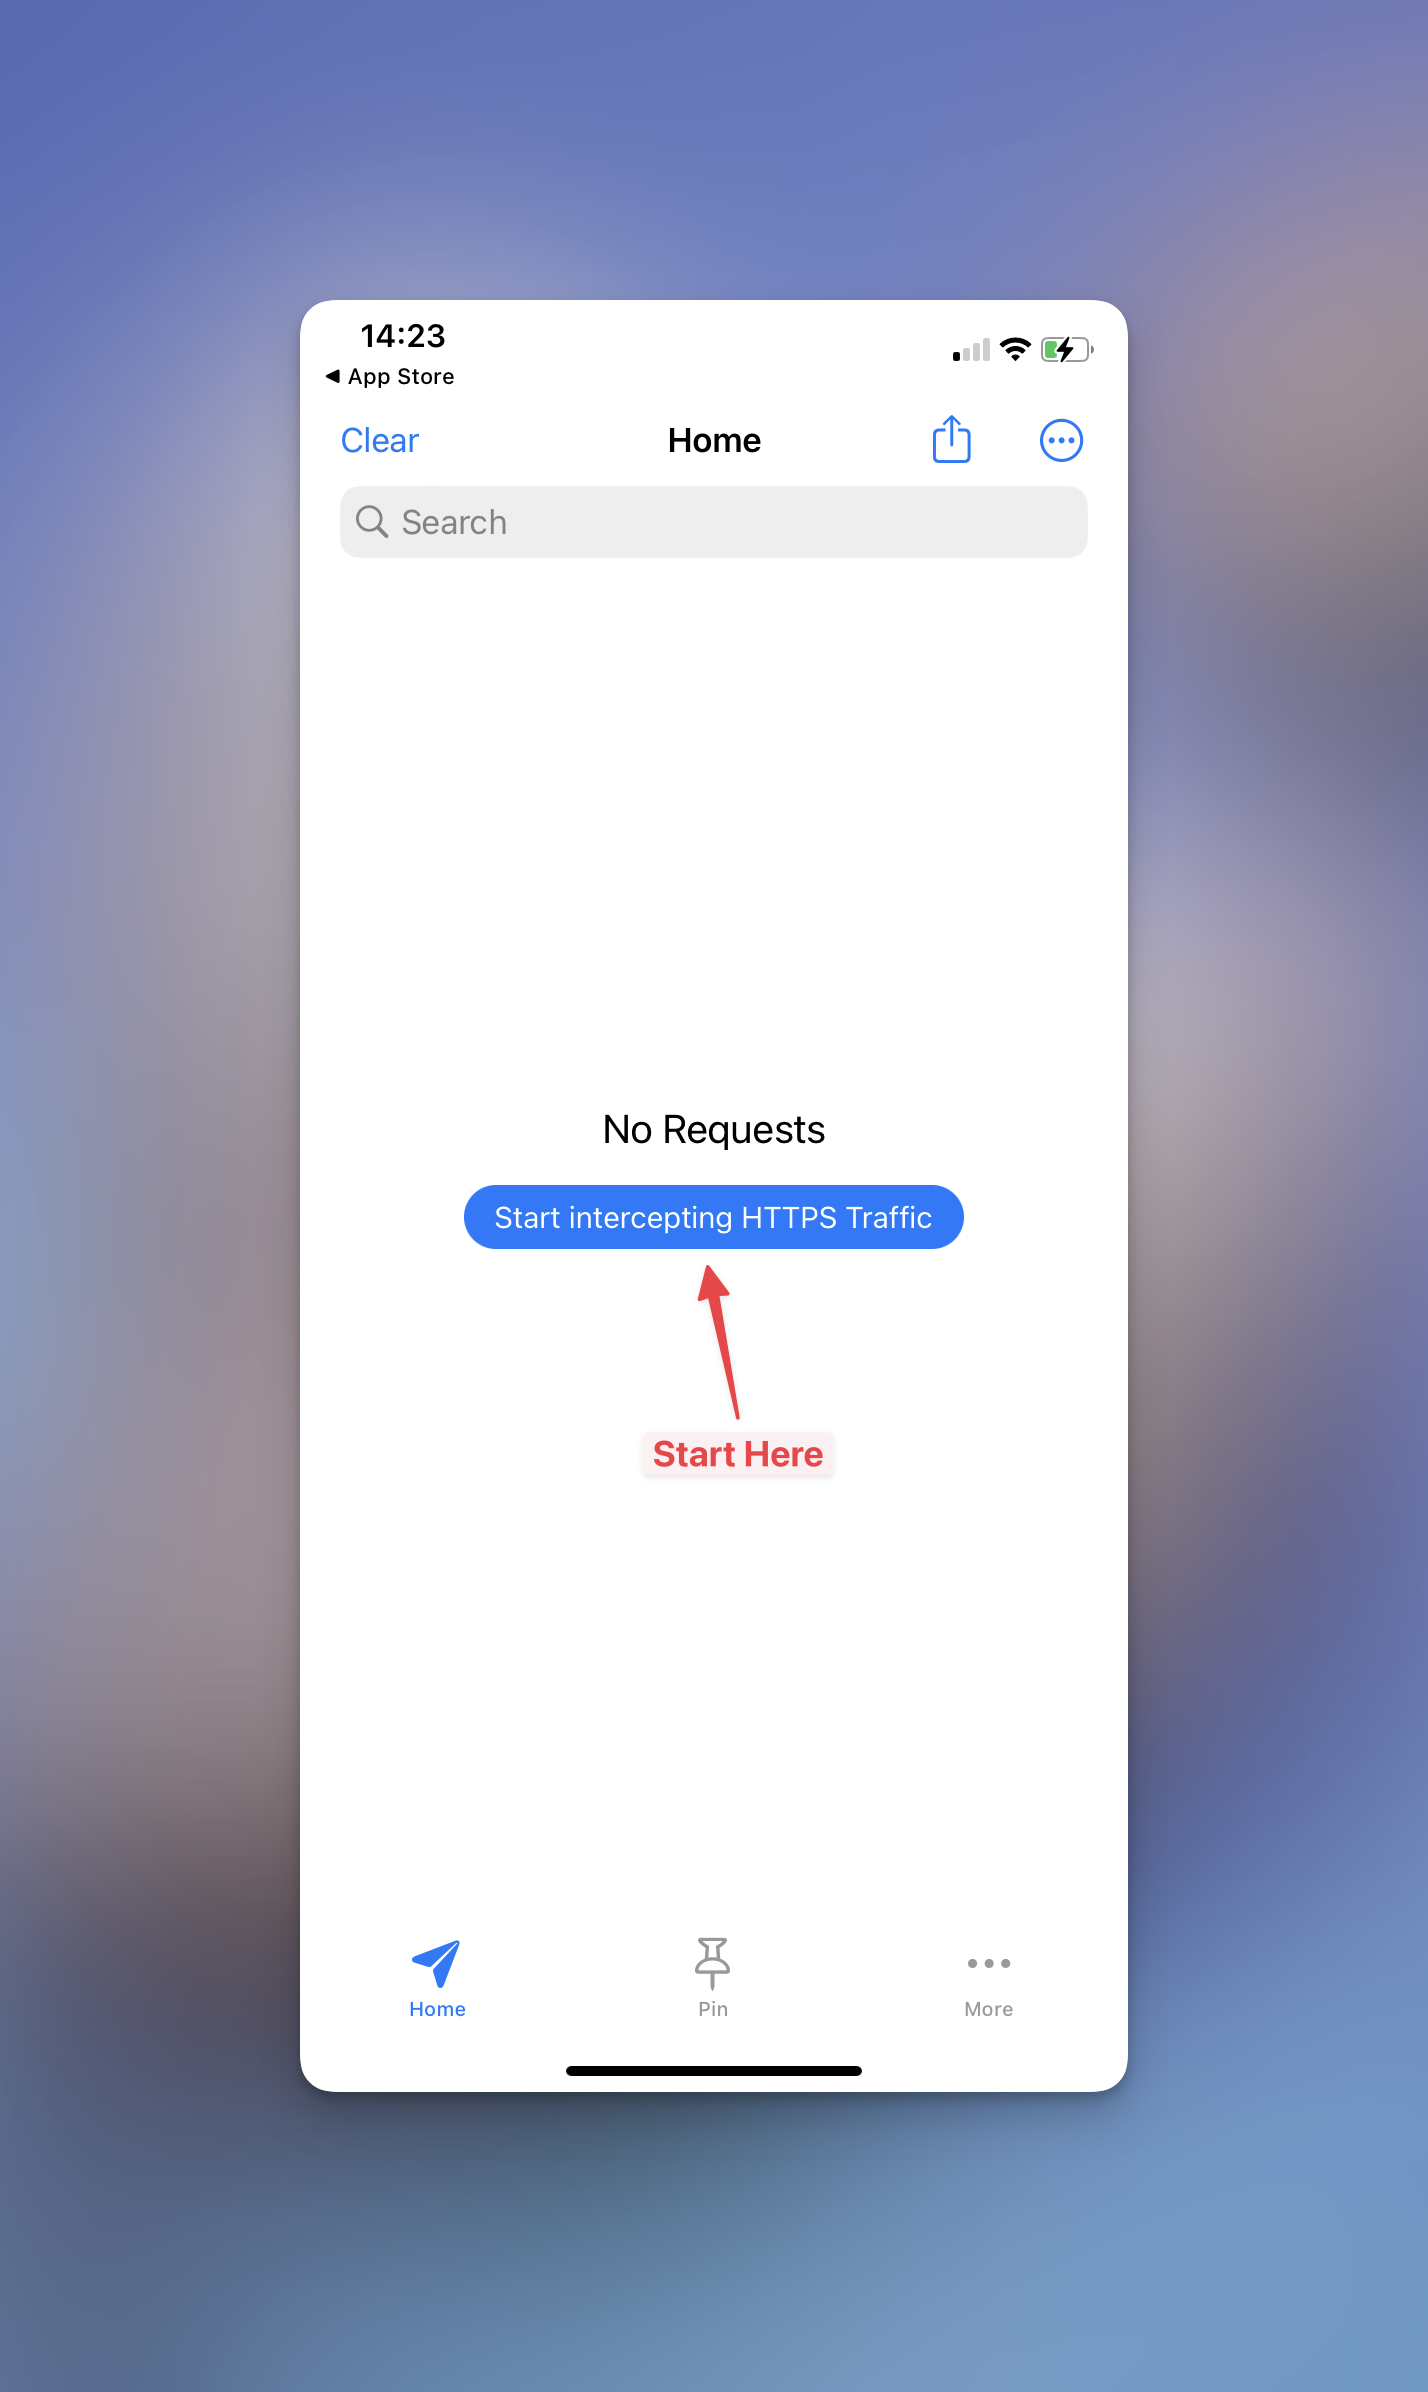
You will be navigated to the "How to Setup" screen which specifies step-by-step guidances for you to follow.
2. Start Proxyman VPN
Proxyman will attempt to install Proxyman VPN to your iOS devices. To elaborate, Proxyman VPN is a local dummy VPN to force all traffic to Proxyman Localhost Proxy Server. Your sensitive data is captured and store in the VPN extension, it does not send to any server.
If you've used Proxyman for macOS, install the VPN is equivalent to overriding the HTTP/HTTPS Proxy.
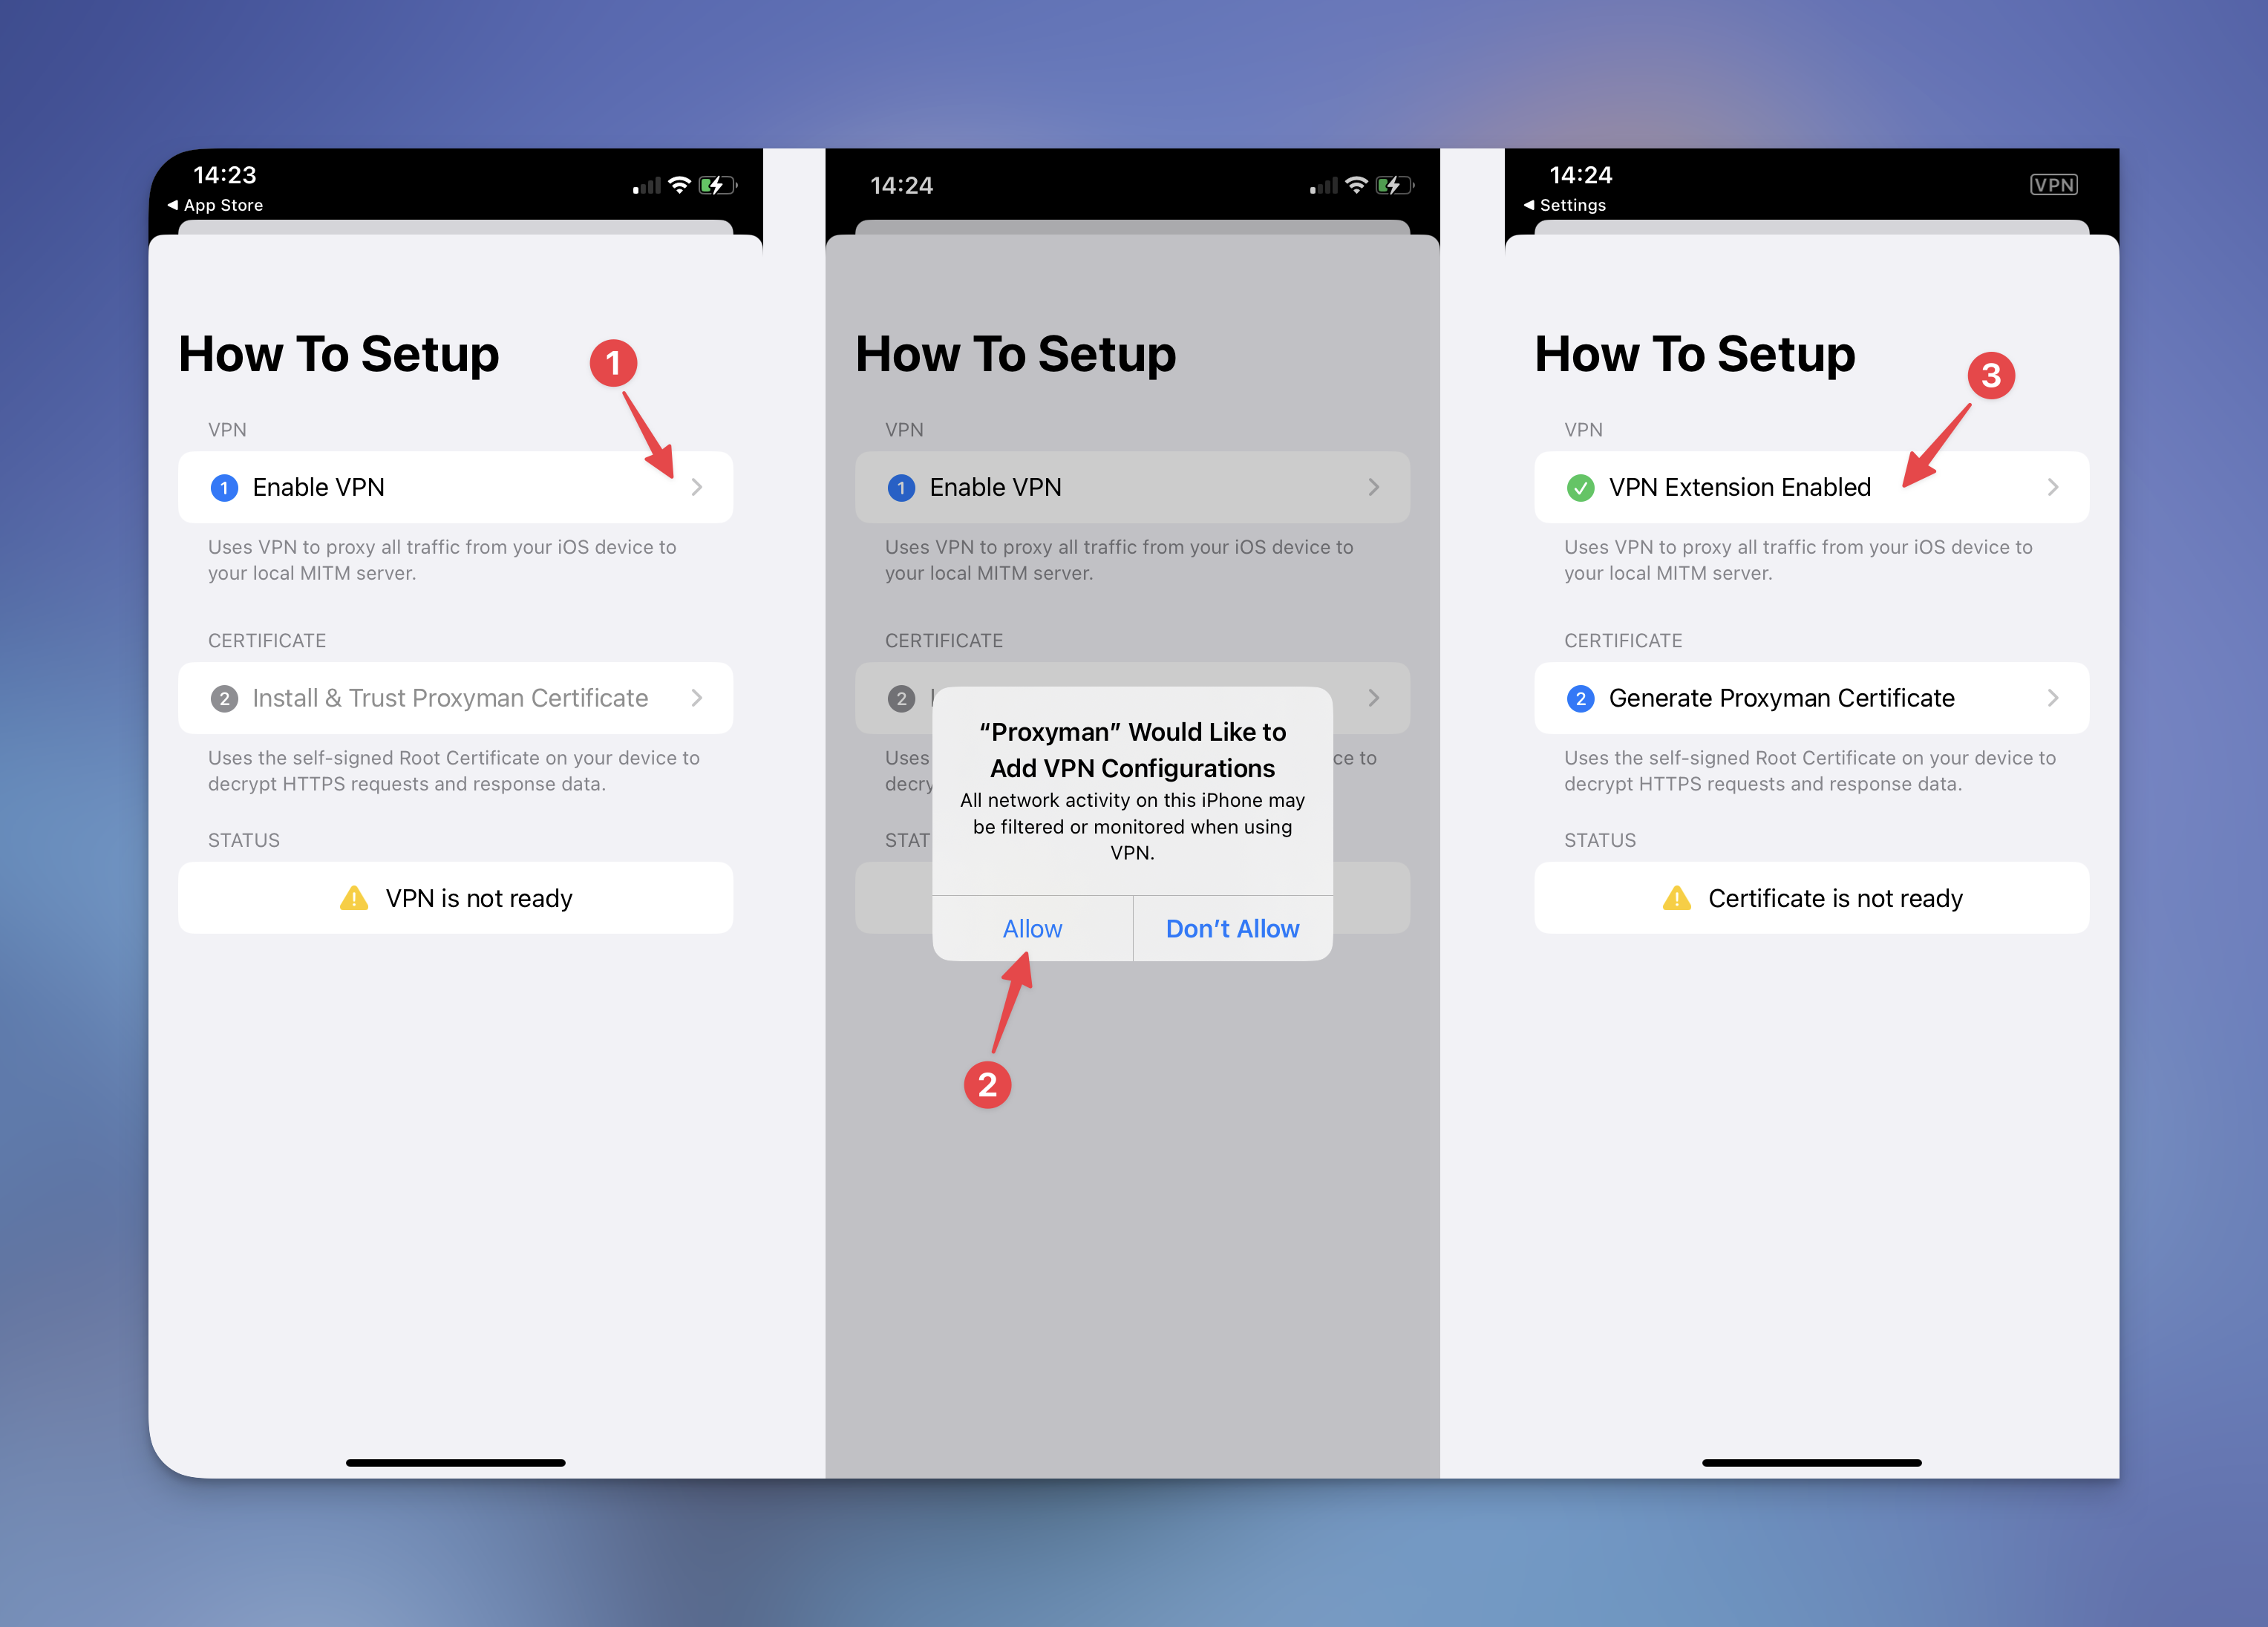
Before moving to the next step, please verify that the VPN is on and you can see the VPN indicator on the system status.
3. Install & Trust Proxyman certificate
To decrypt HTTPS traffic, it requires you to install & trust the Proxyman Root Certificate. This step is quite tricky, so please carefully follow all the step:
3.1 Generate Certificate
Tap on "Generate Certificate". At this point, Proxyman will generate a local self-signed certificate.
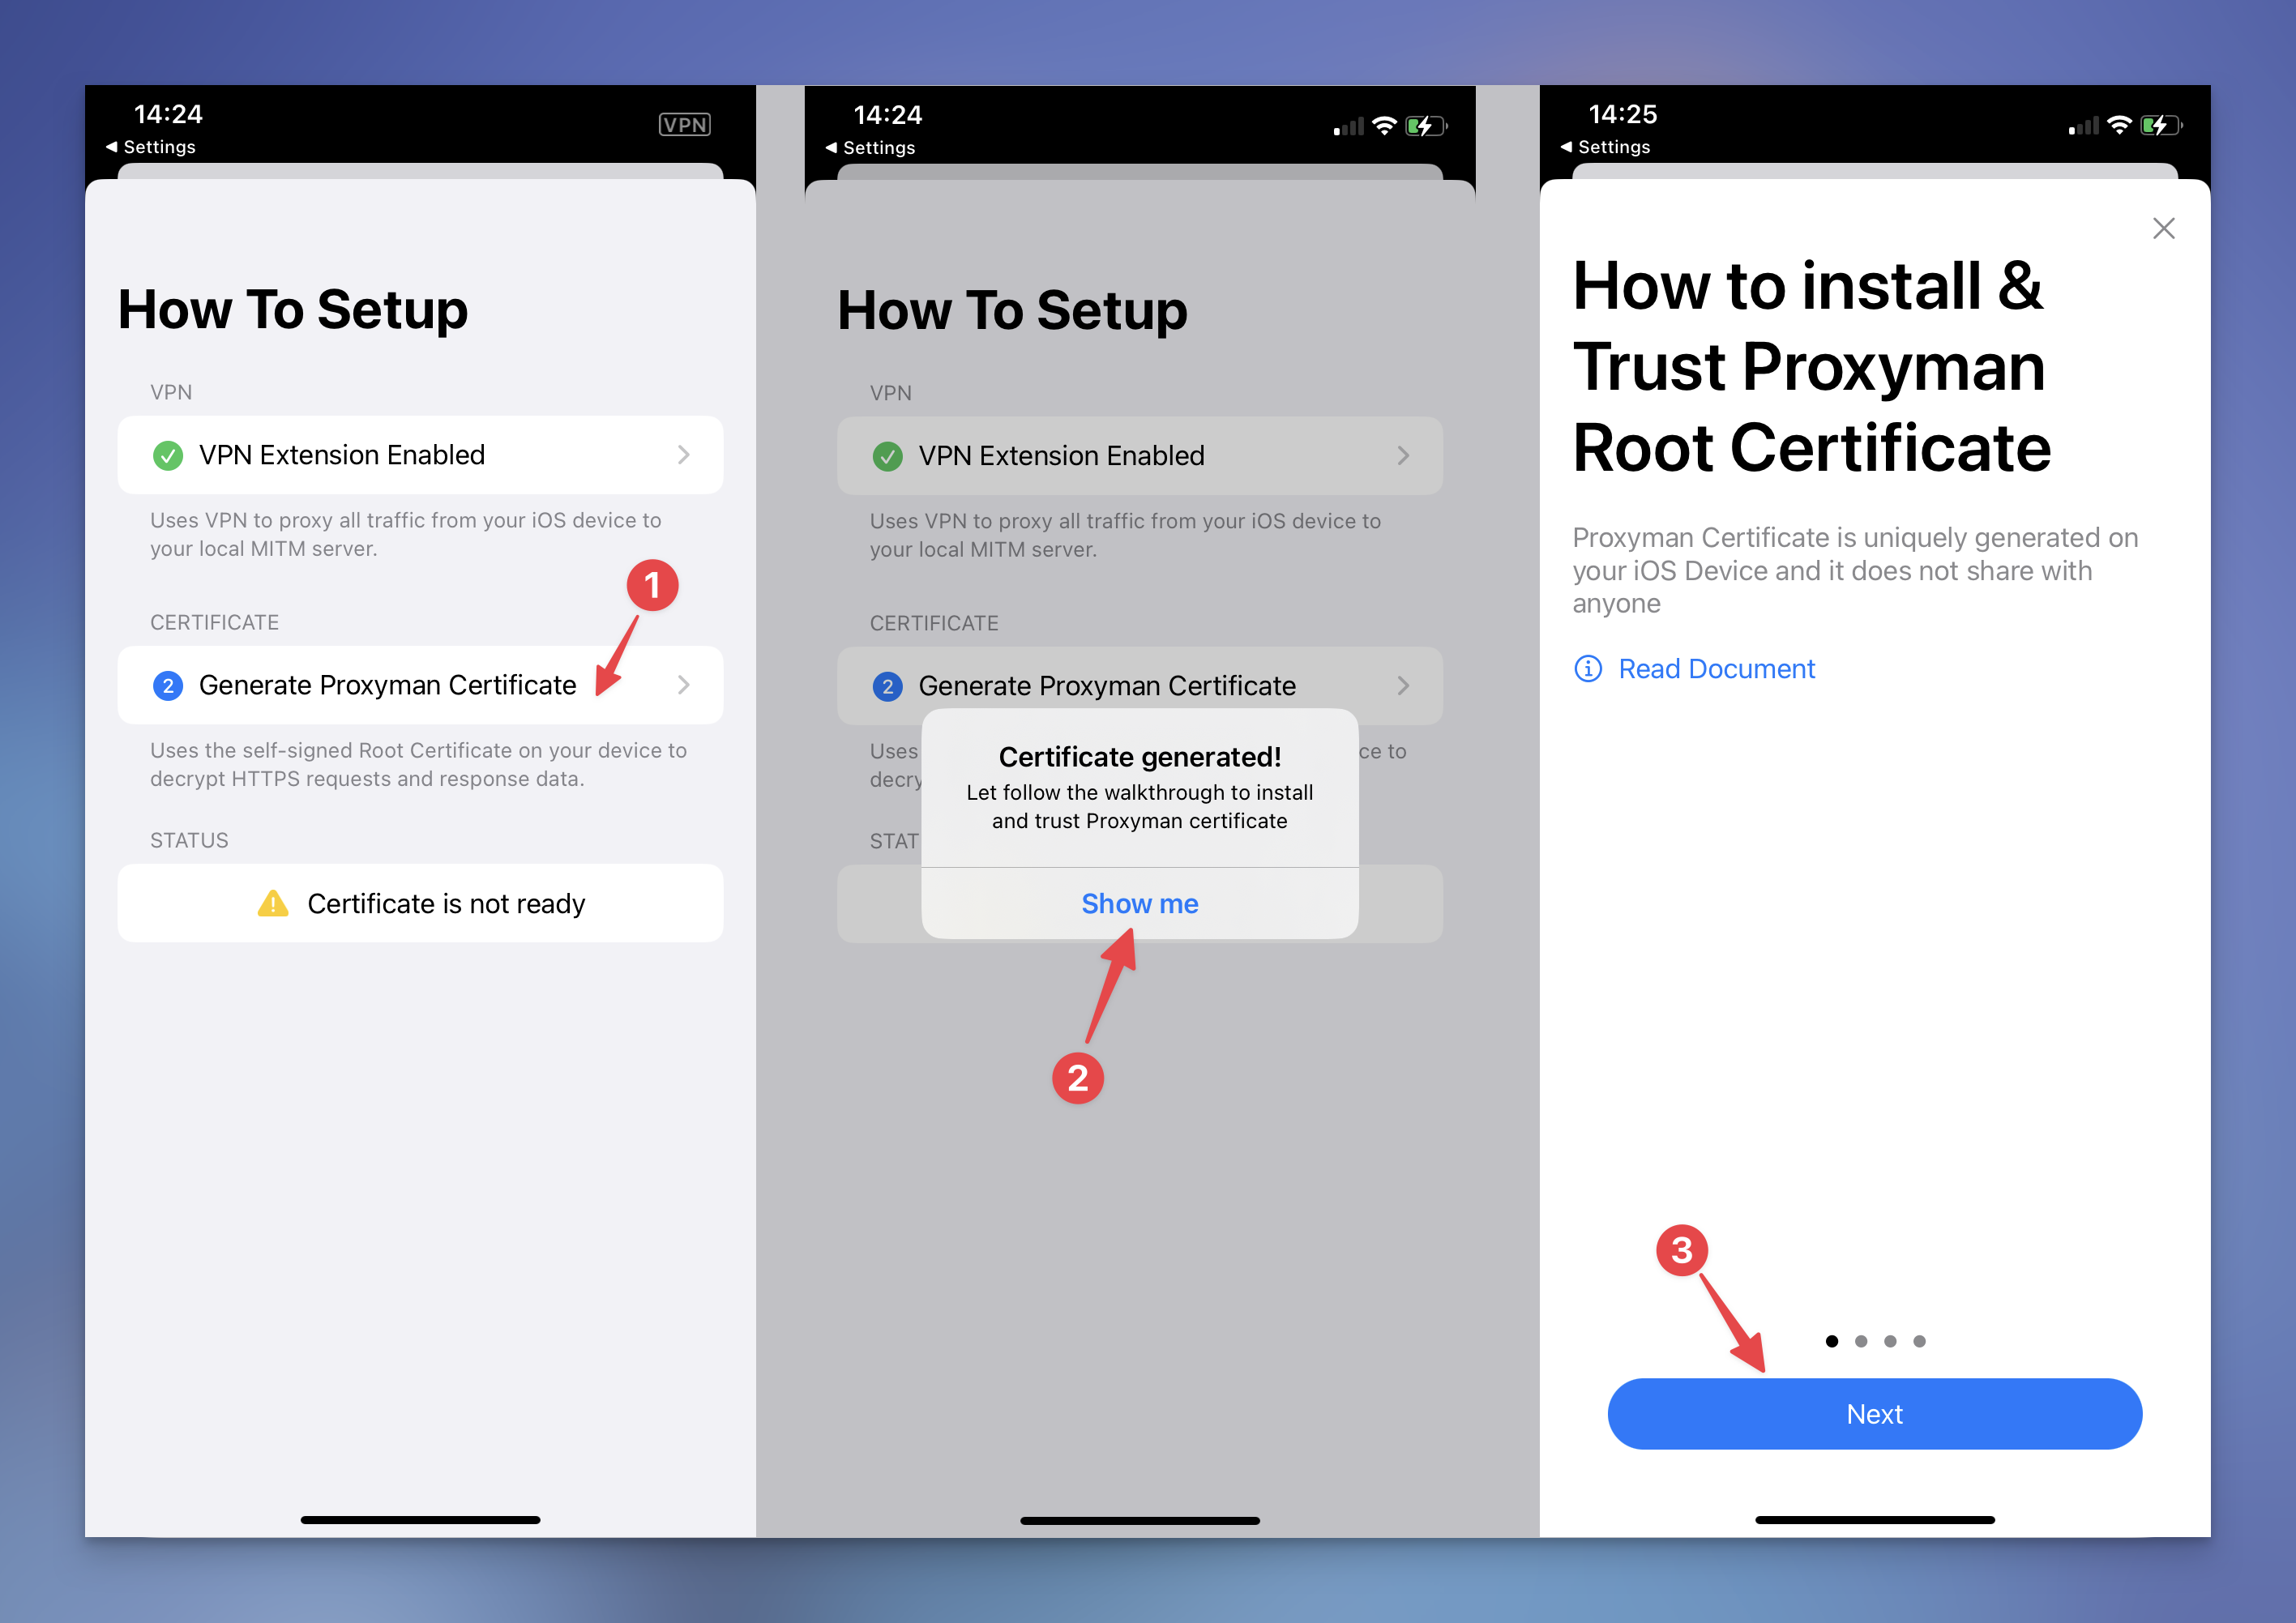
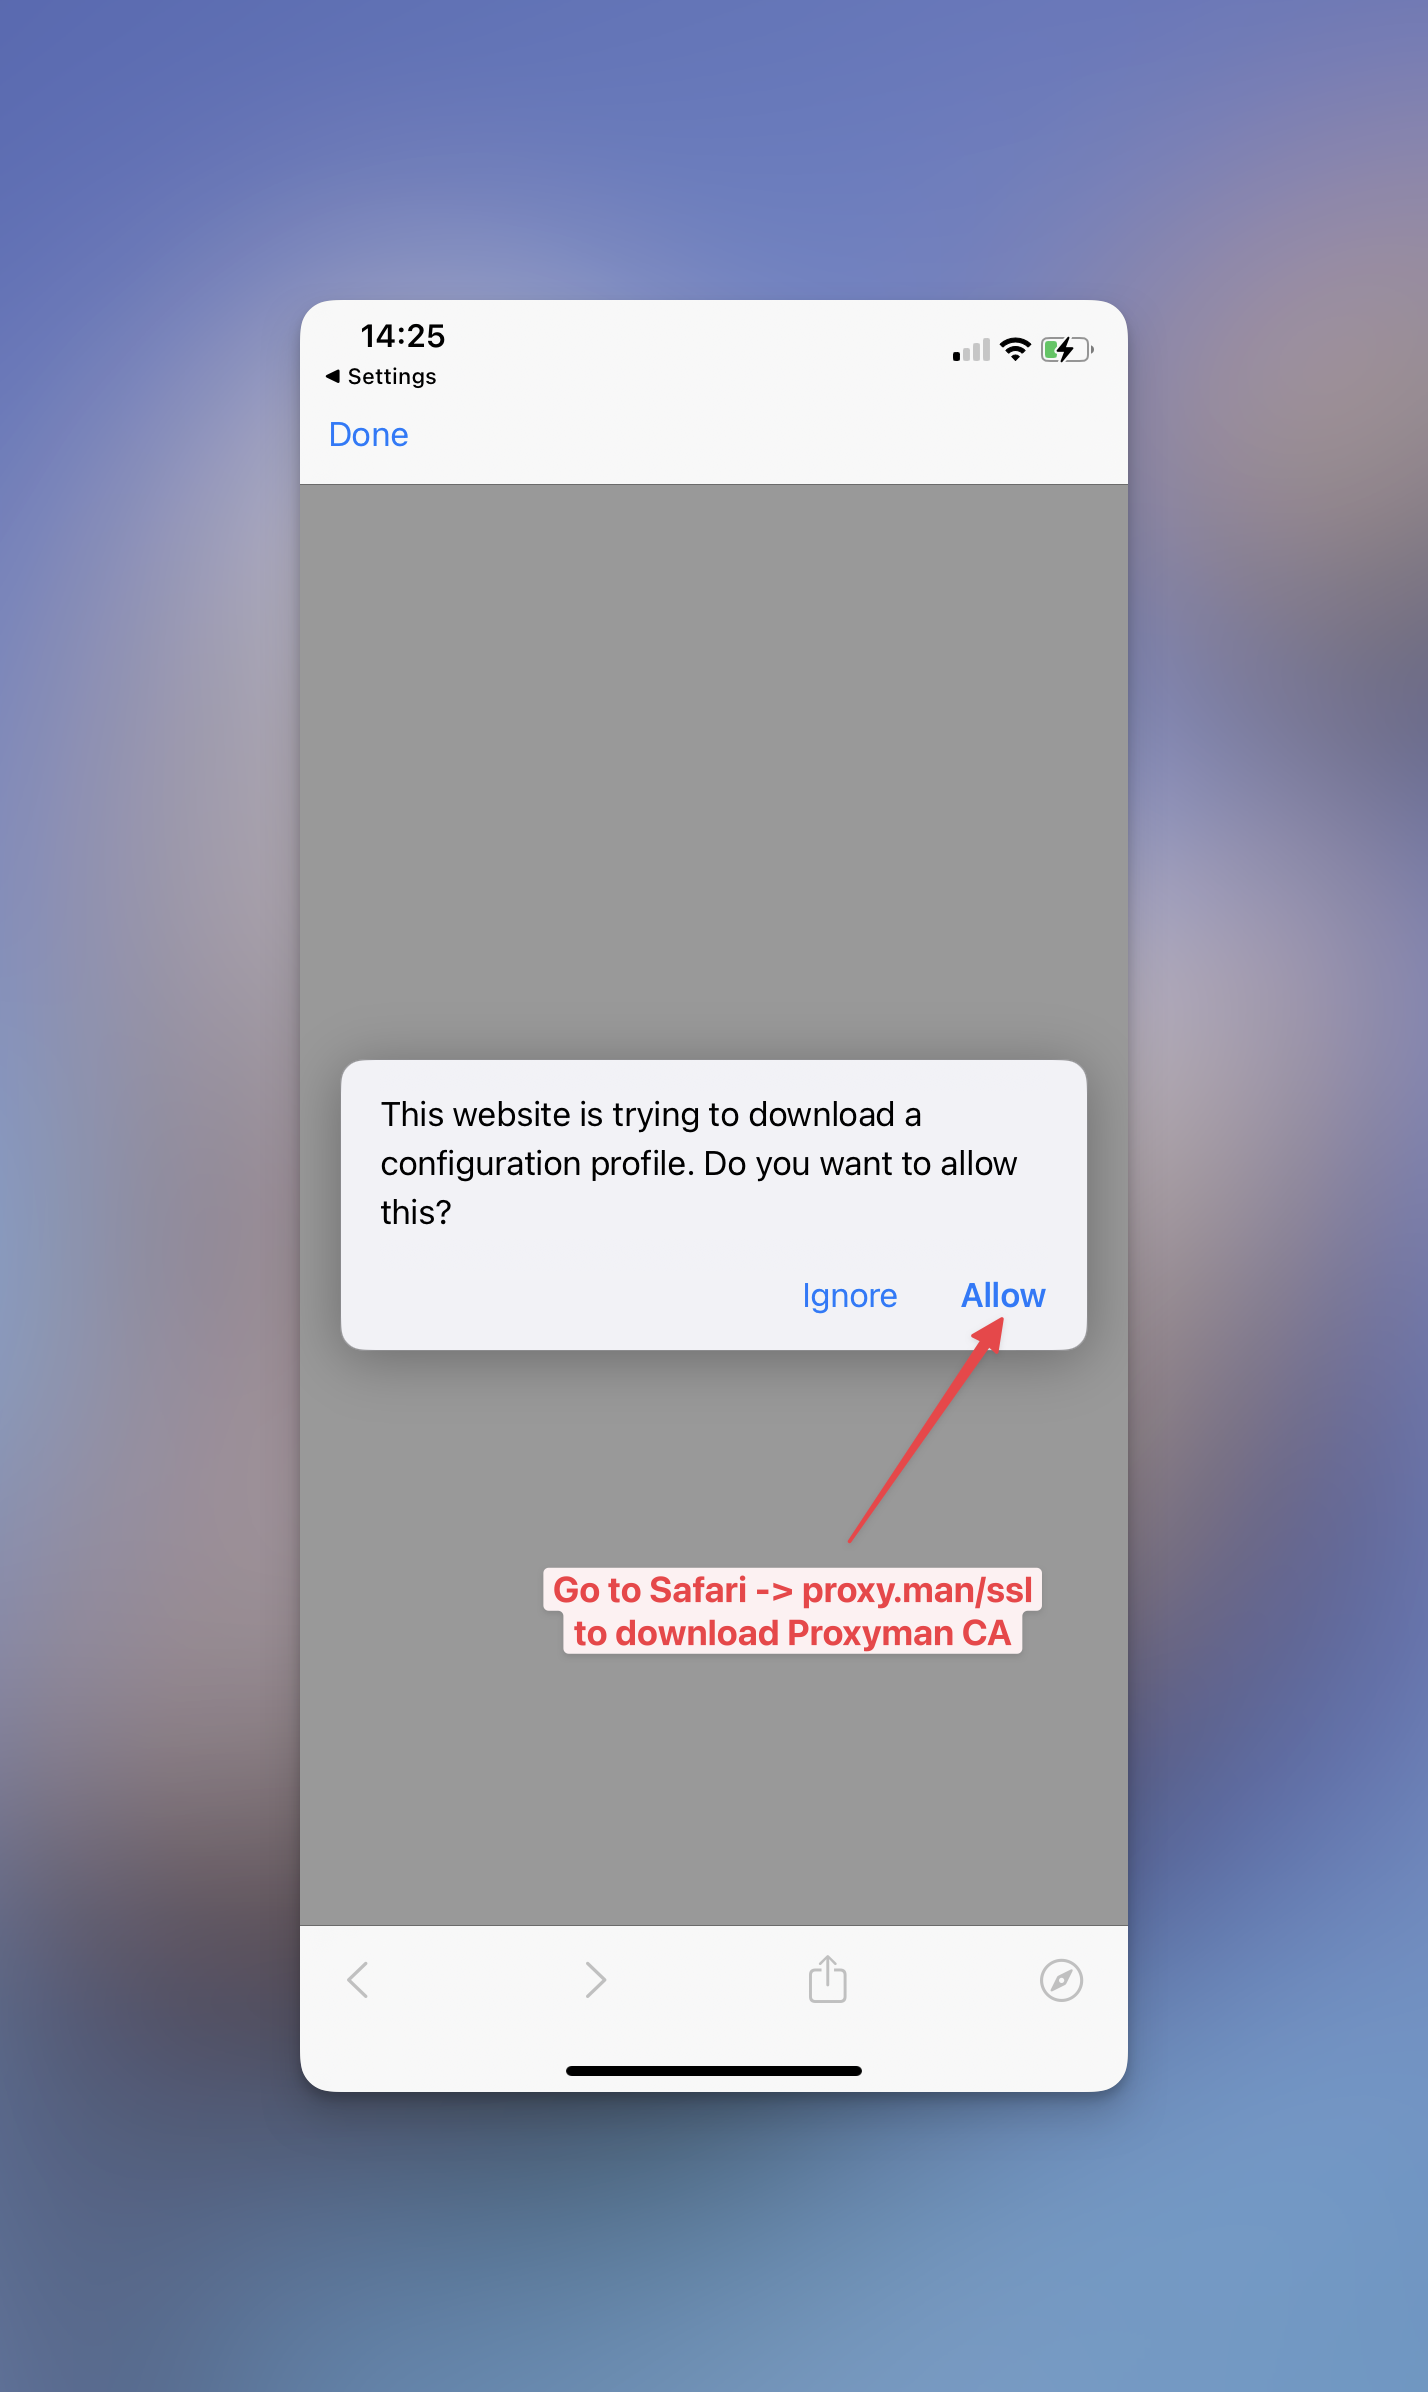
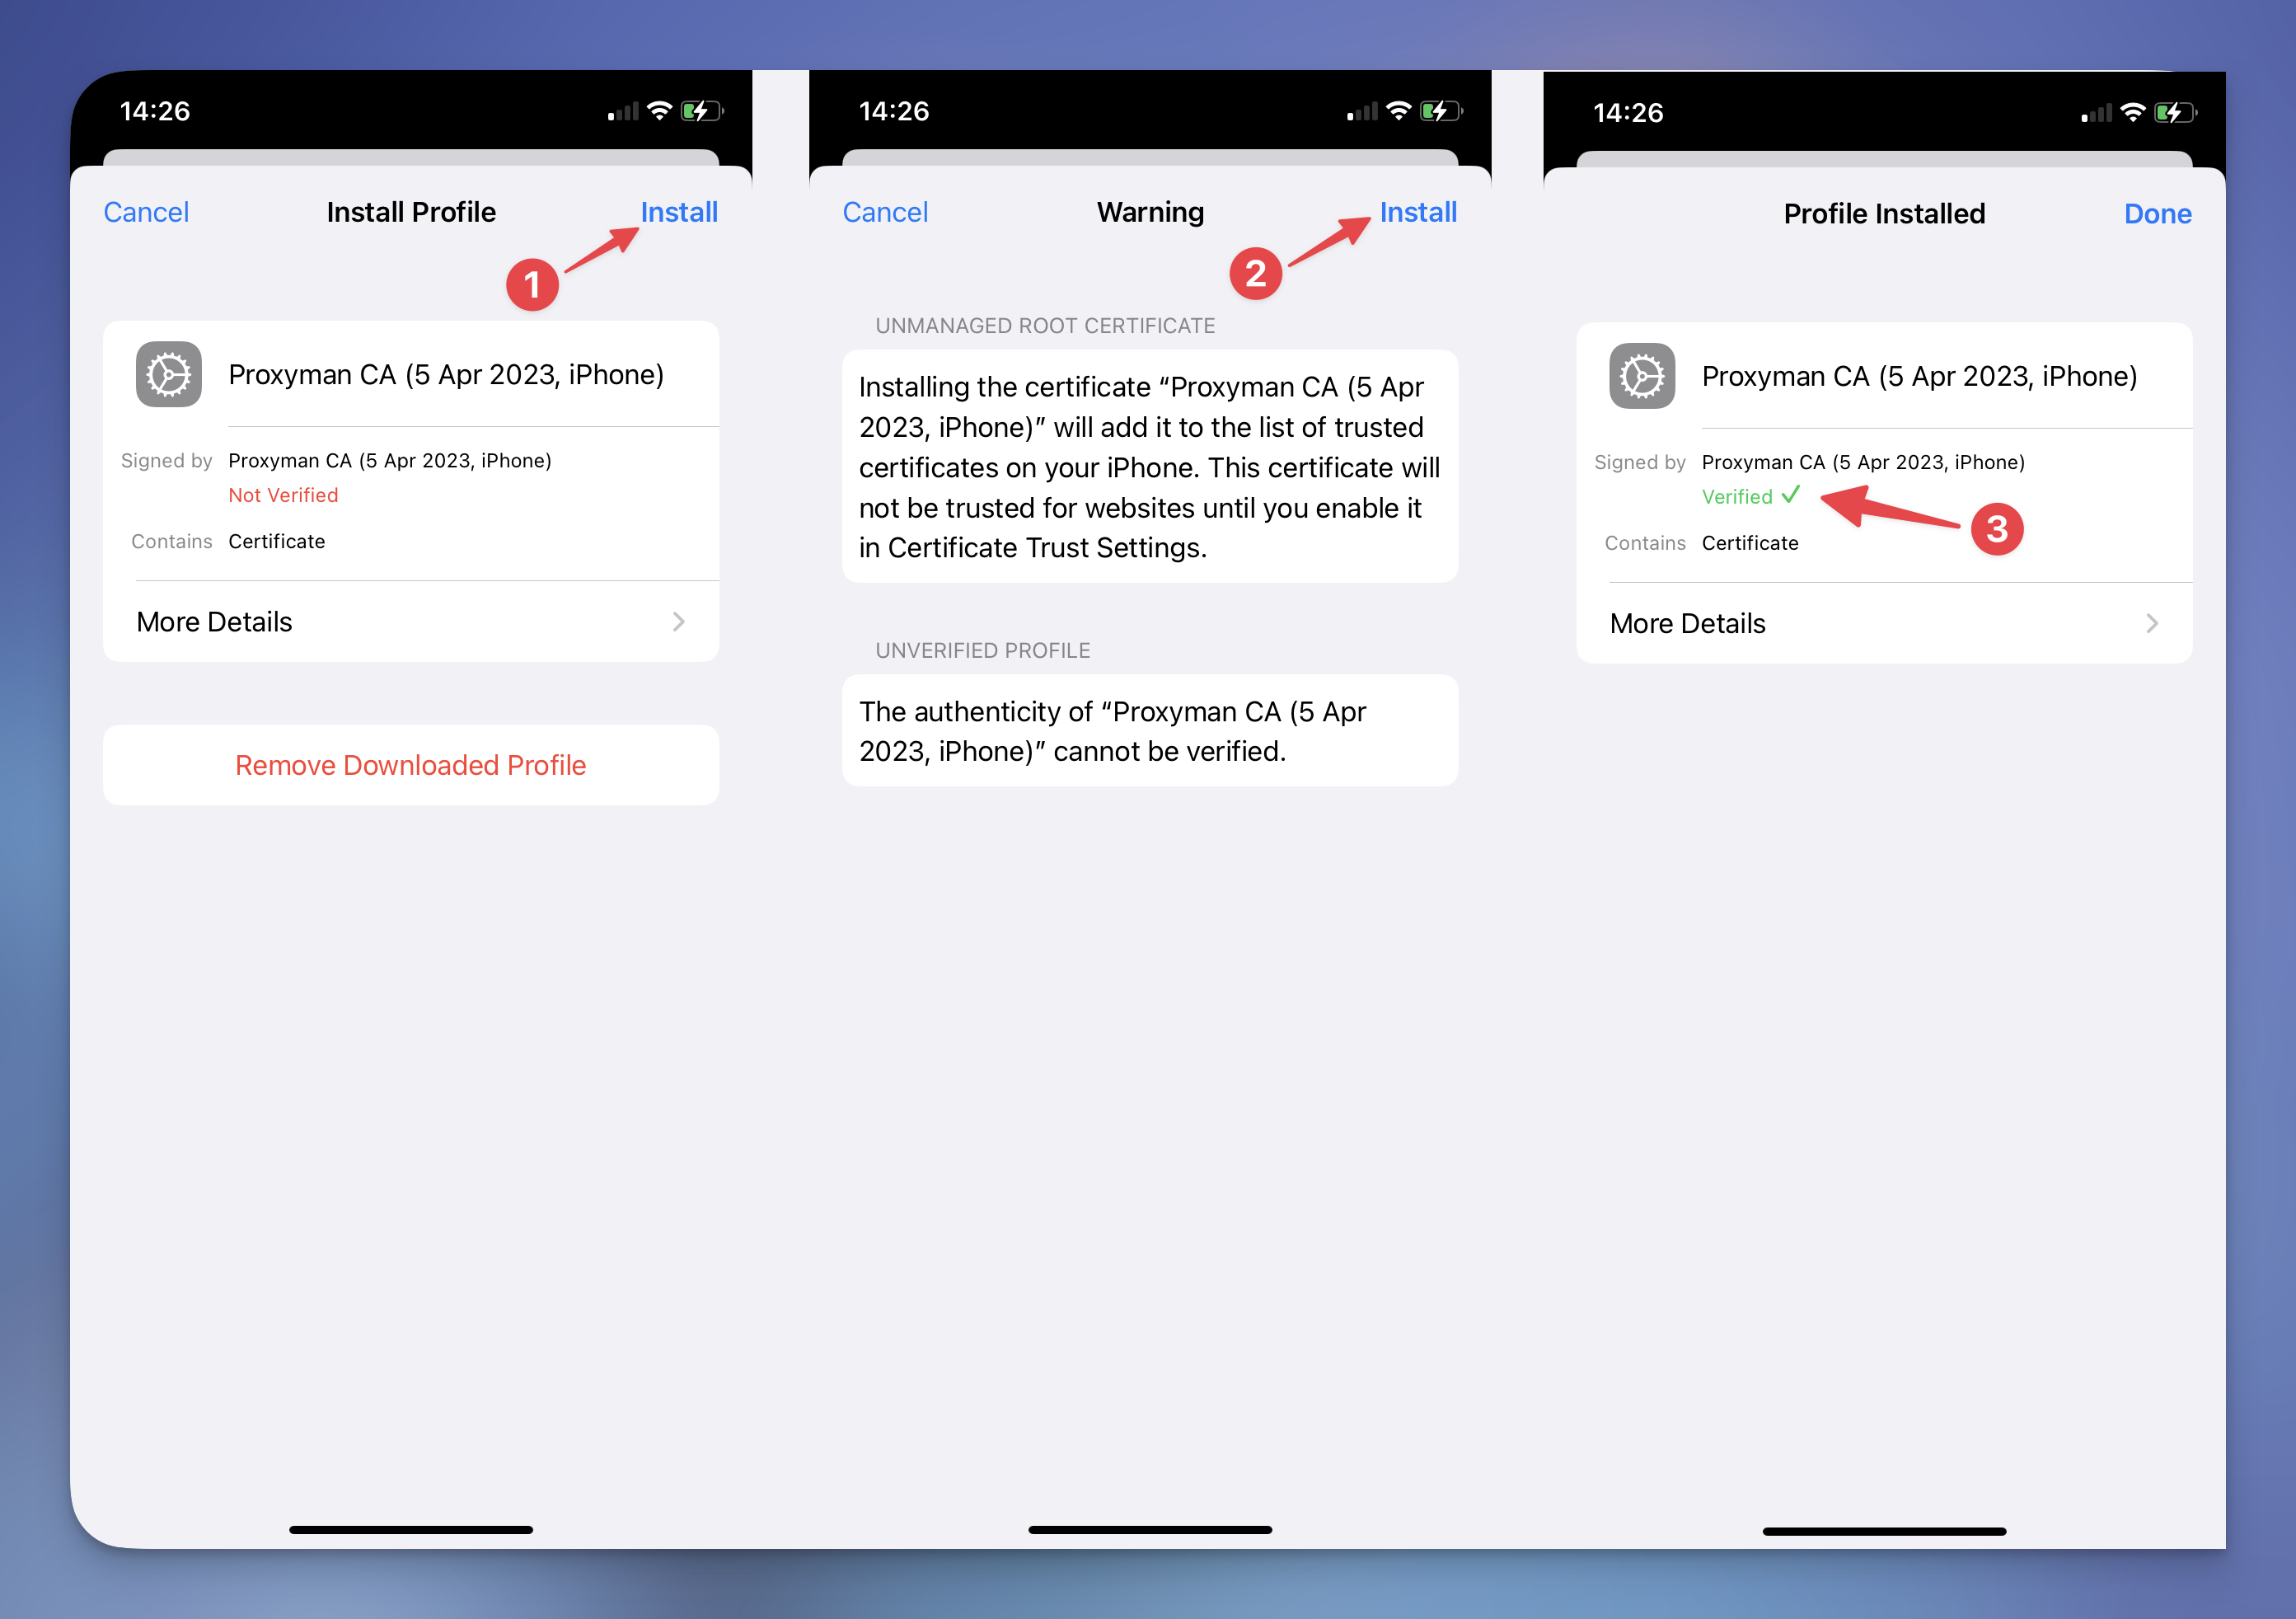
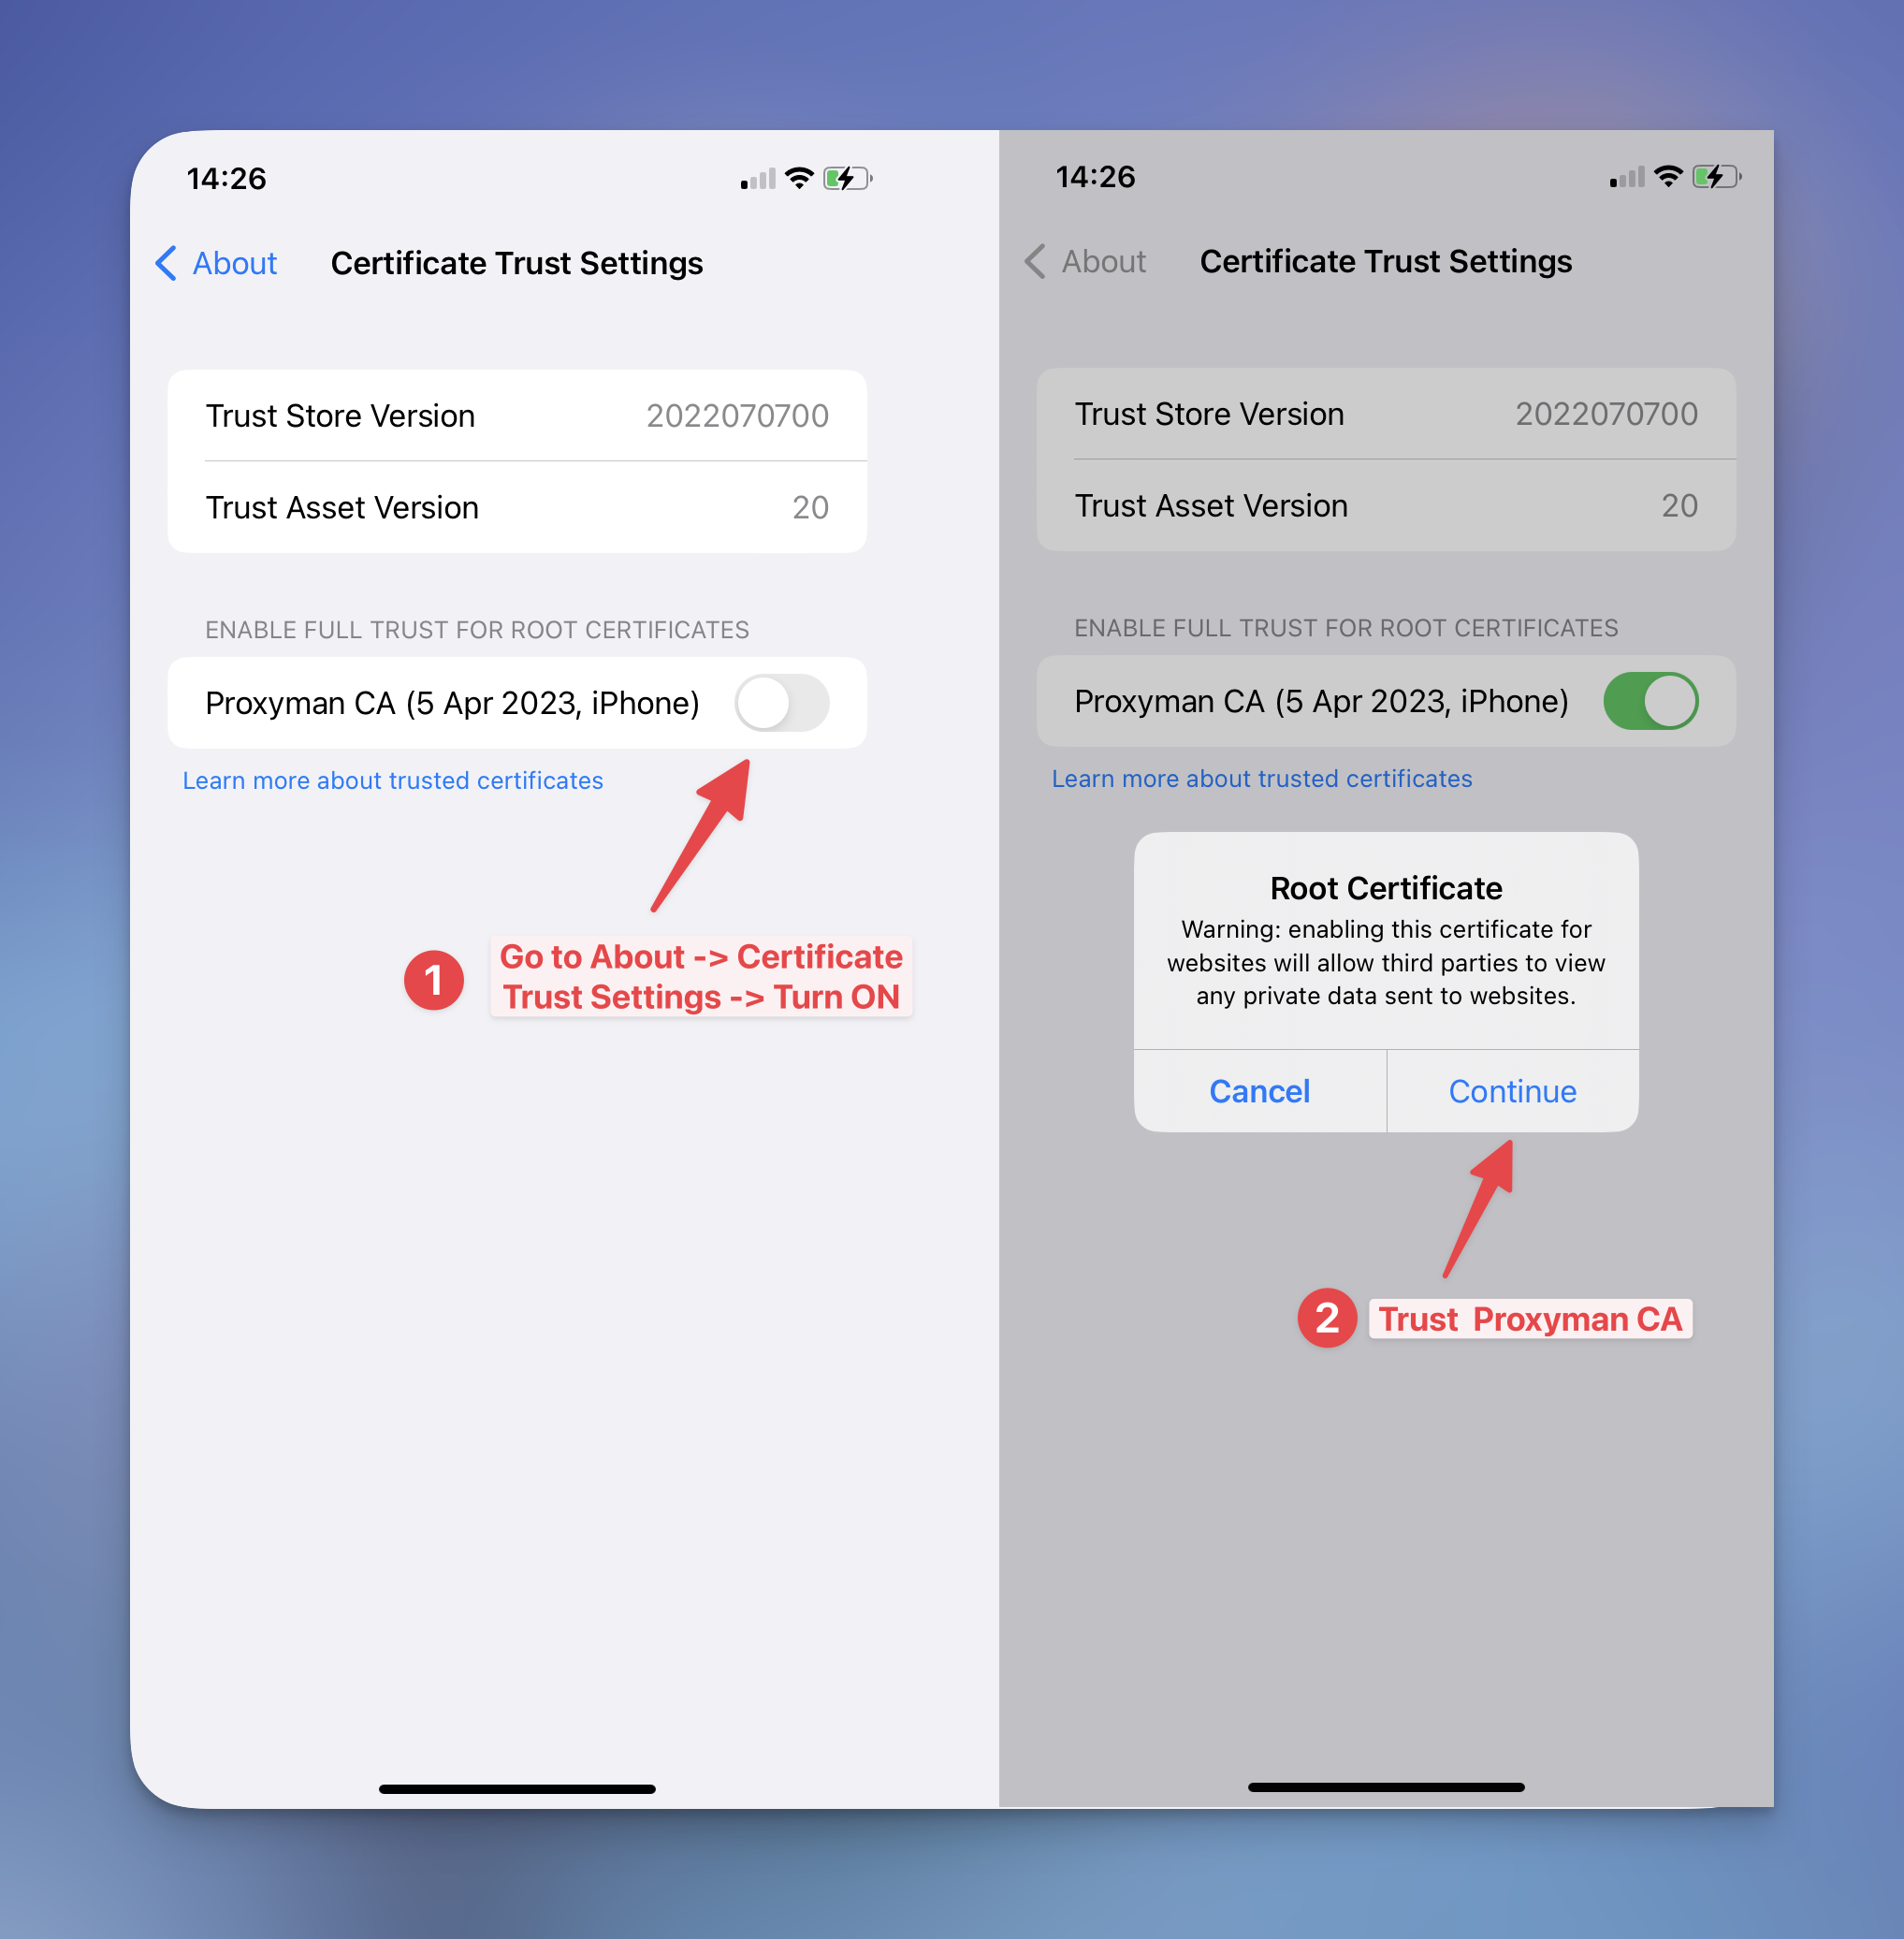
When it success, it will prompt a success model. Tap on "Show me" button and Proxyman will display a walkthrough of how to download, install and trust the Proxyman Certificate in Setting app. Please make sure you follow all step:
3.2 Download Certificate
3.3 Install Certificate
3.4 Trust Certificate
3.5 Verify status
When you've done, let back to Proxyman Setting screen and verify that the status is "Ready to intercept".
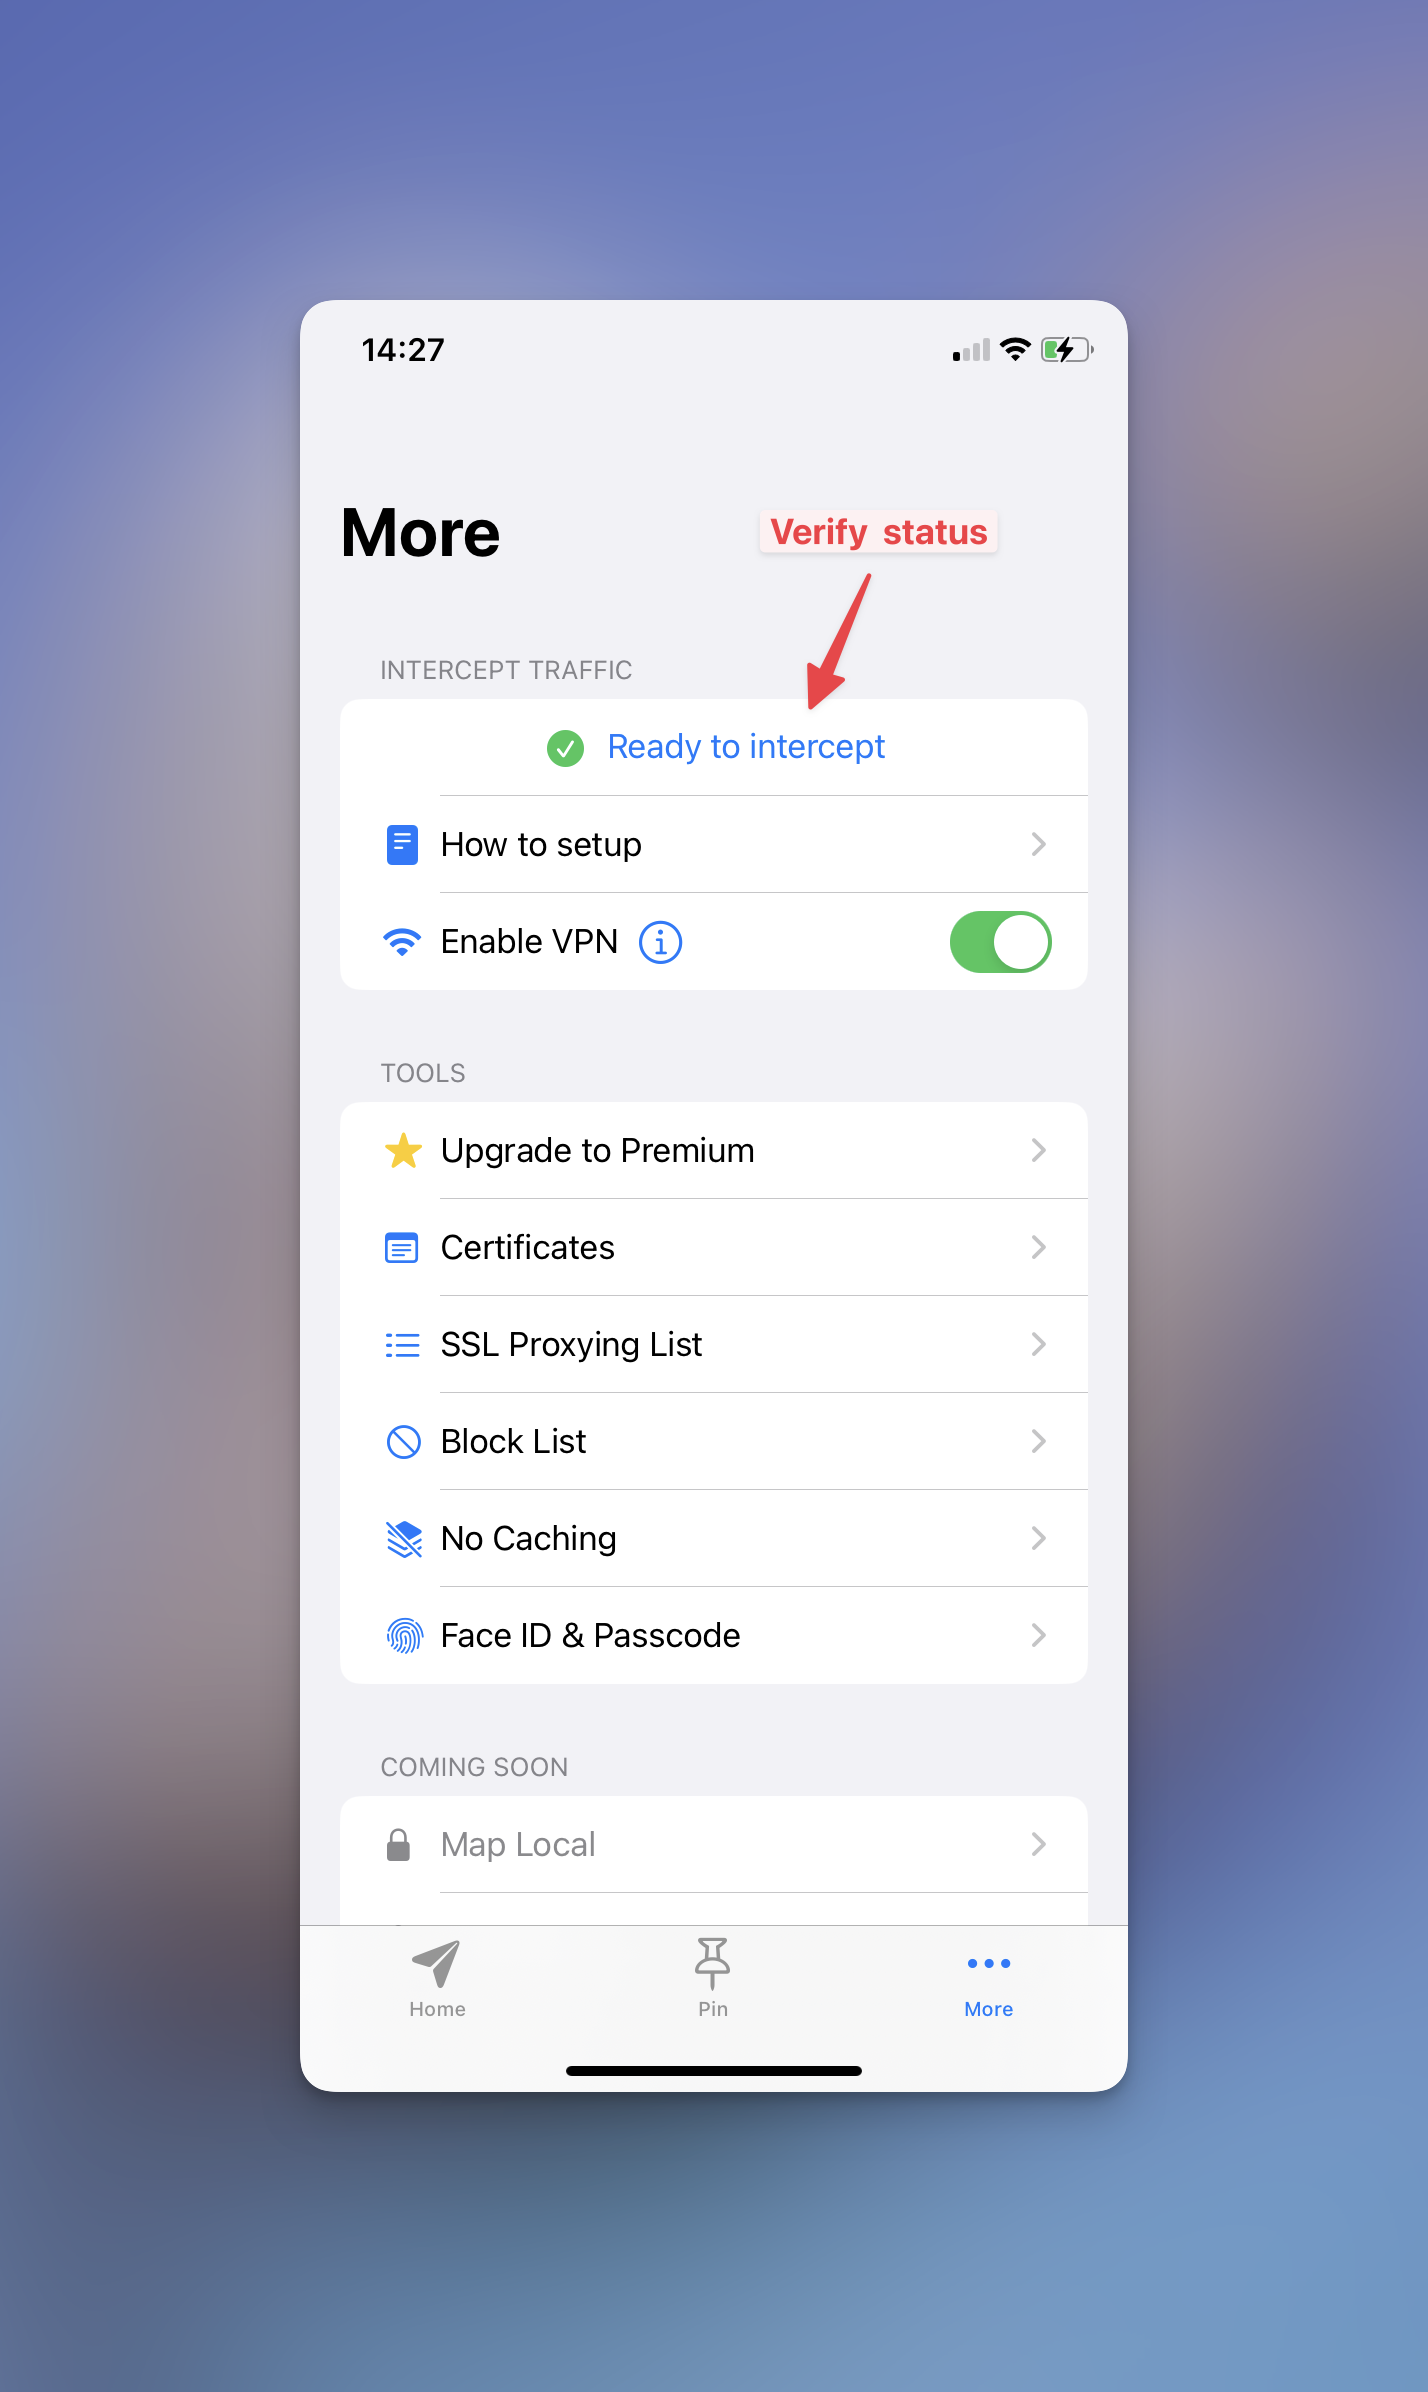
Note: If the status is not updated, you might tap on the "How to settup" button again. It will trigger the Certificate Checker.
At this point, let make sure that the Status is Good. Otherwise, please contact us at support@proxyman.com
4. Enable SSL Proxying on Unsplash app
We would like to use the Unsplash app as an example because it's a free app and easy to demonstrate how Proxyman for iOS can do. If you haven't installed the Unsplash app, please download it at AppStore.
4.1 Filter traffic from Unsplash app.
Let open the app and play around. Then, open the Proxyman app, you can see a bunch of HTTP/HTTPS traffic from your iOS devices. To quickly filter Unsplash traffic, let tap on the Search Bar and type "unsplash".
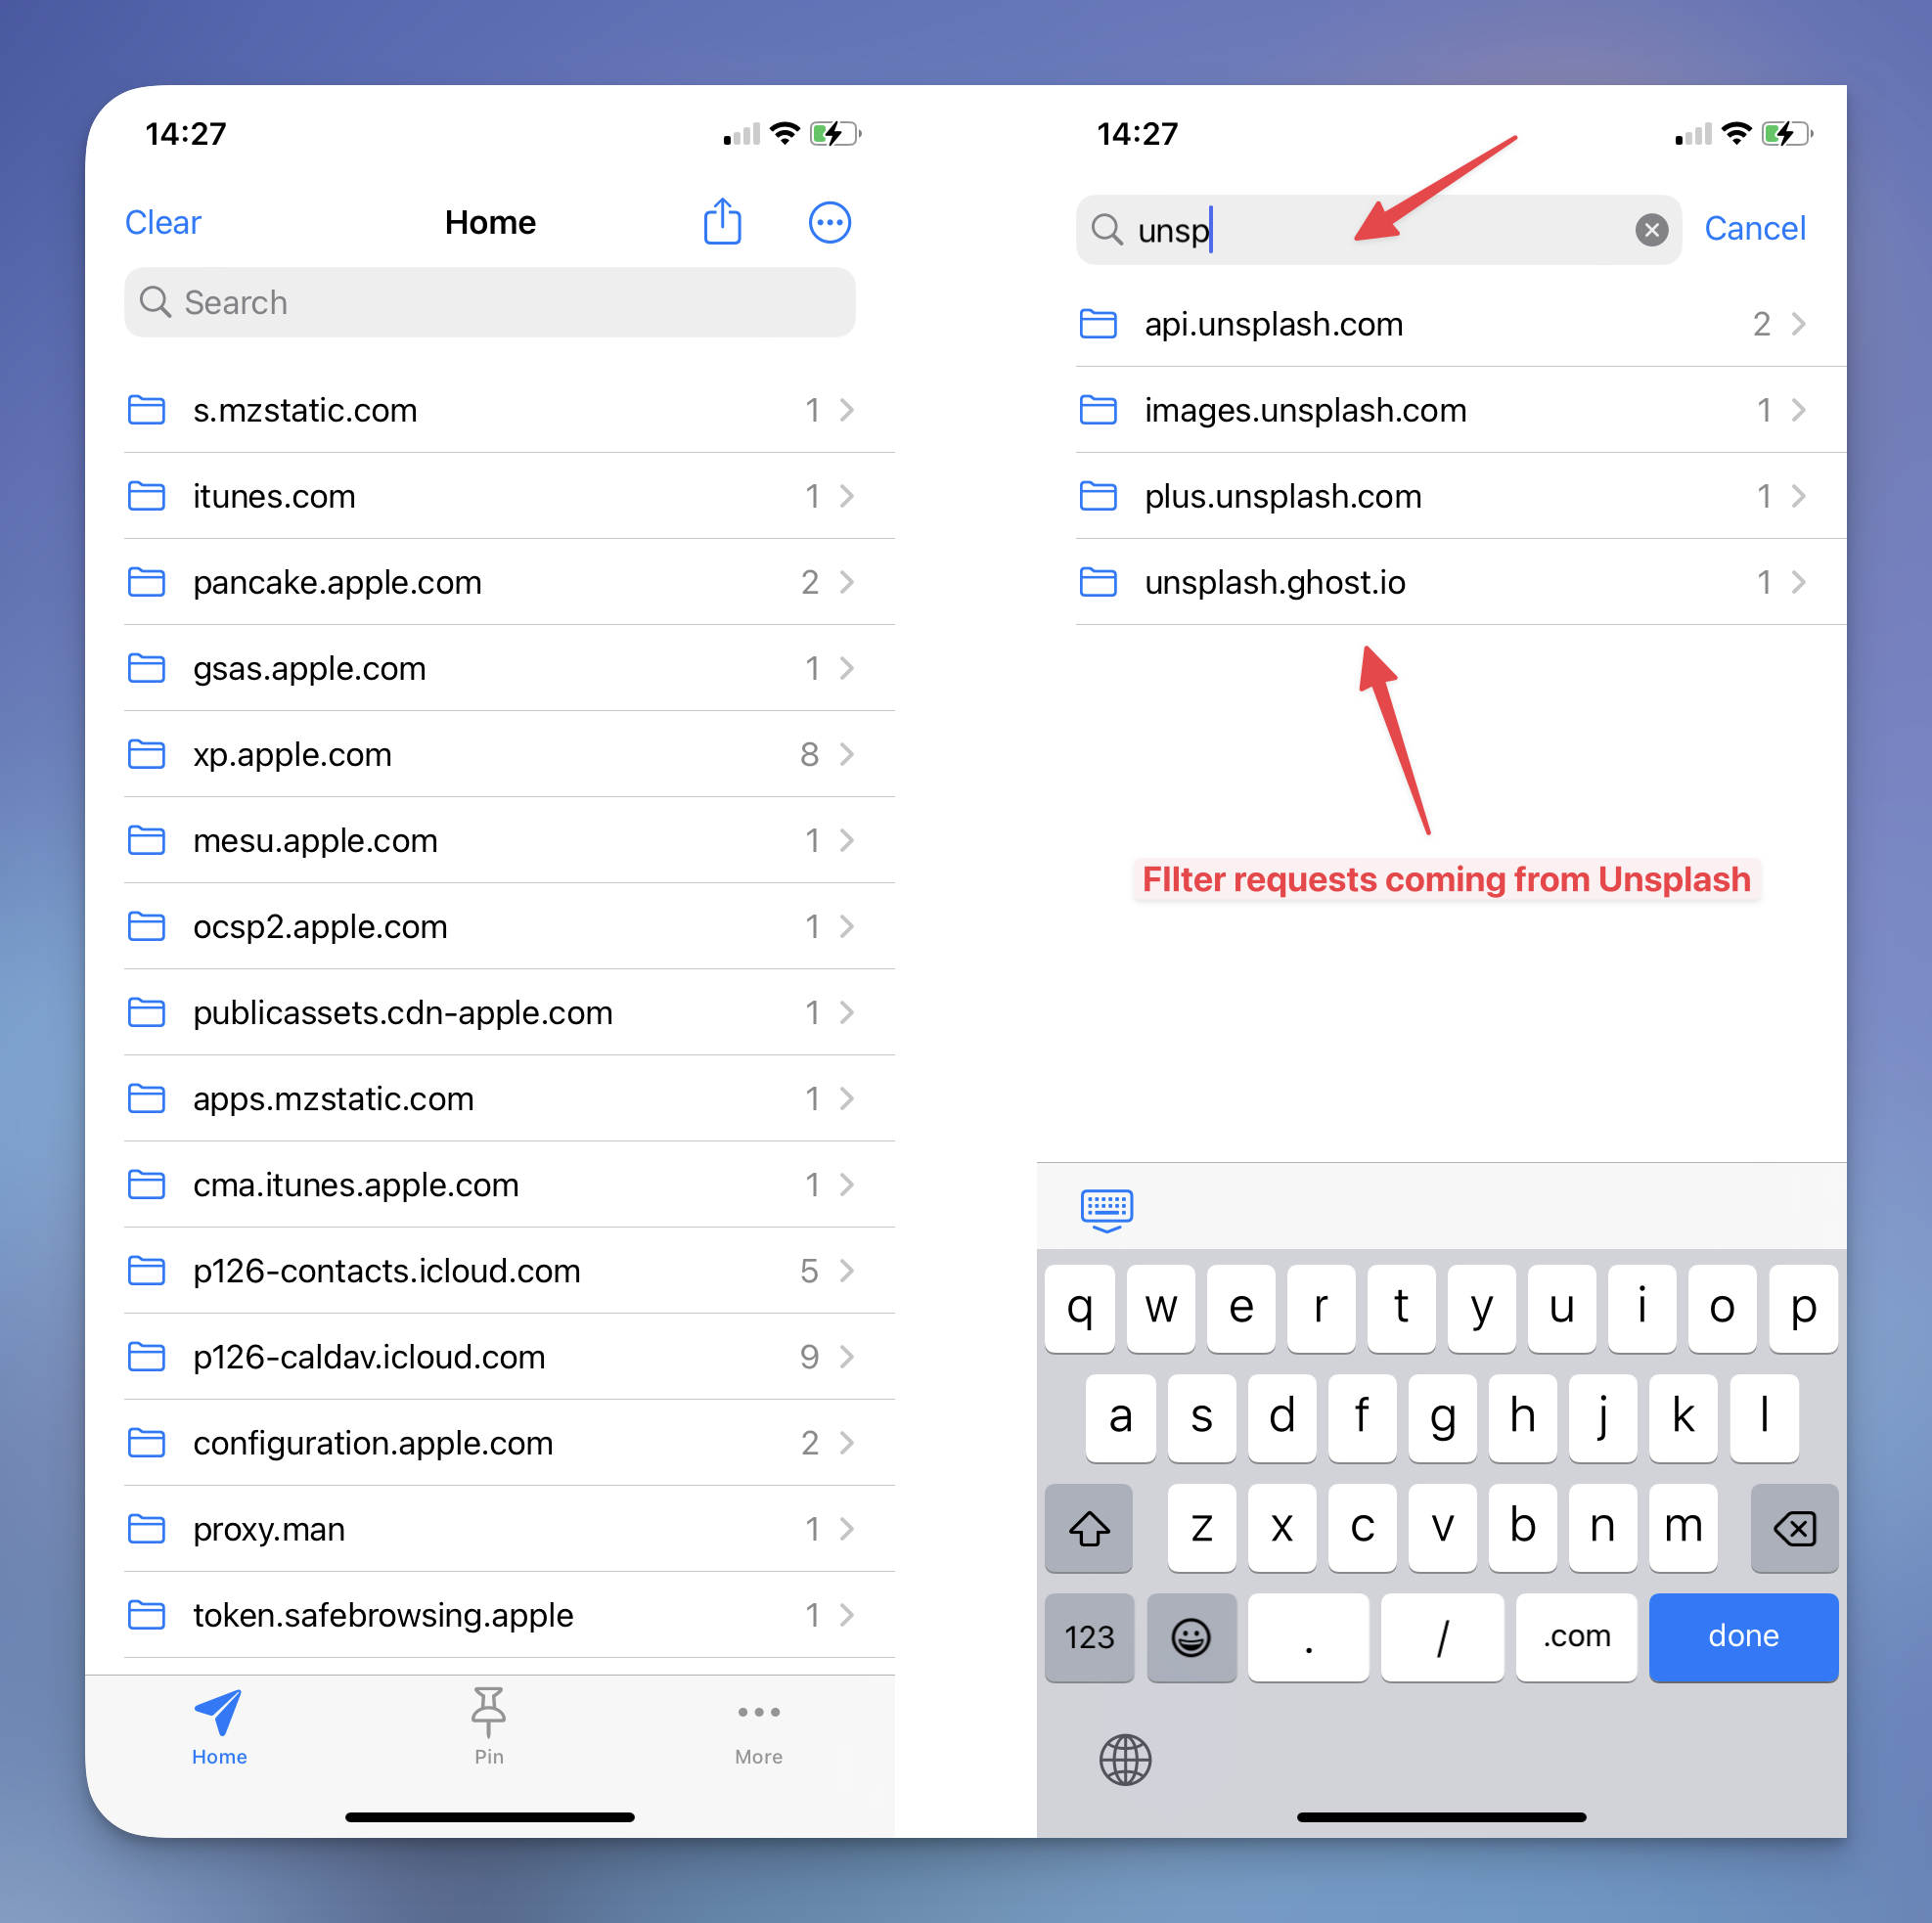
The result is narrowed down to 4 domains. We might assume that "api.unsplash.com" is a domain we're looking for. Great!
4.2 Enable SSL Proxying
Let tap on the "api.unsplash.com" domain -> Tap on the first request -> Swipe right to open the Response Tab.
At this point, you might not see any response yet, because we haven't enabled SSL Proxying on this domain. Tap and "Enable SSL Proxying" button and it should be ready to work.
Please open the Unsplash app and play around again. At this point, Proxyman will capture and decrypt all HTTPS Traffic from Unsplash App.
Back to the Proxyman app, you might see new Unsplash Requests here:
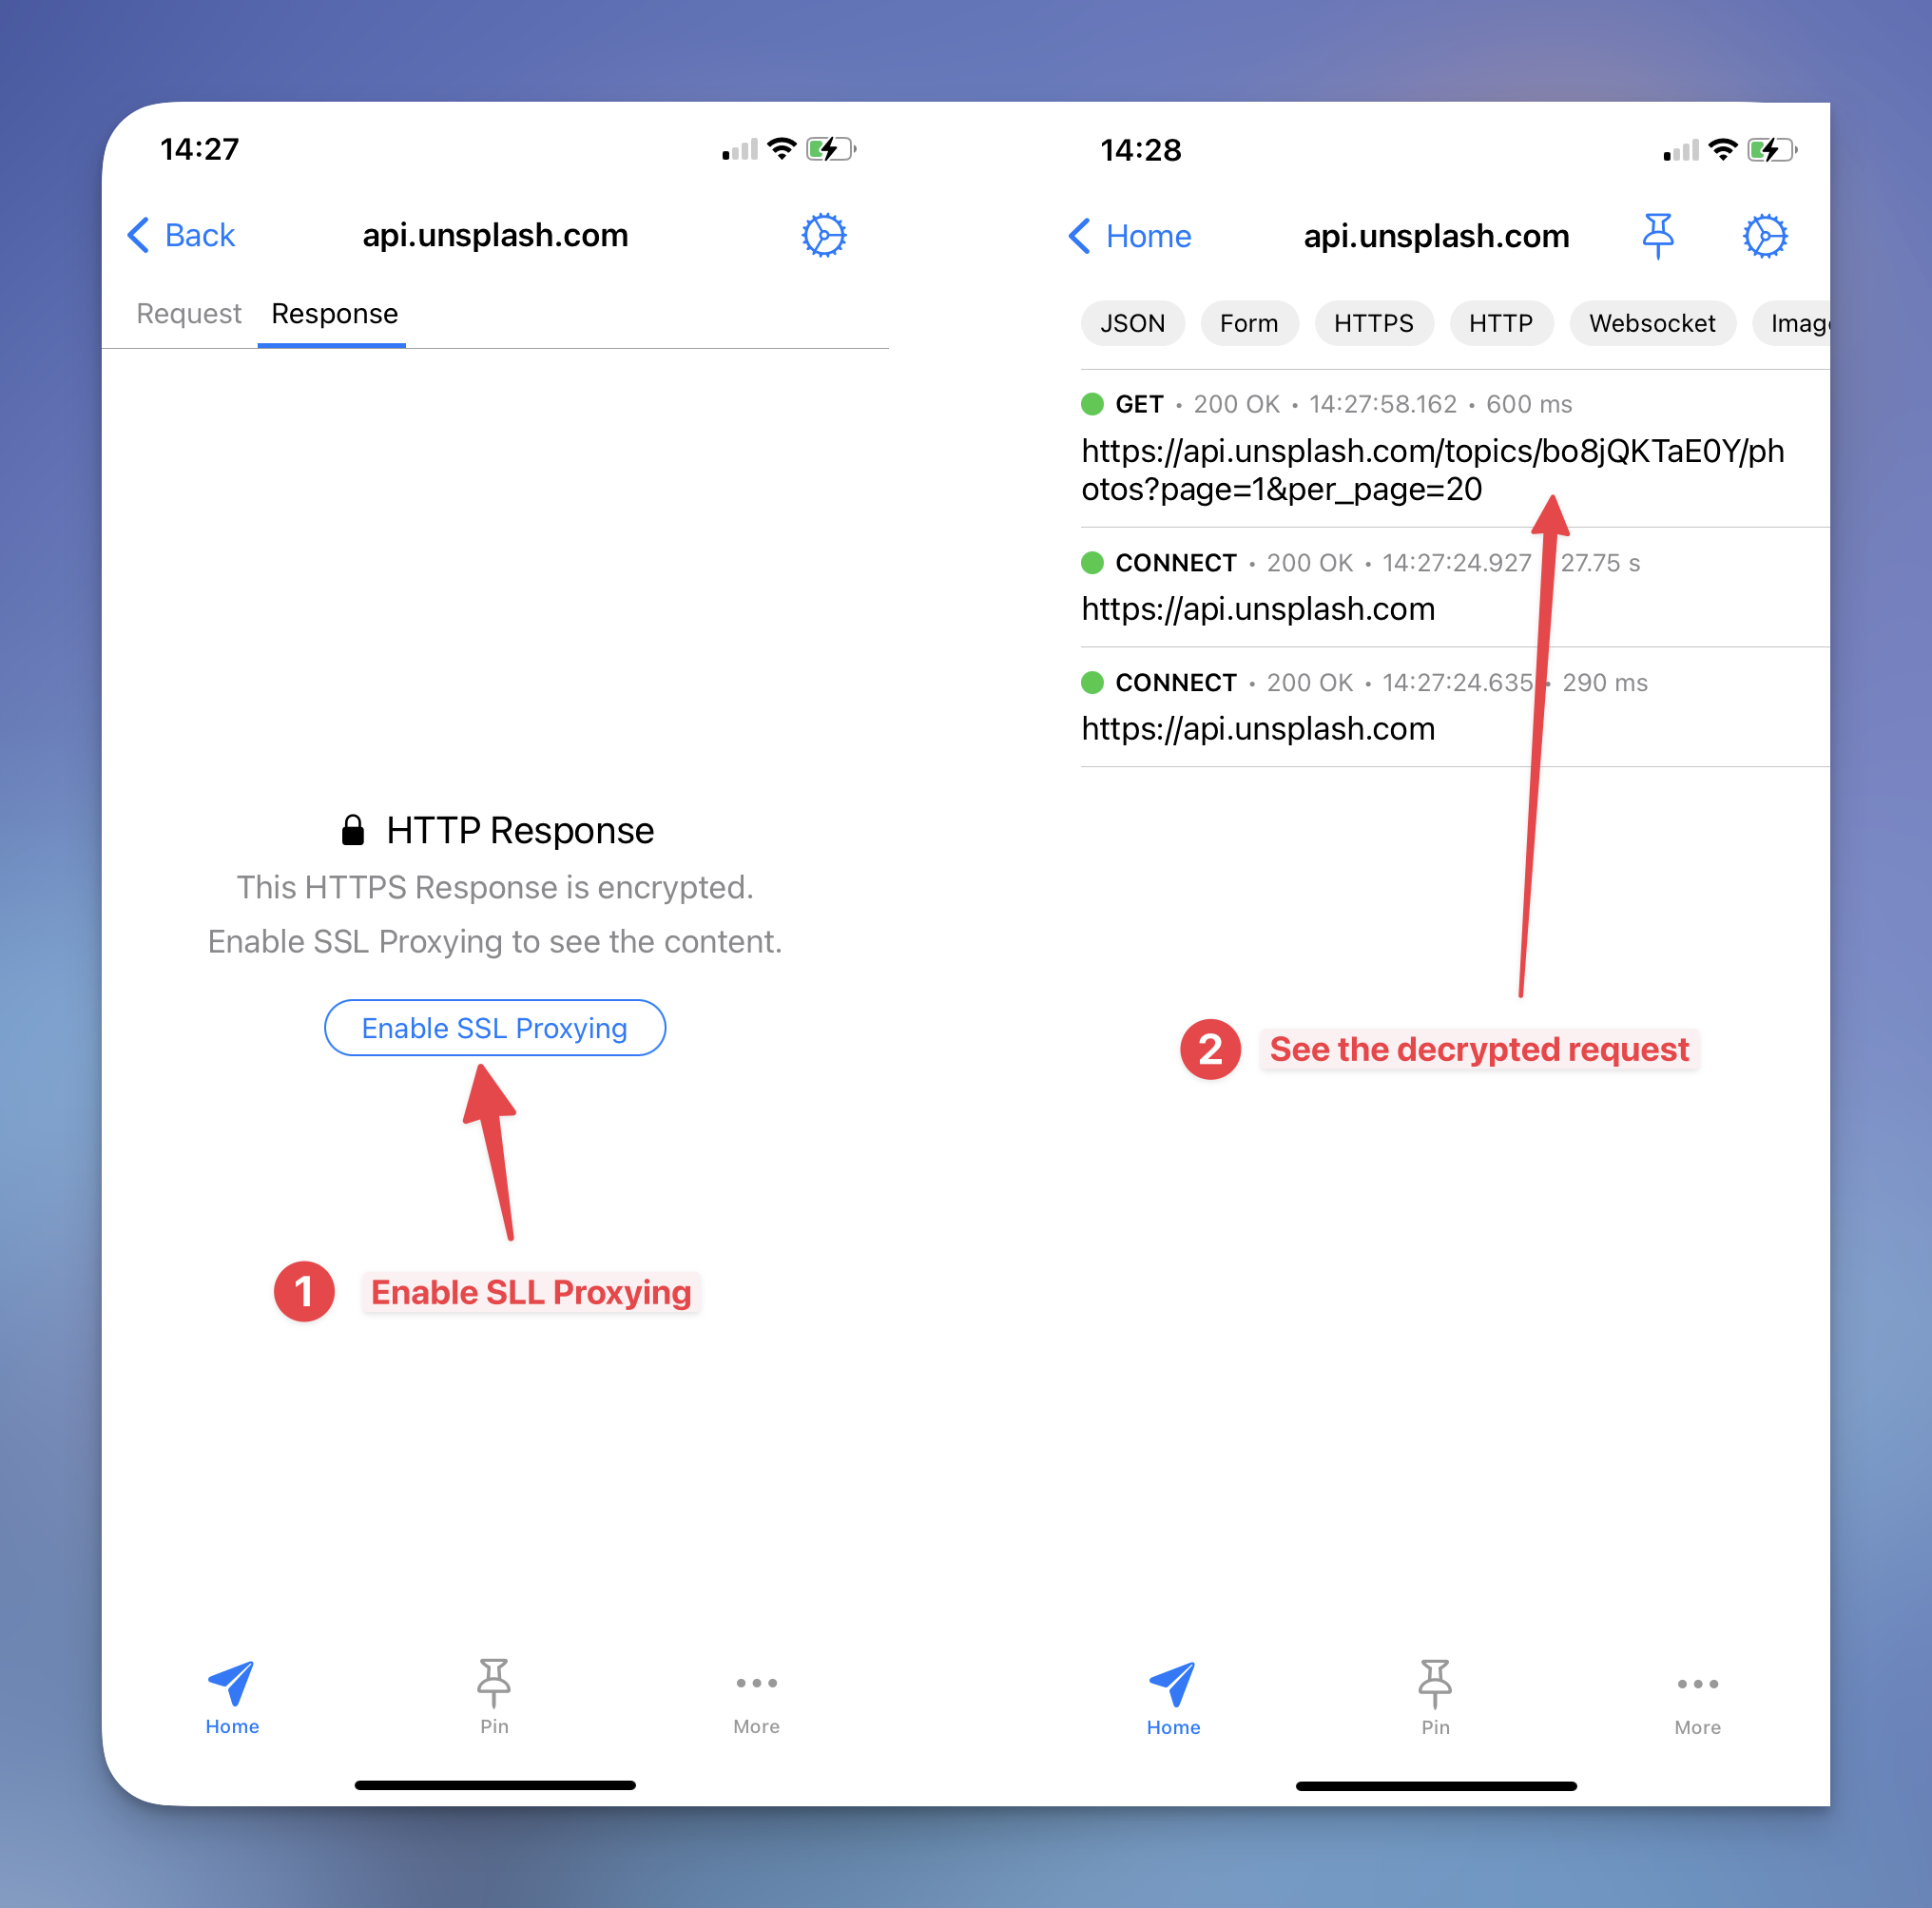
Tip: Proxyman won't automatically intercept all incoming/outgoing traffic from your devices to maintain the performance. You can update the SSL Proxying List in More Setting -> SSL Proxying.
5. Inspect HTTPS Traffic
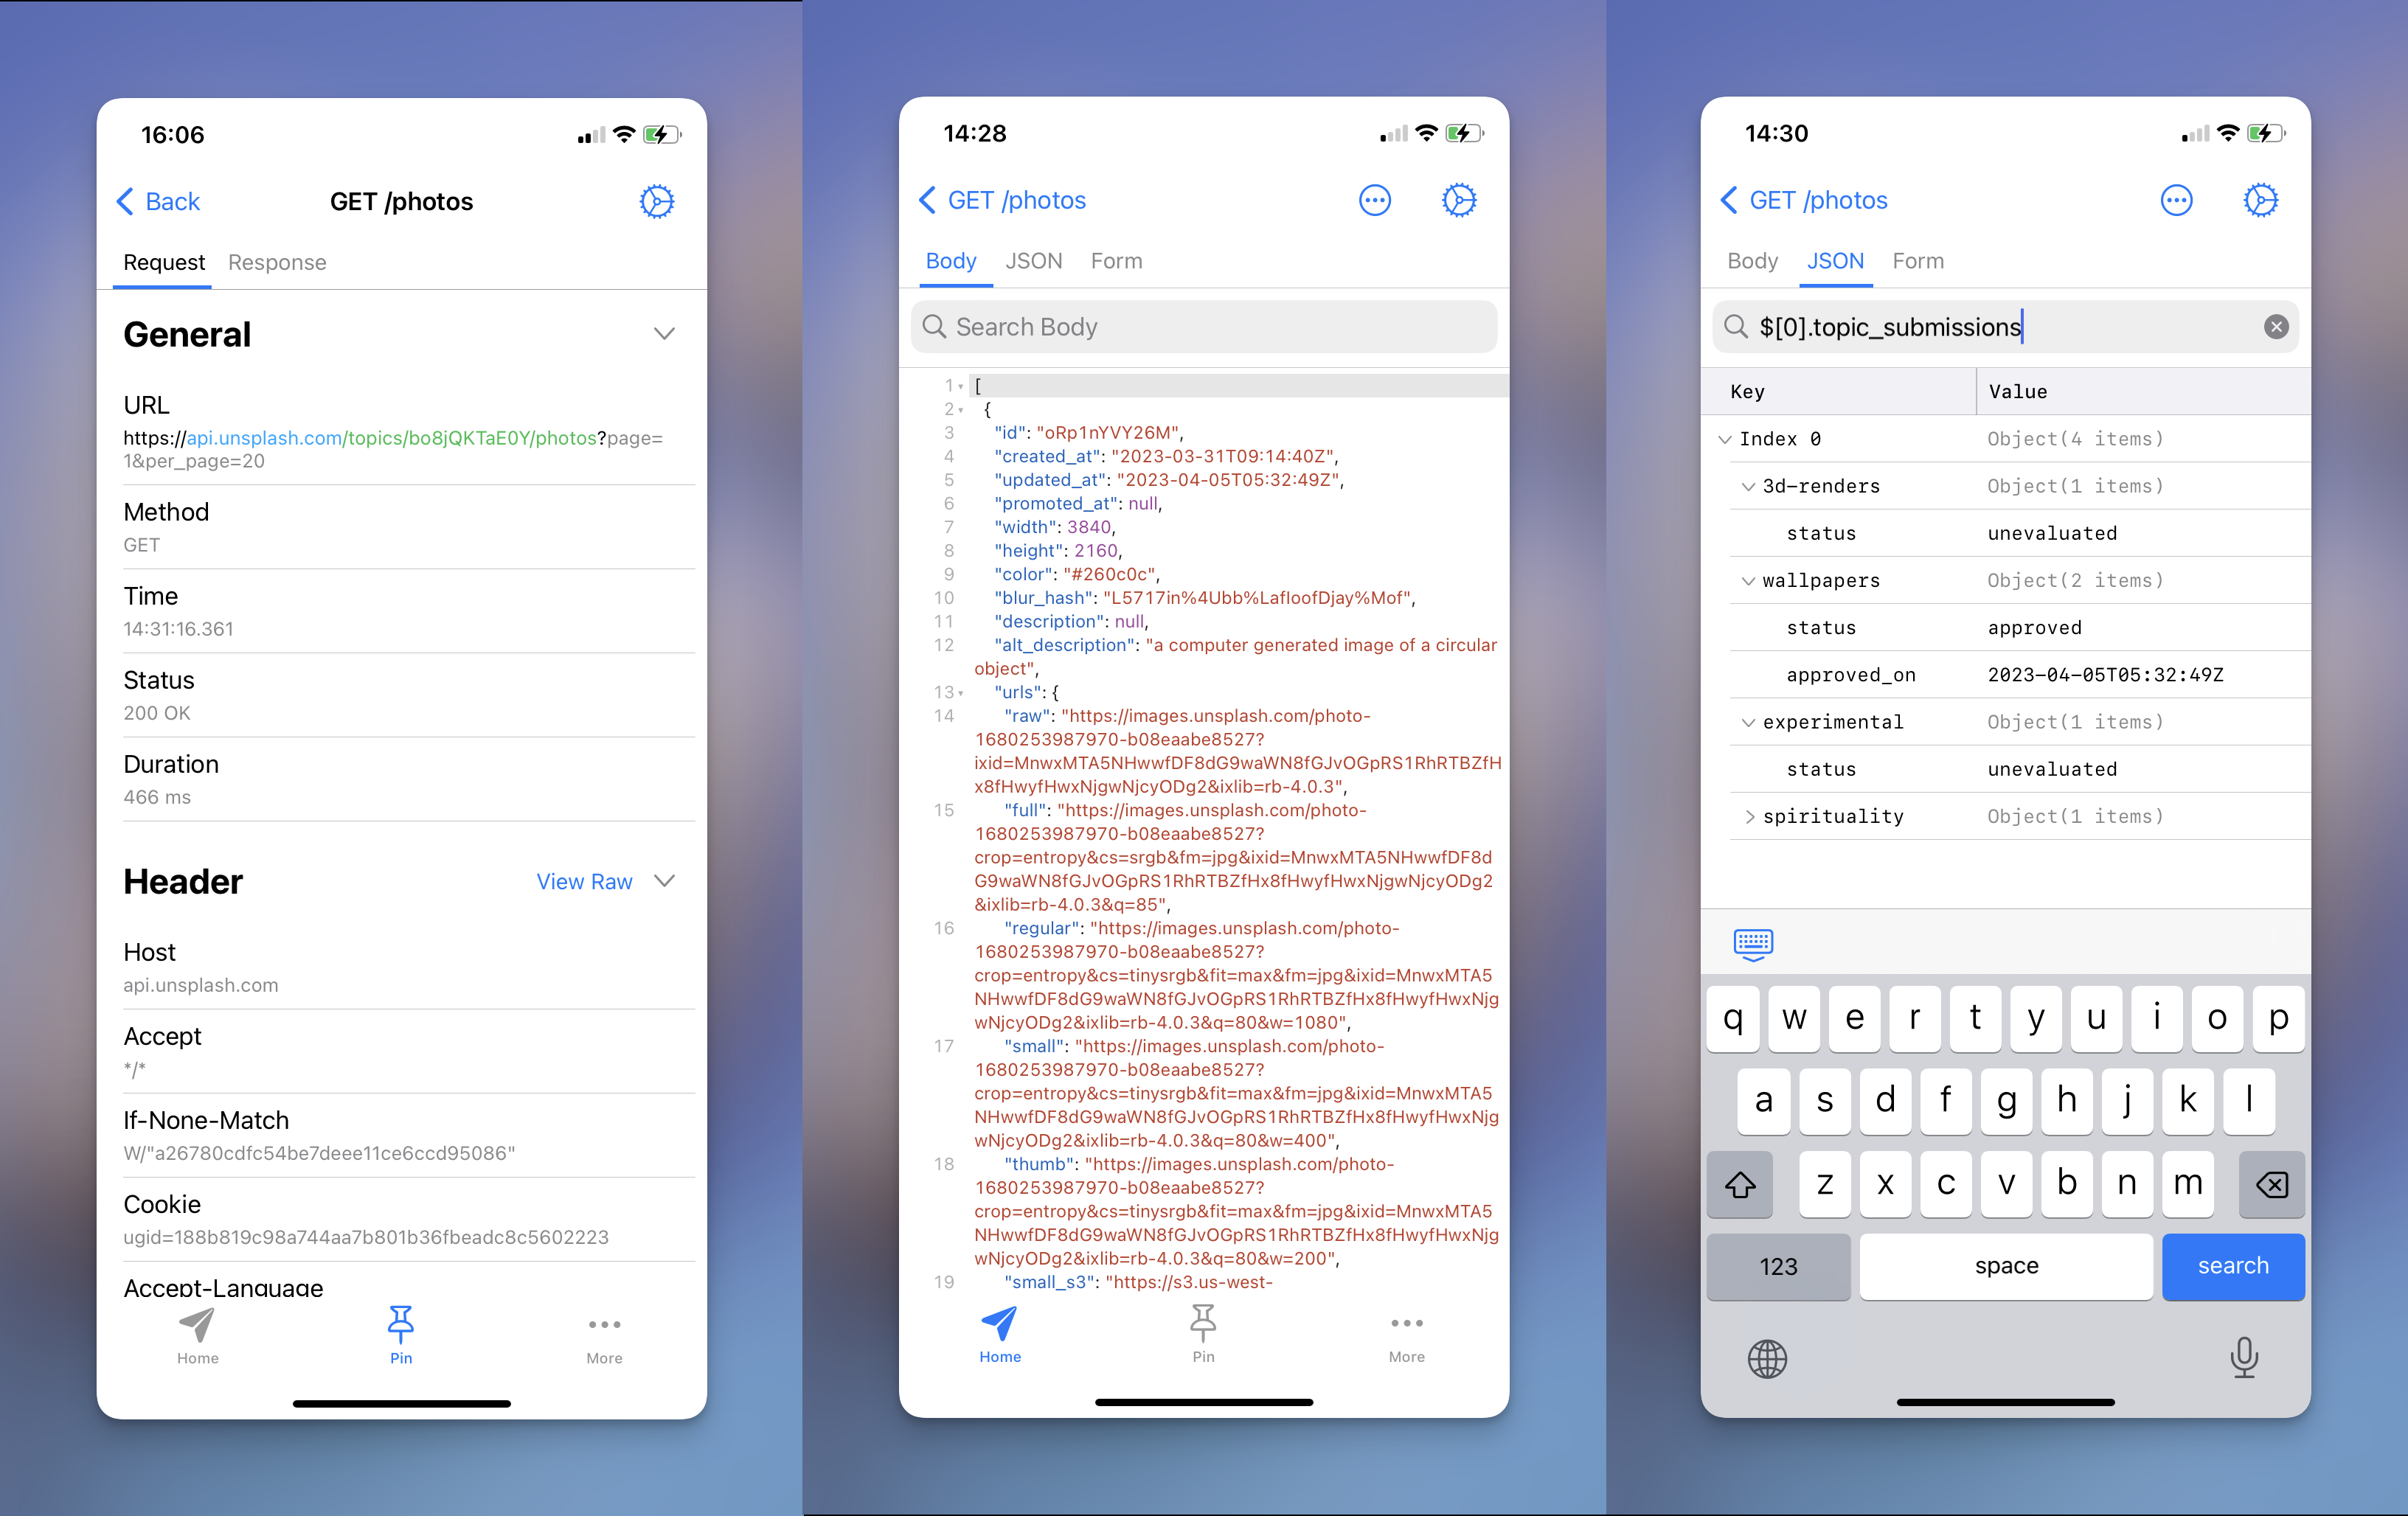
From now, we can easily inspect the Header, Body, Query, Form of Unsplash's Request & Response. Tap on the new request and you will see dycrypted body content
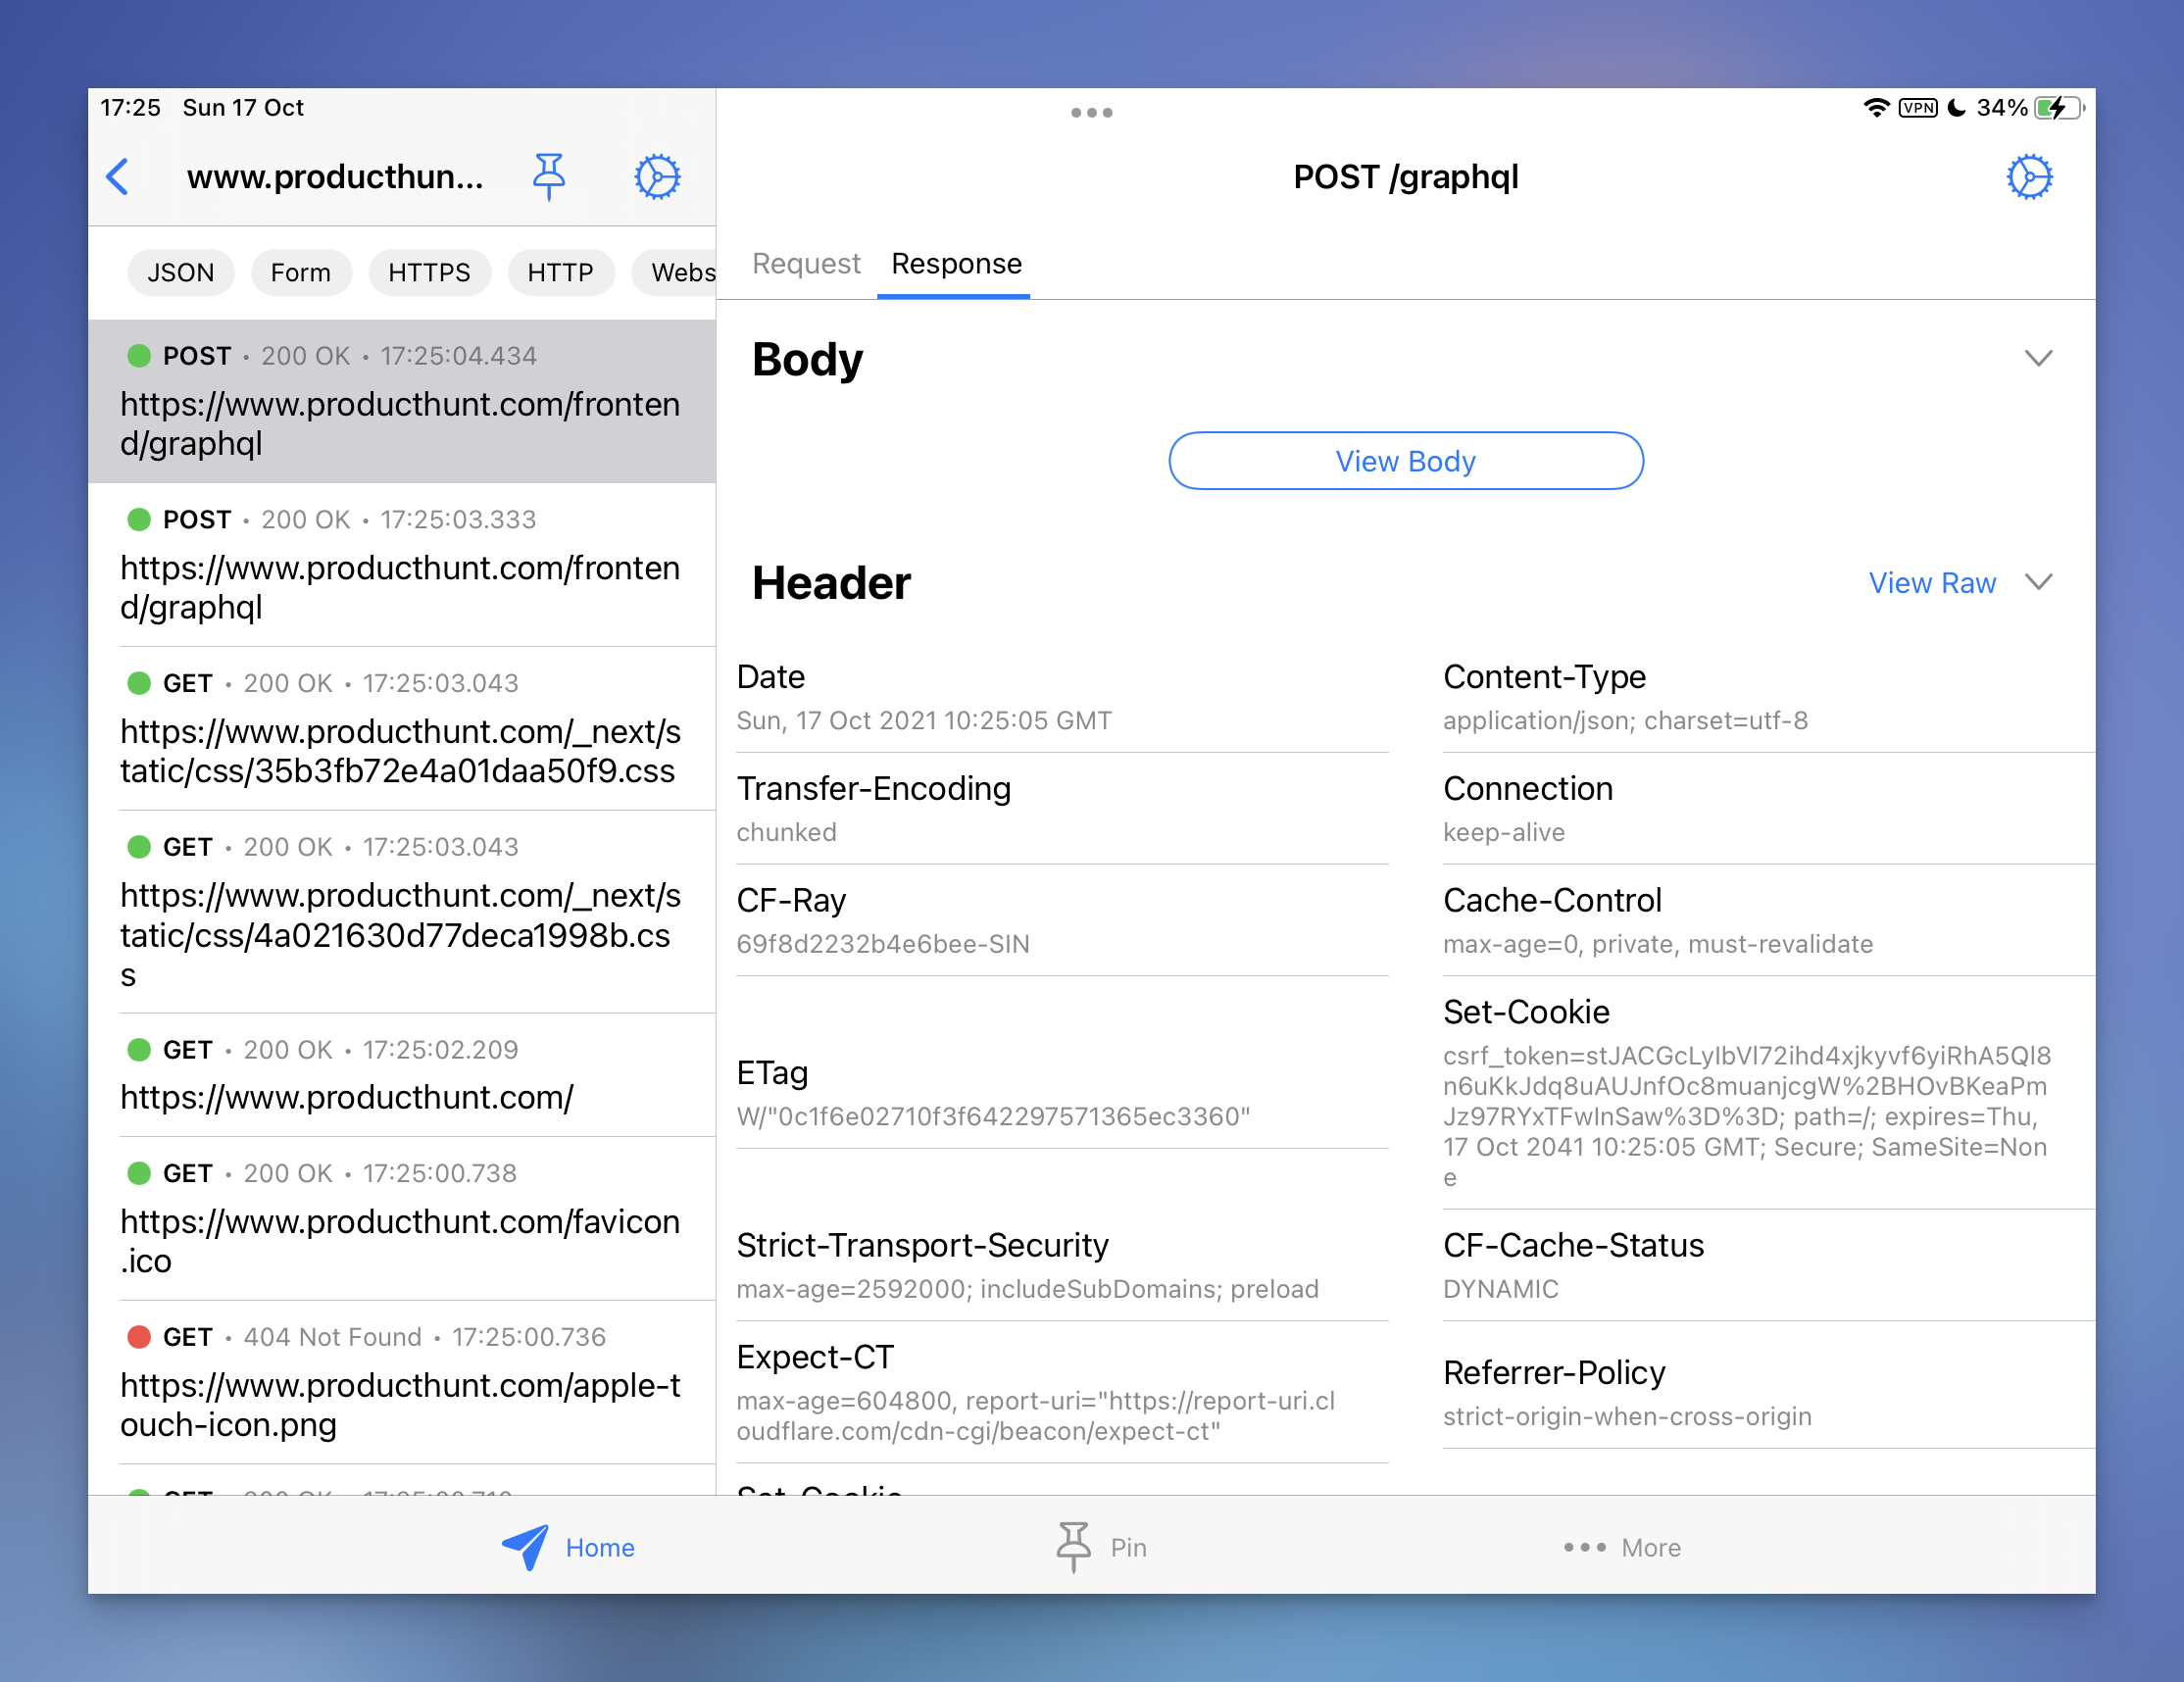
If you're using Proxyman on iPad, you might leverage the multiple columns which display more content on one screen. Yay!
6. Display requests as Sequence List
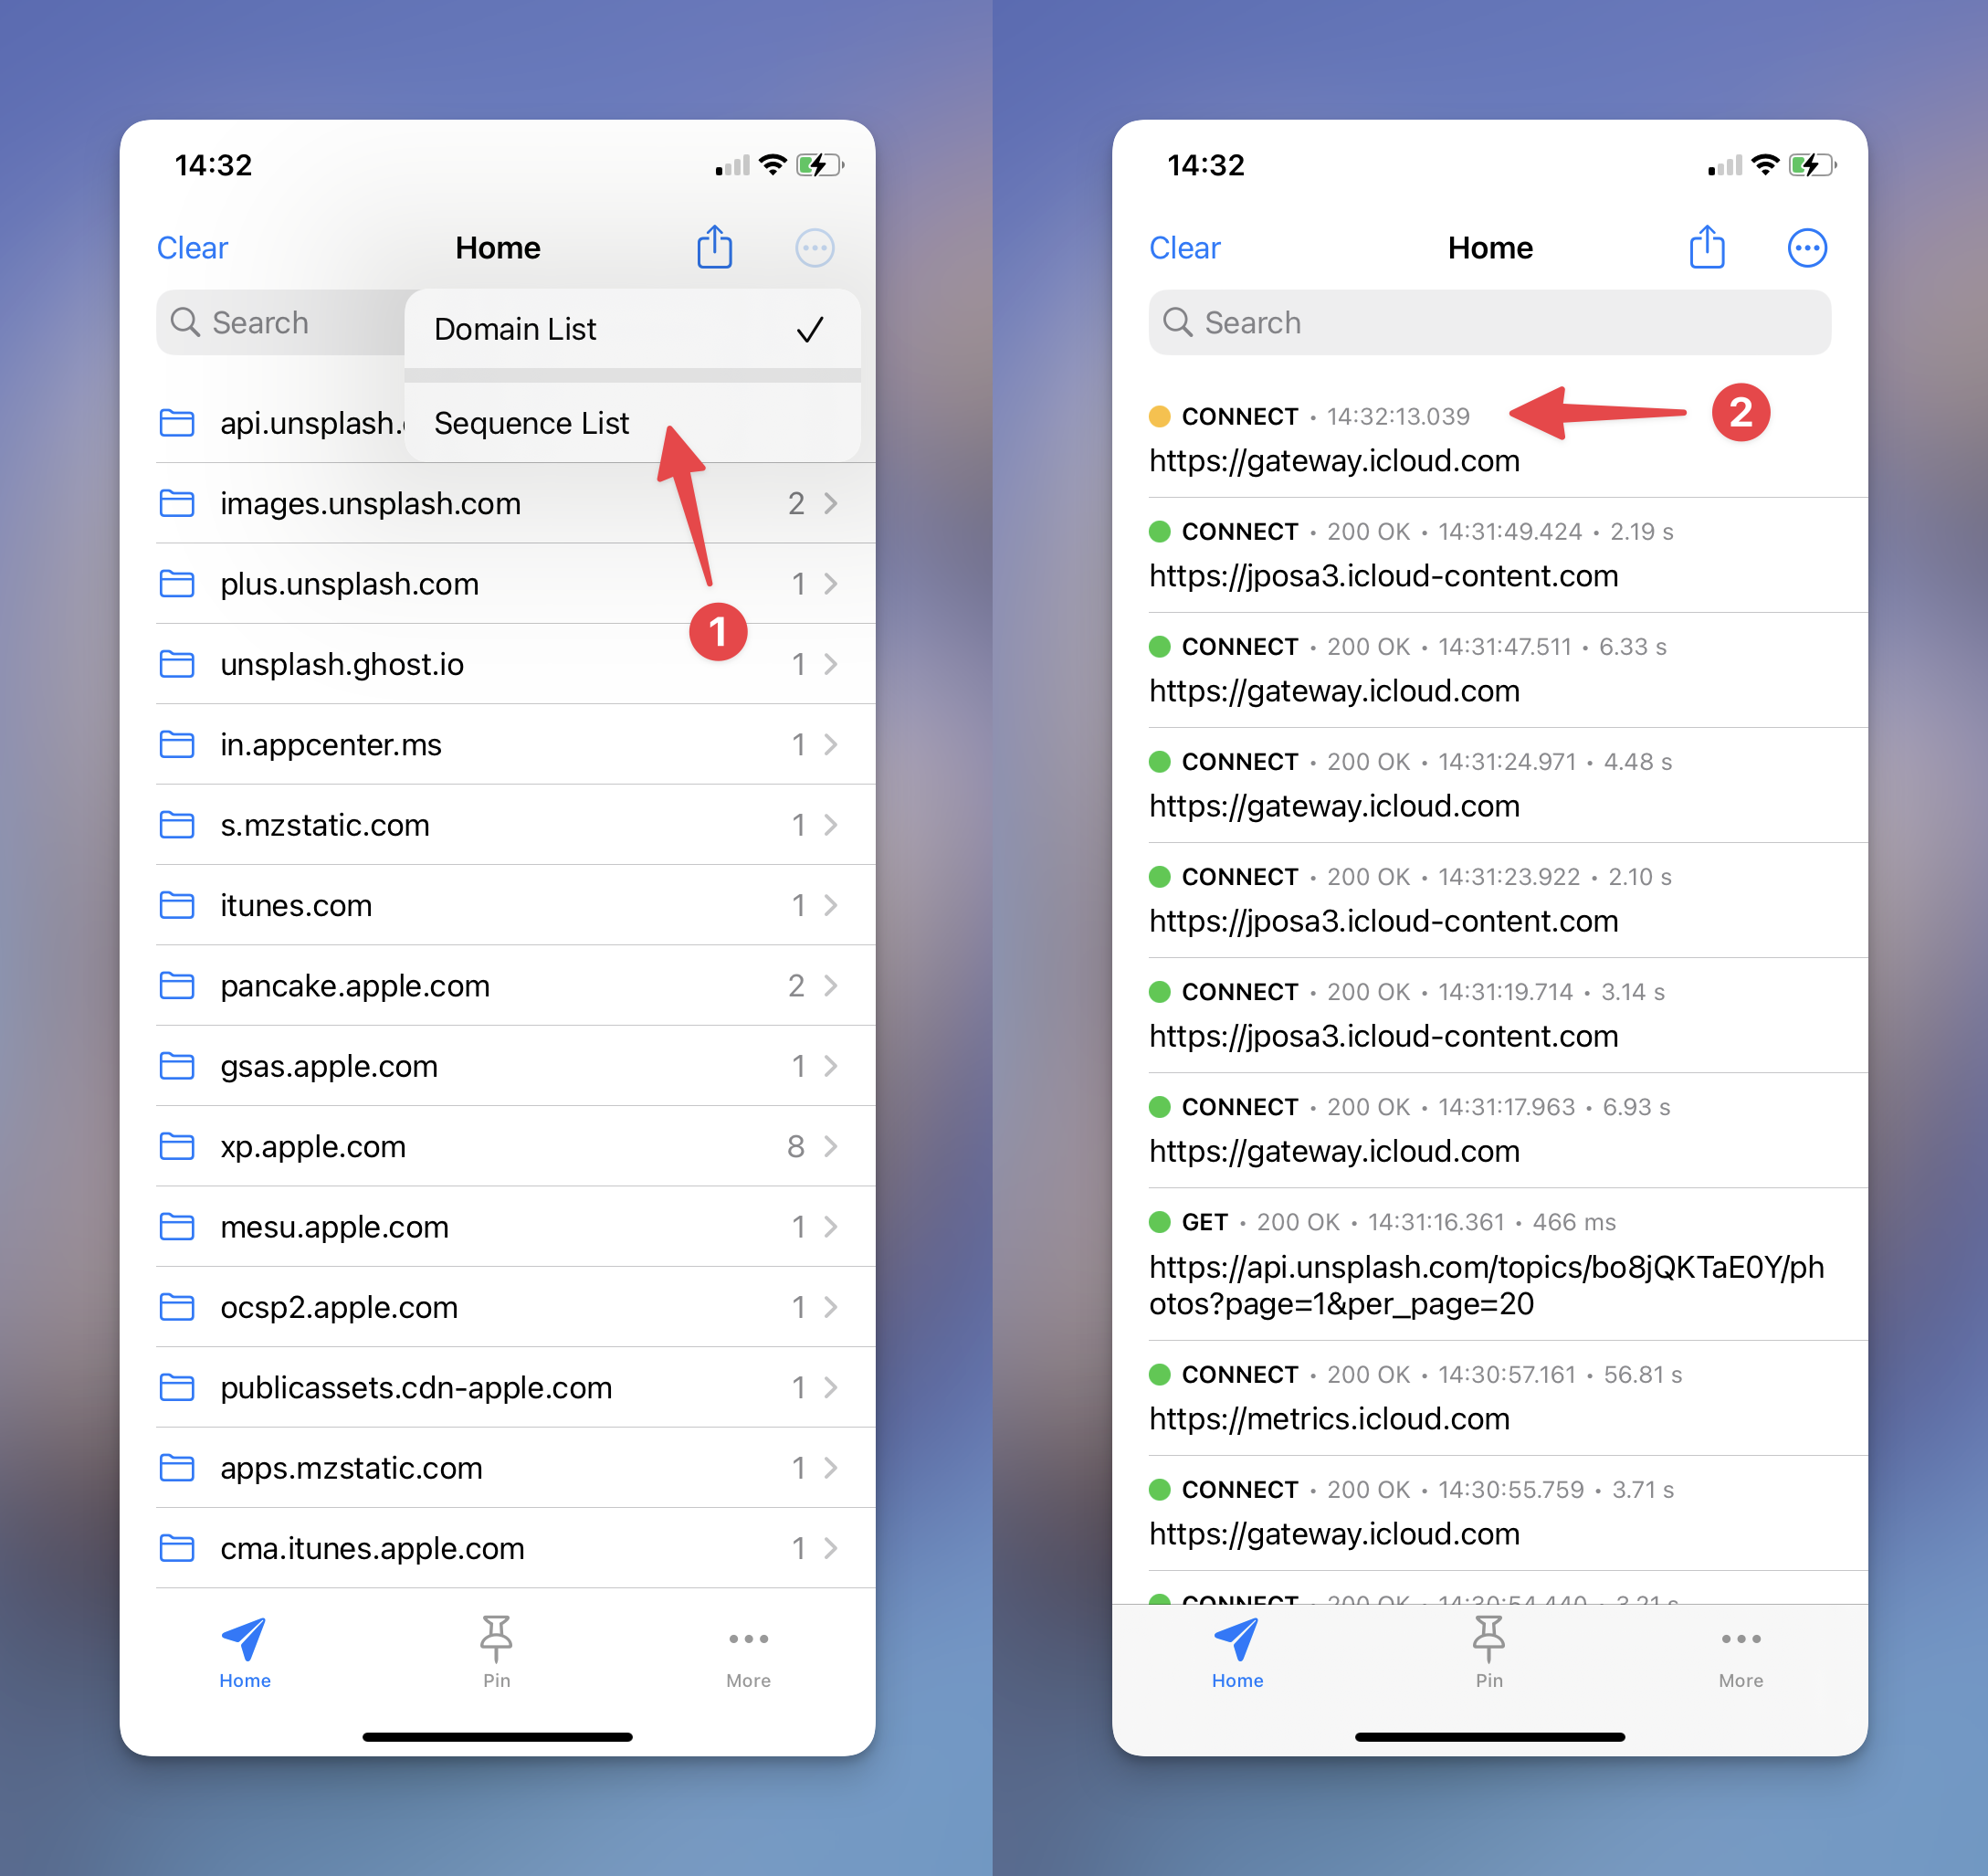
The default setting for displaying requests is to group them by domains. However, you have the option to display requests as Sequence List. You can easily switch between 2 display mode by click on the top right button on Navigation bar. When switching to the Sequence mode, the new coming request will be displayed on top of the screen
7. Share traffic log to Proxyman for macOS
You might be overwhelmed if you record a large number of HTTPS Requests. Proxyman have 2 options for you to export traffic from current iOS device and share with Proxyman macOS.
- To export all requests, you can Tap on the Share icon on the navigation Bar -> Share -> Airdrop to your Macbook Devices.
- To export requests from specific domain, you can use long tap gesture then select the "Share" button from the menu.
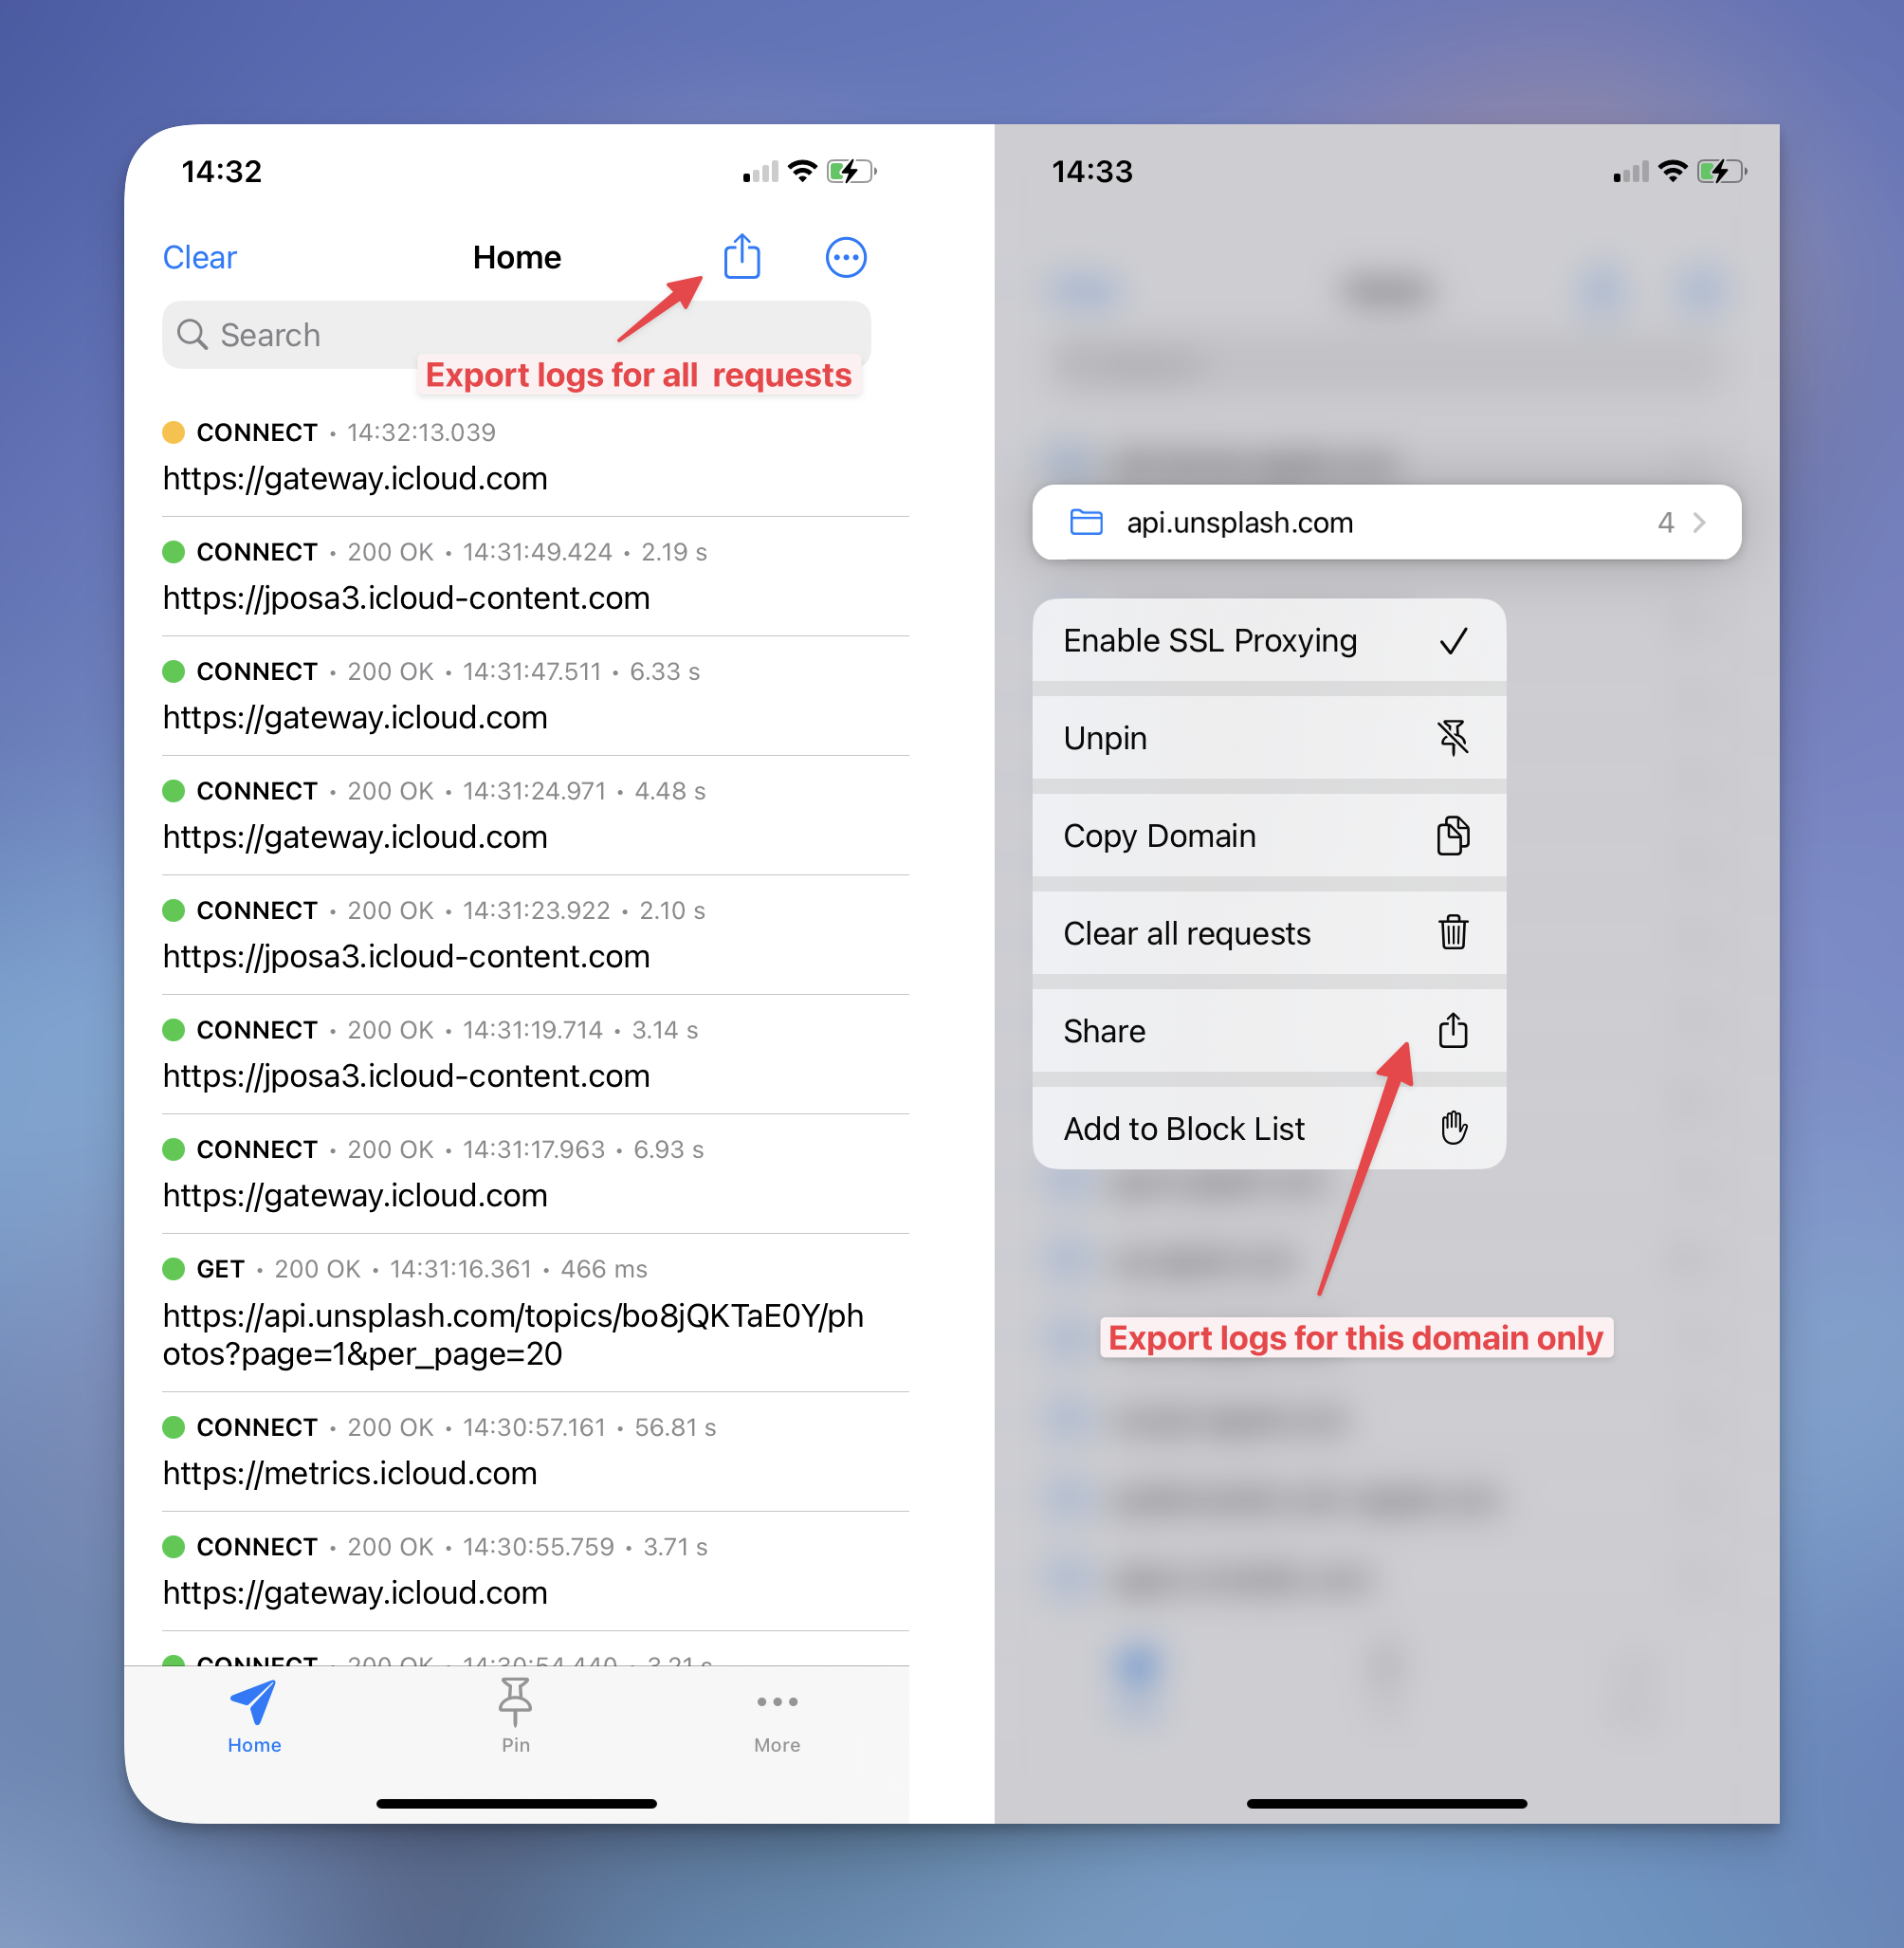
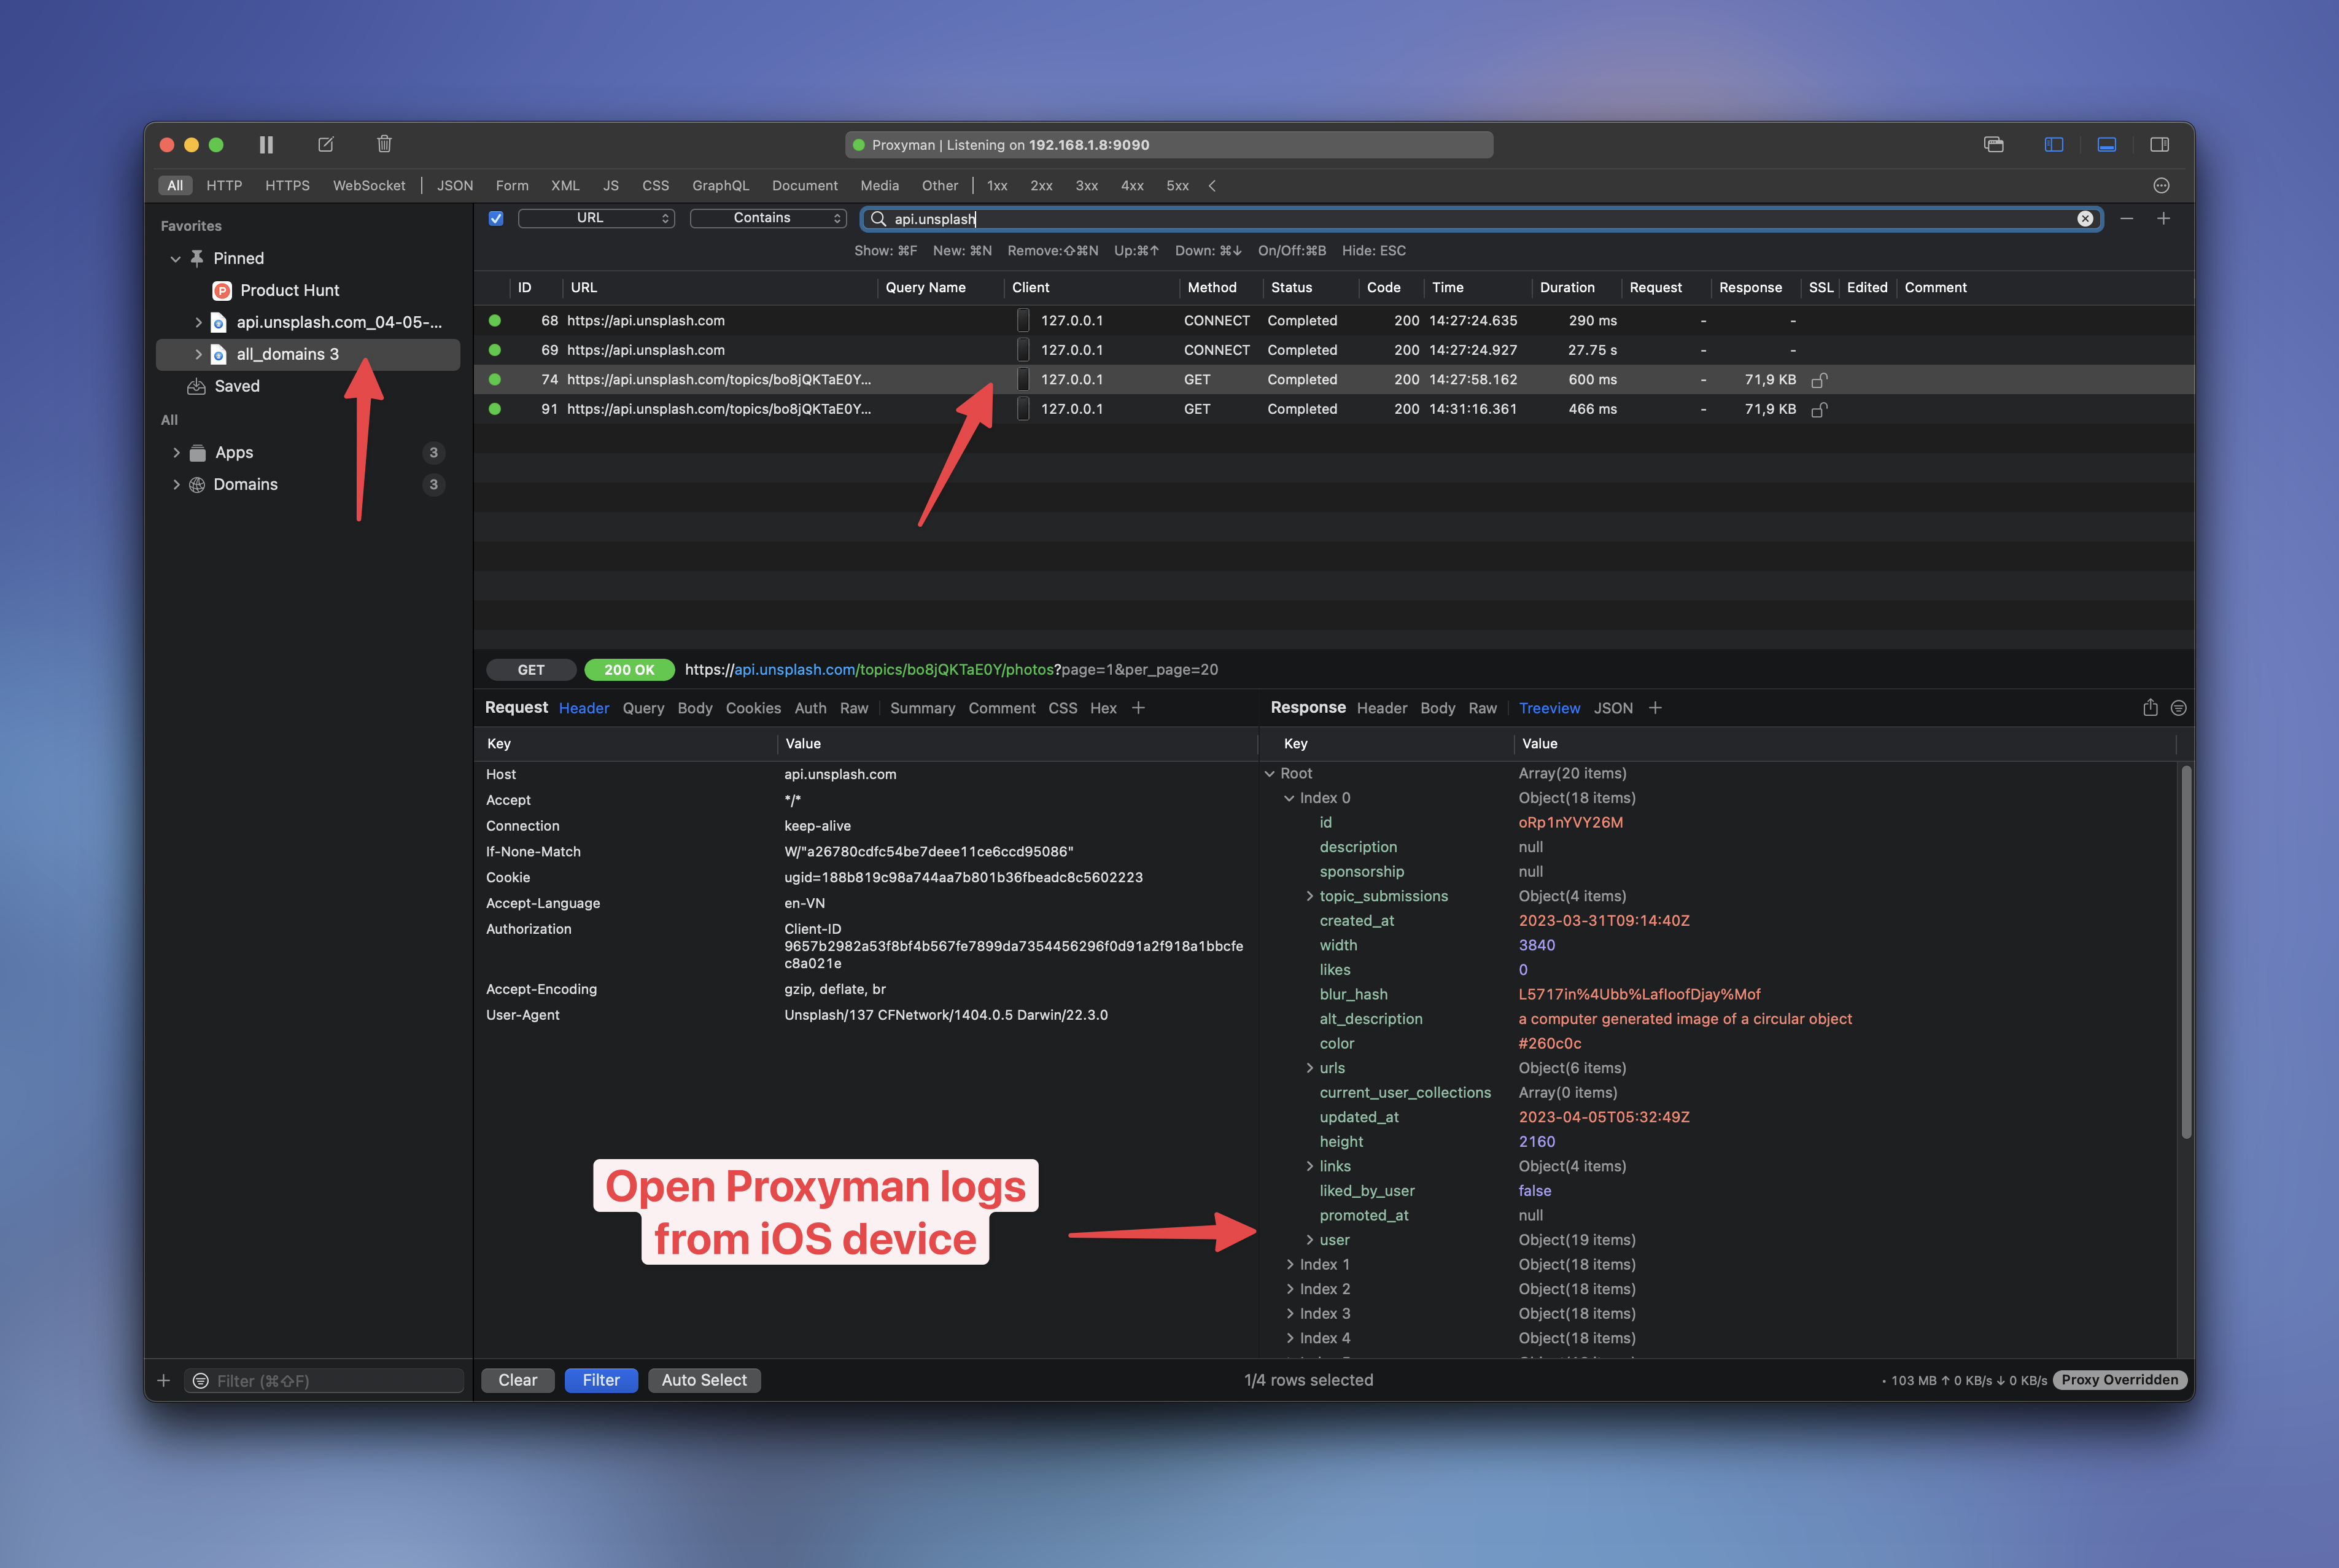
Once you Airdrop the logs to your macOS, you can simply drag to open logs with Proxyman for macOS.
8. Unlock a Premium version with Proxyman License Key
One more thing! If you have a valid Proxyman License Key, don't forget to upgrade to a Premium version, which has an ultimate number of rules, using TouchID/FaceID/Passcode and more.
To activate it, let open More Screen -> Face ID & Passcode -> Unlock -> Enter your license key. Tada!
What's next
The tutorial covers all the important features of Proxyman for iOS. If you'd like to use debugging proxy tools, such as Breakpoint, Map Local, Map Remote, Scripting, let check out Proxyman for macOS.
Proxyman is a native, high-performance macOS app, which enables developers to capture, inspect, and manipulate HTTP(s) requests/responses with ease.
Get it at https://proxyman.com.

