Proxyman vs mitmproxy: Generate OpenAPI from Captured Traffic
You have an API, but its documentation is missing or out of date. You can see the requests in your app, yet writing every path, parameter, and response by hand would take hours.
An HTTP debugging tool can help. It can capture the real requests that your app sends. The next step is to turn those requests into an OpenAPI document that people and tools can understand.
Both mitmproxy and Proxyman can be part of this workflow. The main difference is how many steps you need. With mitmproxy, the common solution uses a separate command-line tool. With Proxyman, OpenAPI export is built into the app.
In this guide, you will learn:
- What OpenAPI is and why it is useful
- How the current mitmproxy workflow works
- Where that workflow can become difficult for beginners
- How to export OpenAPI YAML or HTML with Proxyman
- What to check before you share the generated document
What is OpenAPI?
OpenAPI is a standard format for describing a REST API. It tells people and software things such as:
- Which URLs are available
- Which HTTP methods they use, such as
GET,POST, orDELETE - Which query parameters or path parameters they accept
- What the request body looks like
- What the server can return
- Which status codes are used
For example, your app may send this request:
GET https://api.example.com/users/123
An OpenAPI document can describe that request as a path like /users/{id}. It can also describe the JSON returned by the server.
OpenAPI files are usually written as YAML or JSON. You can open them with tools such as Swagger Editor, use them to create API documentation, or generate client code from them.
Why generate OpenAPI from real traffic?
The best API documentation is written and maintained with the API source code. In real projects, however, that documentation may be incomplete, old, or unavailable.
Generating a first draft from captured traffic is useful when:
- You are working with a legacy API
- You joined a project with little documentation
- You need to understand an API used by your own mobile or web app
- You want to give QA a list of real endpoints
- You want to compare the current API with an older document
- You need a quick starting point before writing better documentation
Captured traffic gives you real examples. It shows what the app sent and what the server returned during that session.
Only capture APIs, apps, and accounts that you are allowed to inspect. A captured request may contain passwords, cookies, access tokens, personal data, or private company information.
The current solution with mitmproxy
mitmproxy is a free and powerful intercepting proxy. It can capture HTTP, HTTPS, and WebSocket traffic. It is a good choice for developers who like terminal tools, Python, and automated workflows.
mitmproxy does not provide OpenAPI export as a simple built-in action in its main interface. A common solution is to use the separate community project mitmproxy2swagger.
The usual workflow looks like this:
- Install and start mitmproxy or mitmweb.
- Configure your app or device to send traffic through the proxy.
- Capture the API requests you need.
- Save the captured traffic as a mitmproxy flow file or a HAR file.
- Install
mitmproxy2swaggerand its required Python environment. - Run a command with the input file, output file, and API URL prefix.
- Open the first YAML result and choose which detected paths to include.
- Run the command again to create the fuller OpenAPI document.
A first command may look like this:
mitmproxy2swagger \
  -i capture.flow \
  -o api-schema.yaml \
  -p https://api.example.com/v1
The first pass finds possible API paths. You then review the YAML, remove ignore: from the paths you want, and fix any path parameters. After that, you run the tool again. Optional flags can add examples or headers.
This solution is flexible. It is also a good fit for a script or repeatable build process. But it has several moving parts.
What is difficult about the current solution?
The problem is not that mitmproxy cannot capture the traffic. It can. The difficulty is everything between the capture and the final OpenAPI file.
1. You need more than one tool
You capture traffic with mitmproxy, then install and run another project to create OpenAPI. Each tool has its own setup, commands, versions, and file formats.
For an experienced command-line user, this may be fine. For a new developer or QA tester, it can slow down a task that should feel small.
2. You need a two-pass workflow
The first generated file is not the final result. You need to open it, choose paths, edit values, and run the command again.
That extra review is useful, but it may be surprising if you only want a quick document from a few selected requests.
3. A full capture can be noisy
A browser or mobile app may call analytics, image servers, feature flags, authentication services, and many other hosts. If you export the whole session, your OpenAPI result may contain far more than the API you wanted.
It is easier when you can see the requests and select only the useful ones before exporting.
4. Examples may contain private data
Real traffic is helpful because it contains real values. Those values can also be dangerous. An example may include a token, email address, internal URL, or user ID.
Always review the output before you commit it to Git, upload it to a documentation site, or share it with another person.
The simpler solution with Proxyman
Proxyman includes OpenAPI export in the macOS app. You capture the traffic, select the requests you want, and export them as OpenAPI YAML or HTML.
There is no extra converter to install and no second command to run.
Step 1: Capture your API traffic
Download and open the current version of Proxyman for macOS. Install and trust the Proxyman certificate by following the setup shown inside the app.
Then use your website, simulator, or mobile app and perform the action you want to document. For example, open a profile screen to capture the request that loads a user.
Make sure Proxyman can see the decrypted request and response.
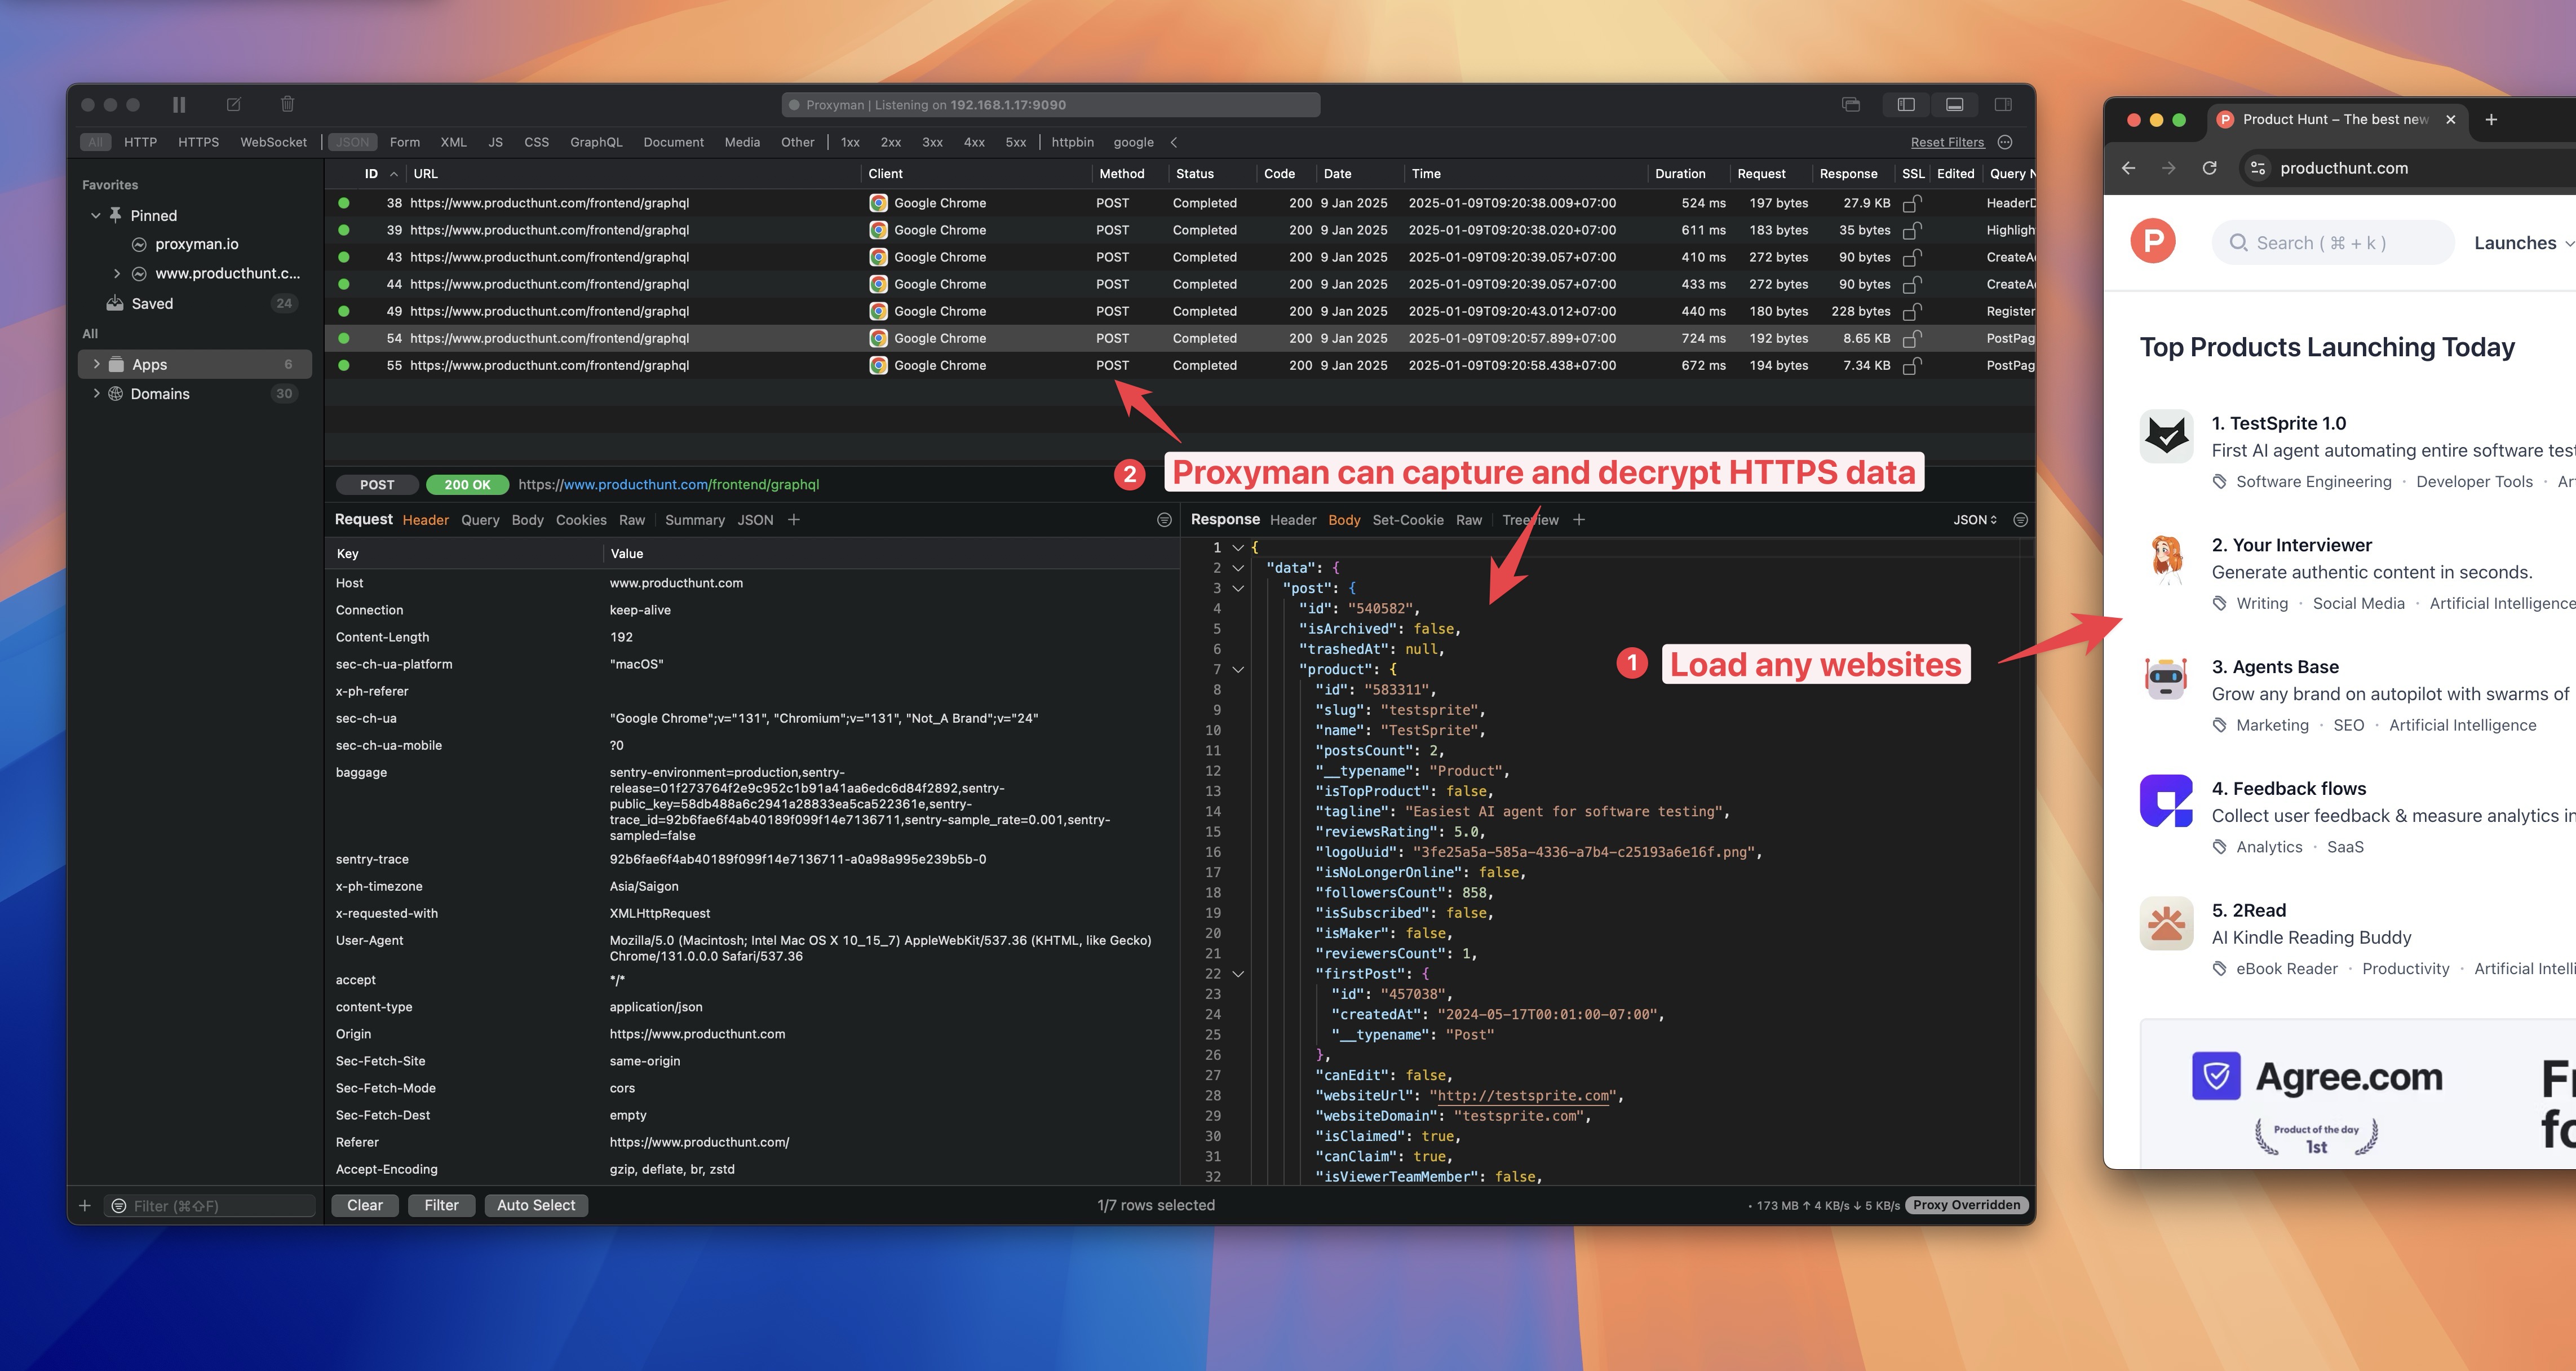
For a clean result, capture one small user journey at a time. You can clear the current session before you start.
Step 2: Select the useful requests
Find the API host in the main table. Select the requests that belong in your document.
You do not need to select every request. Leave out images, analytics, and other services that are not part of the API.
If the same endpoint appears many times, start with one clear success response. You can add more examples later when they show a different request or response shape.
Step 3: Export OpenAPI
Right-click the selected requests, then choose:
Export → OpenAPI → OpenAPI YAML
Choose where to save the file.
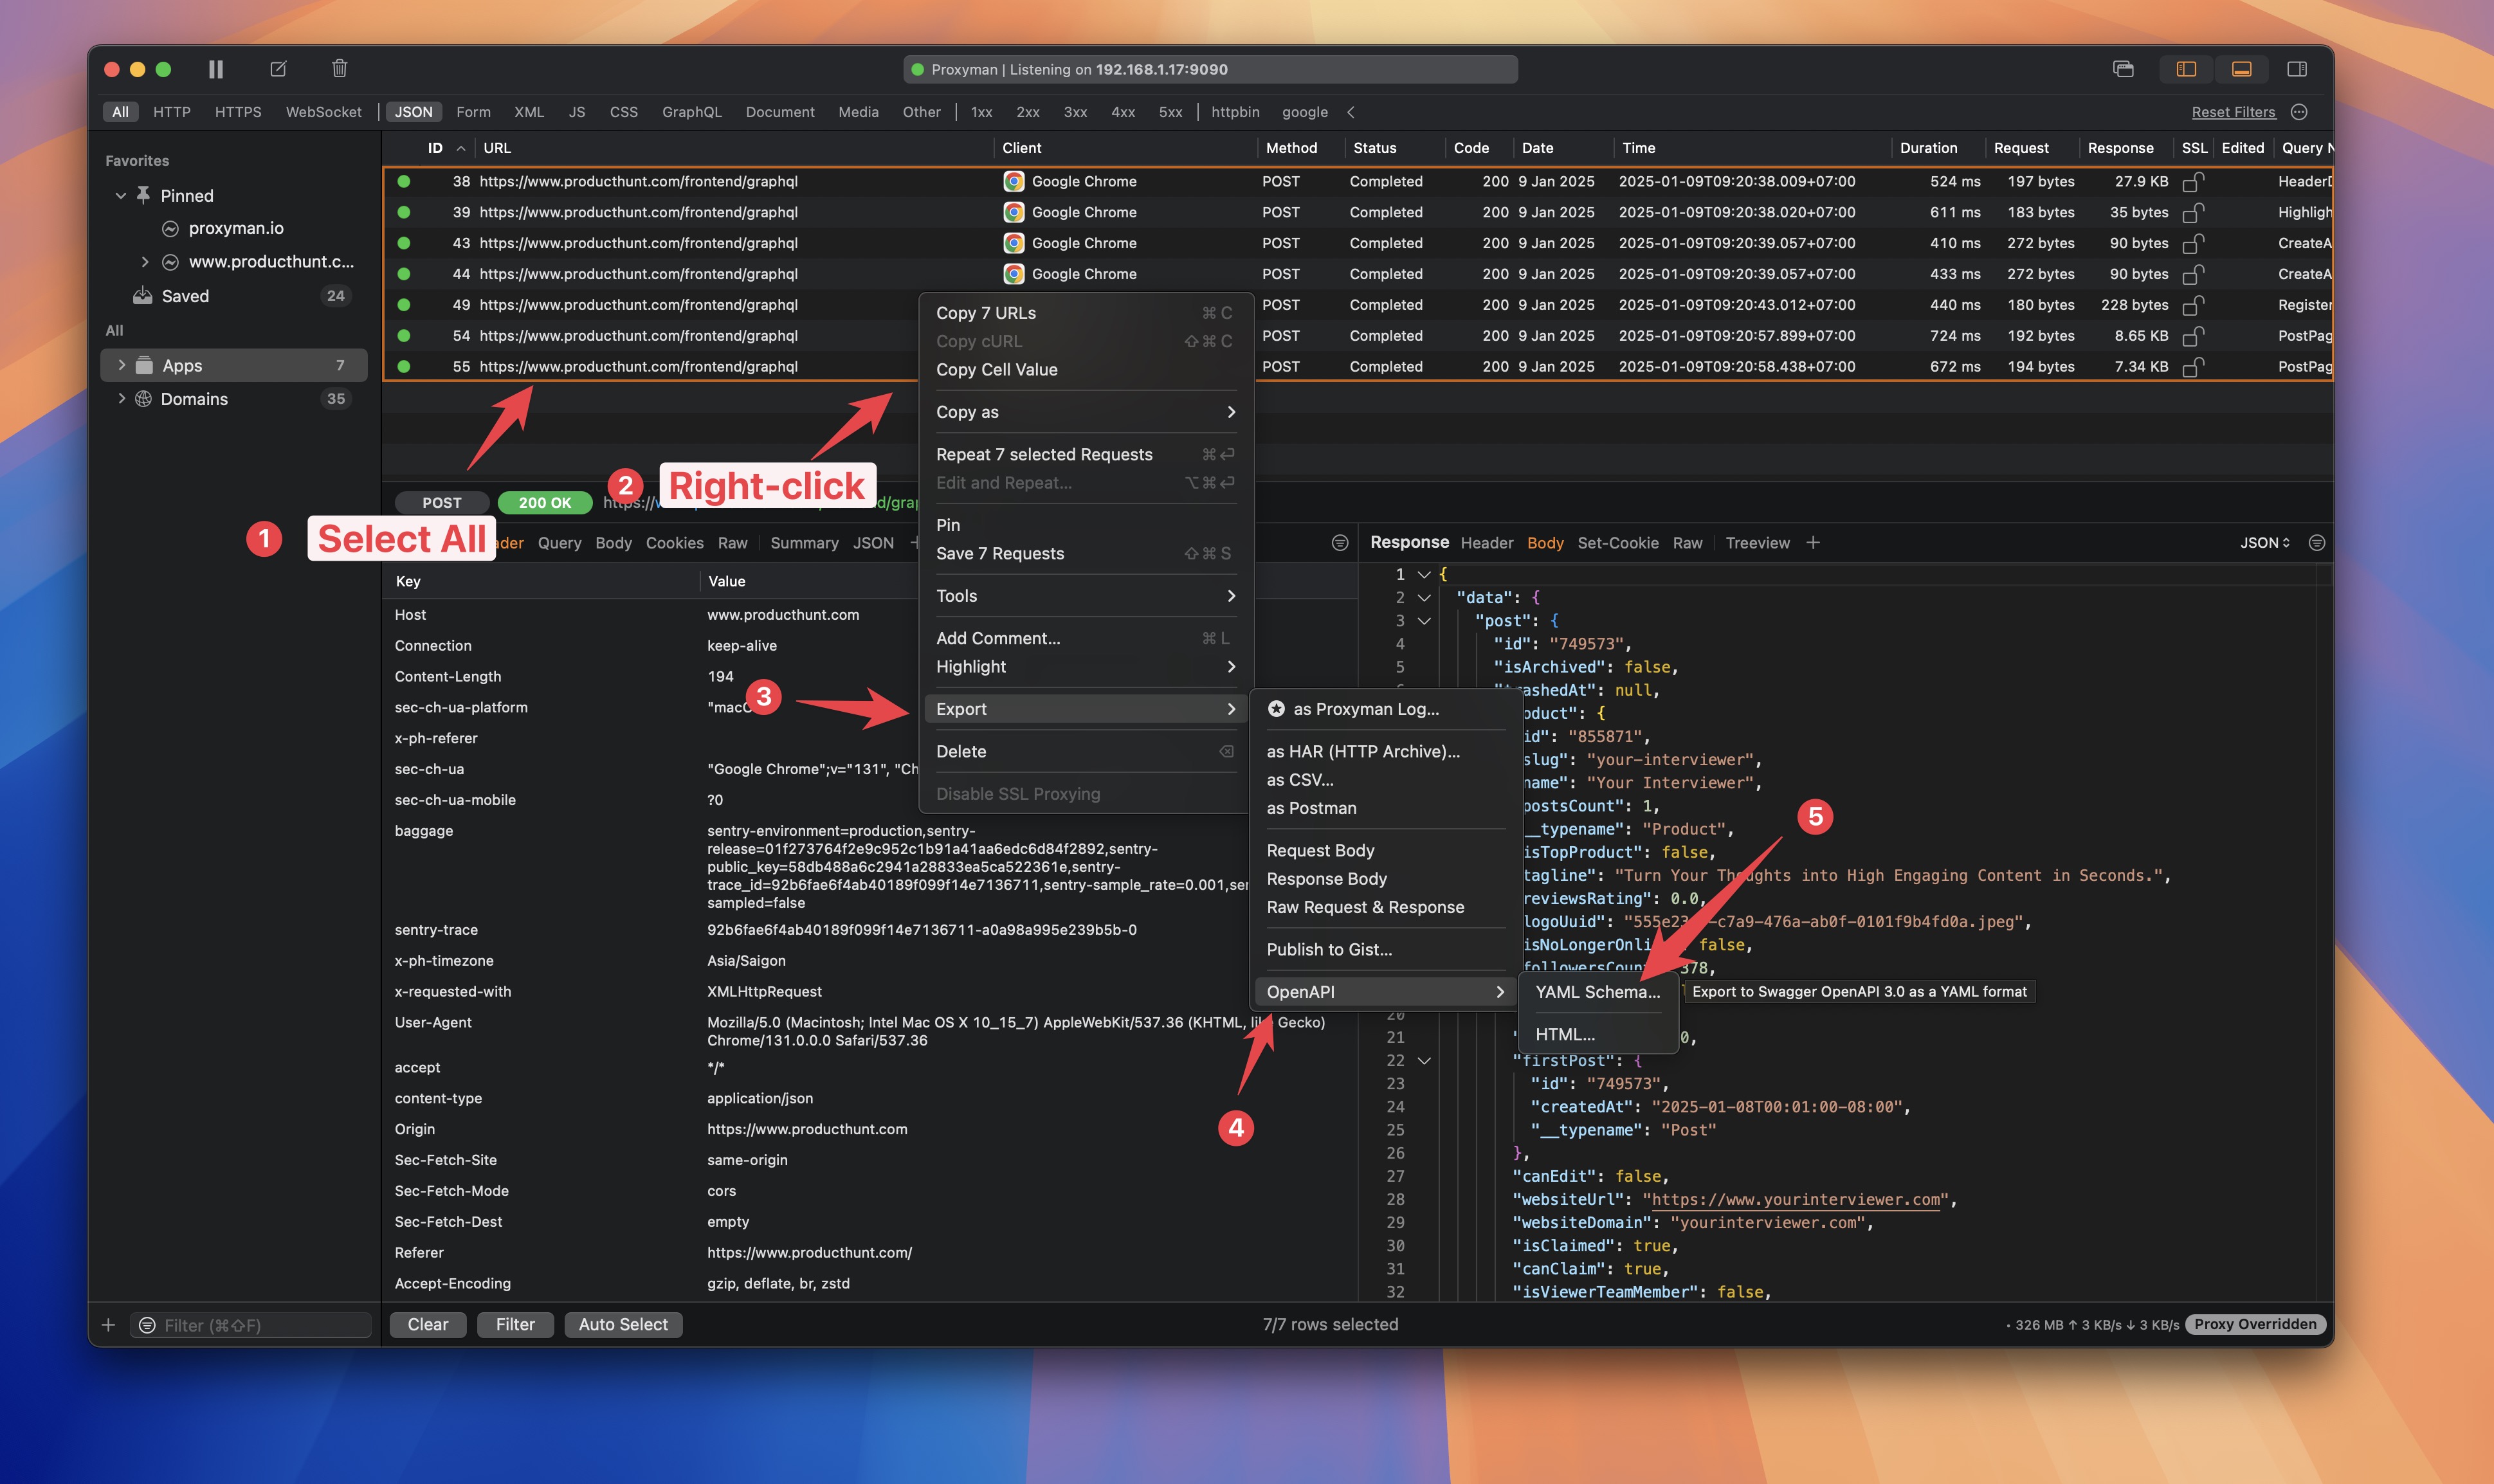
That is the full export workflow. Proxyman creates the OpenAPI file from the requests and responses you selected.
Step 4: Review the YAML file
Open the YAML in Swagger Editor or your normal code editor. Check that the paths, methods, parameters, and schemas make sense.
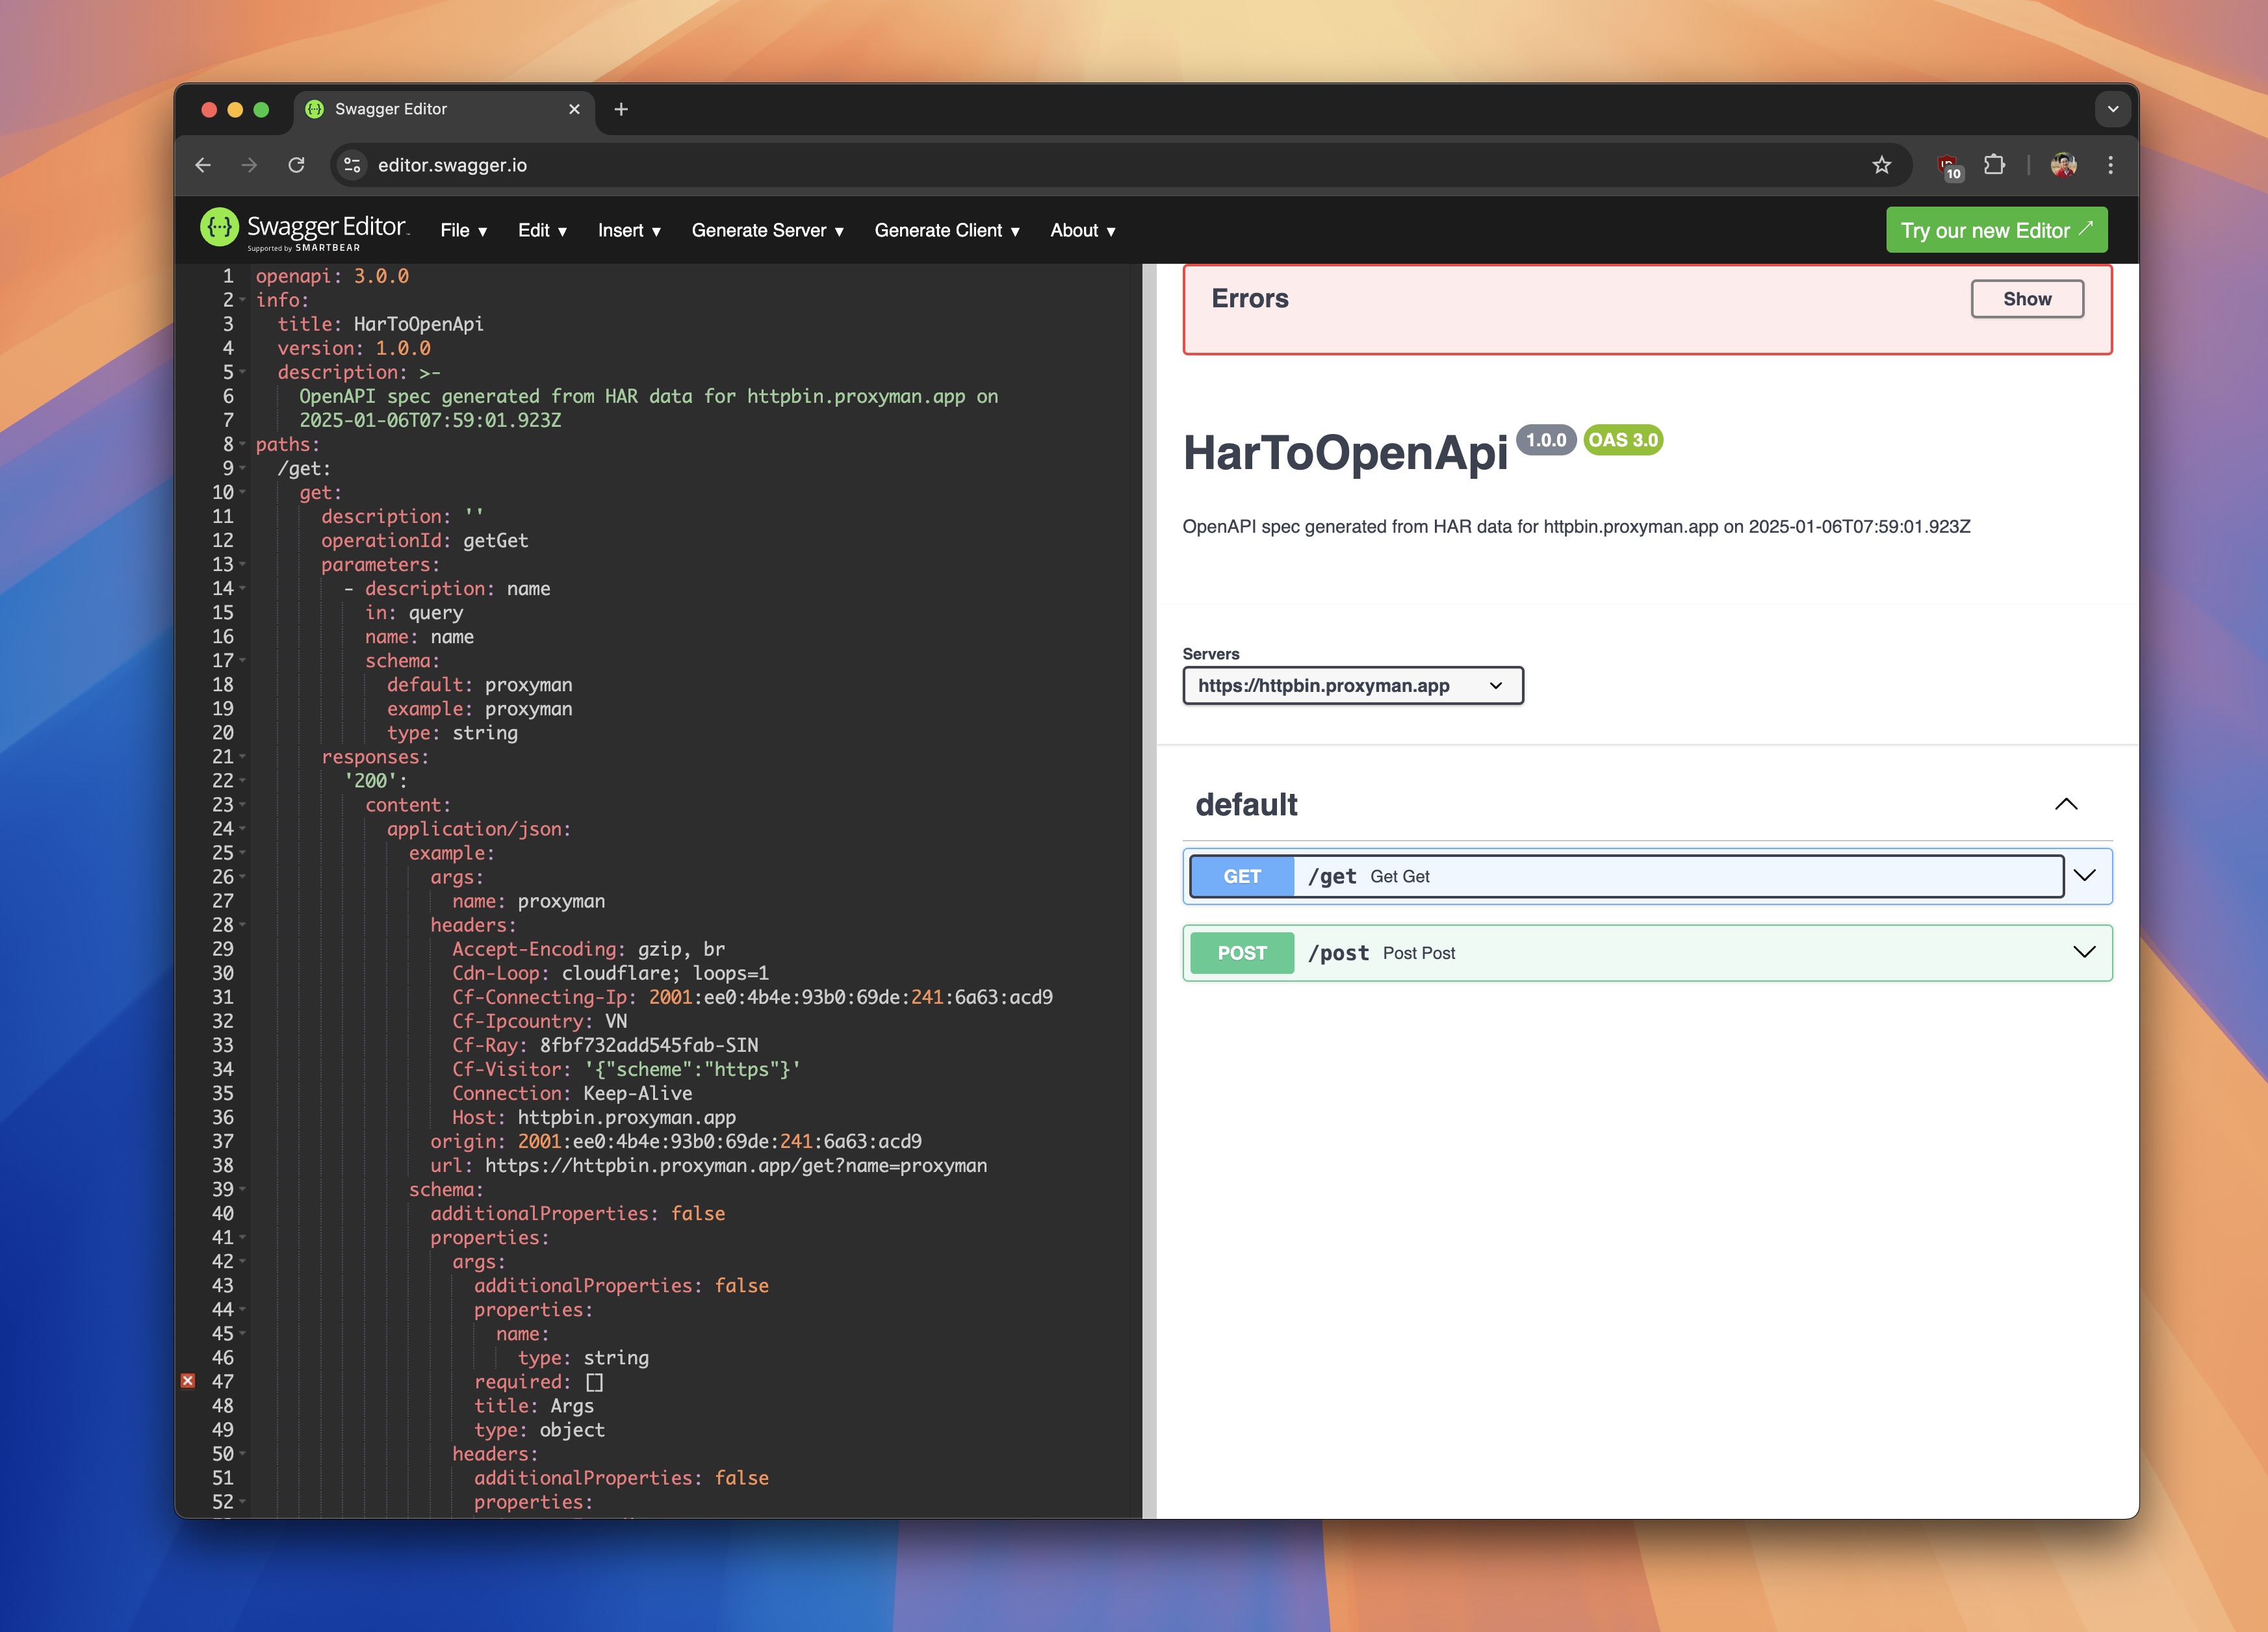
The generated document is a starting point. Real traffic shows what happened in one session. It cannot know every possible error response or every optional value supported by the server.
Step 5: Export readable HTML when needed
If a teammate only needs to read the API, export HTML instead:
Export → OpenAPI → OpenAPI HTML
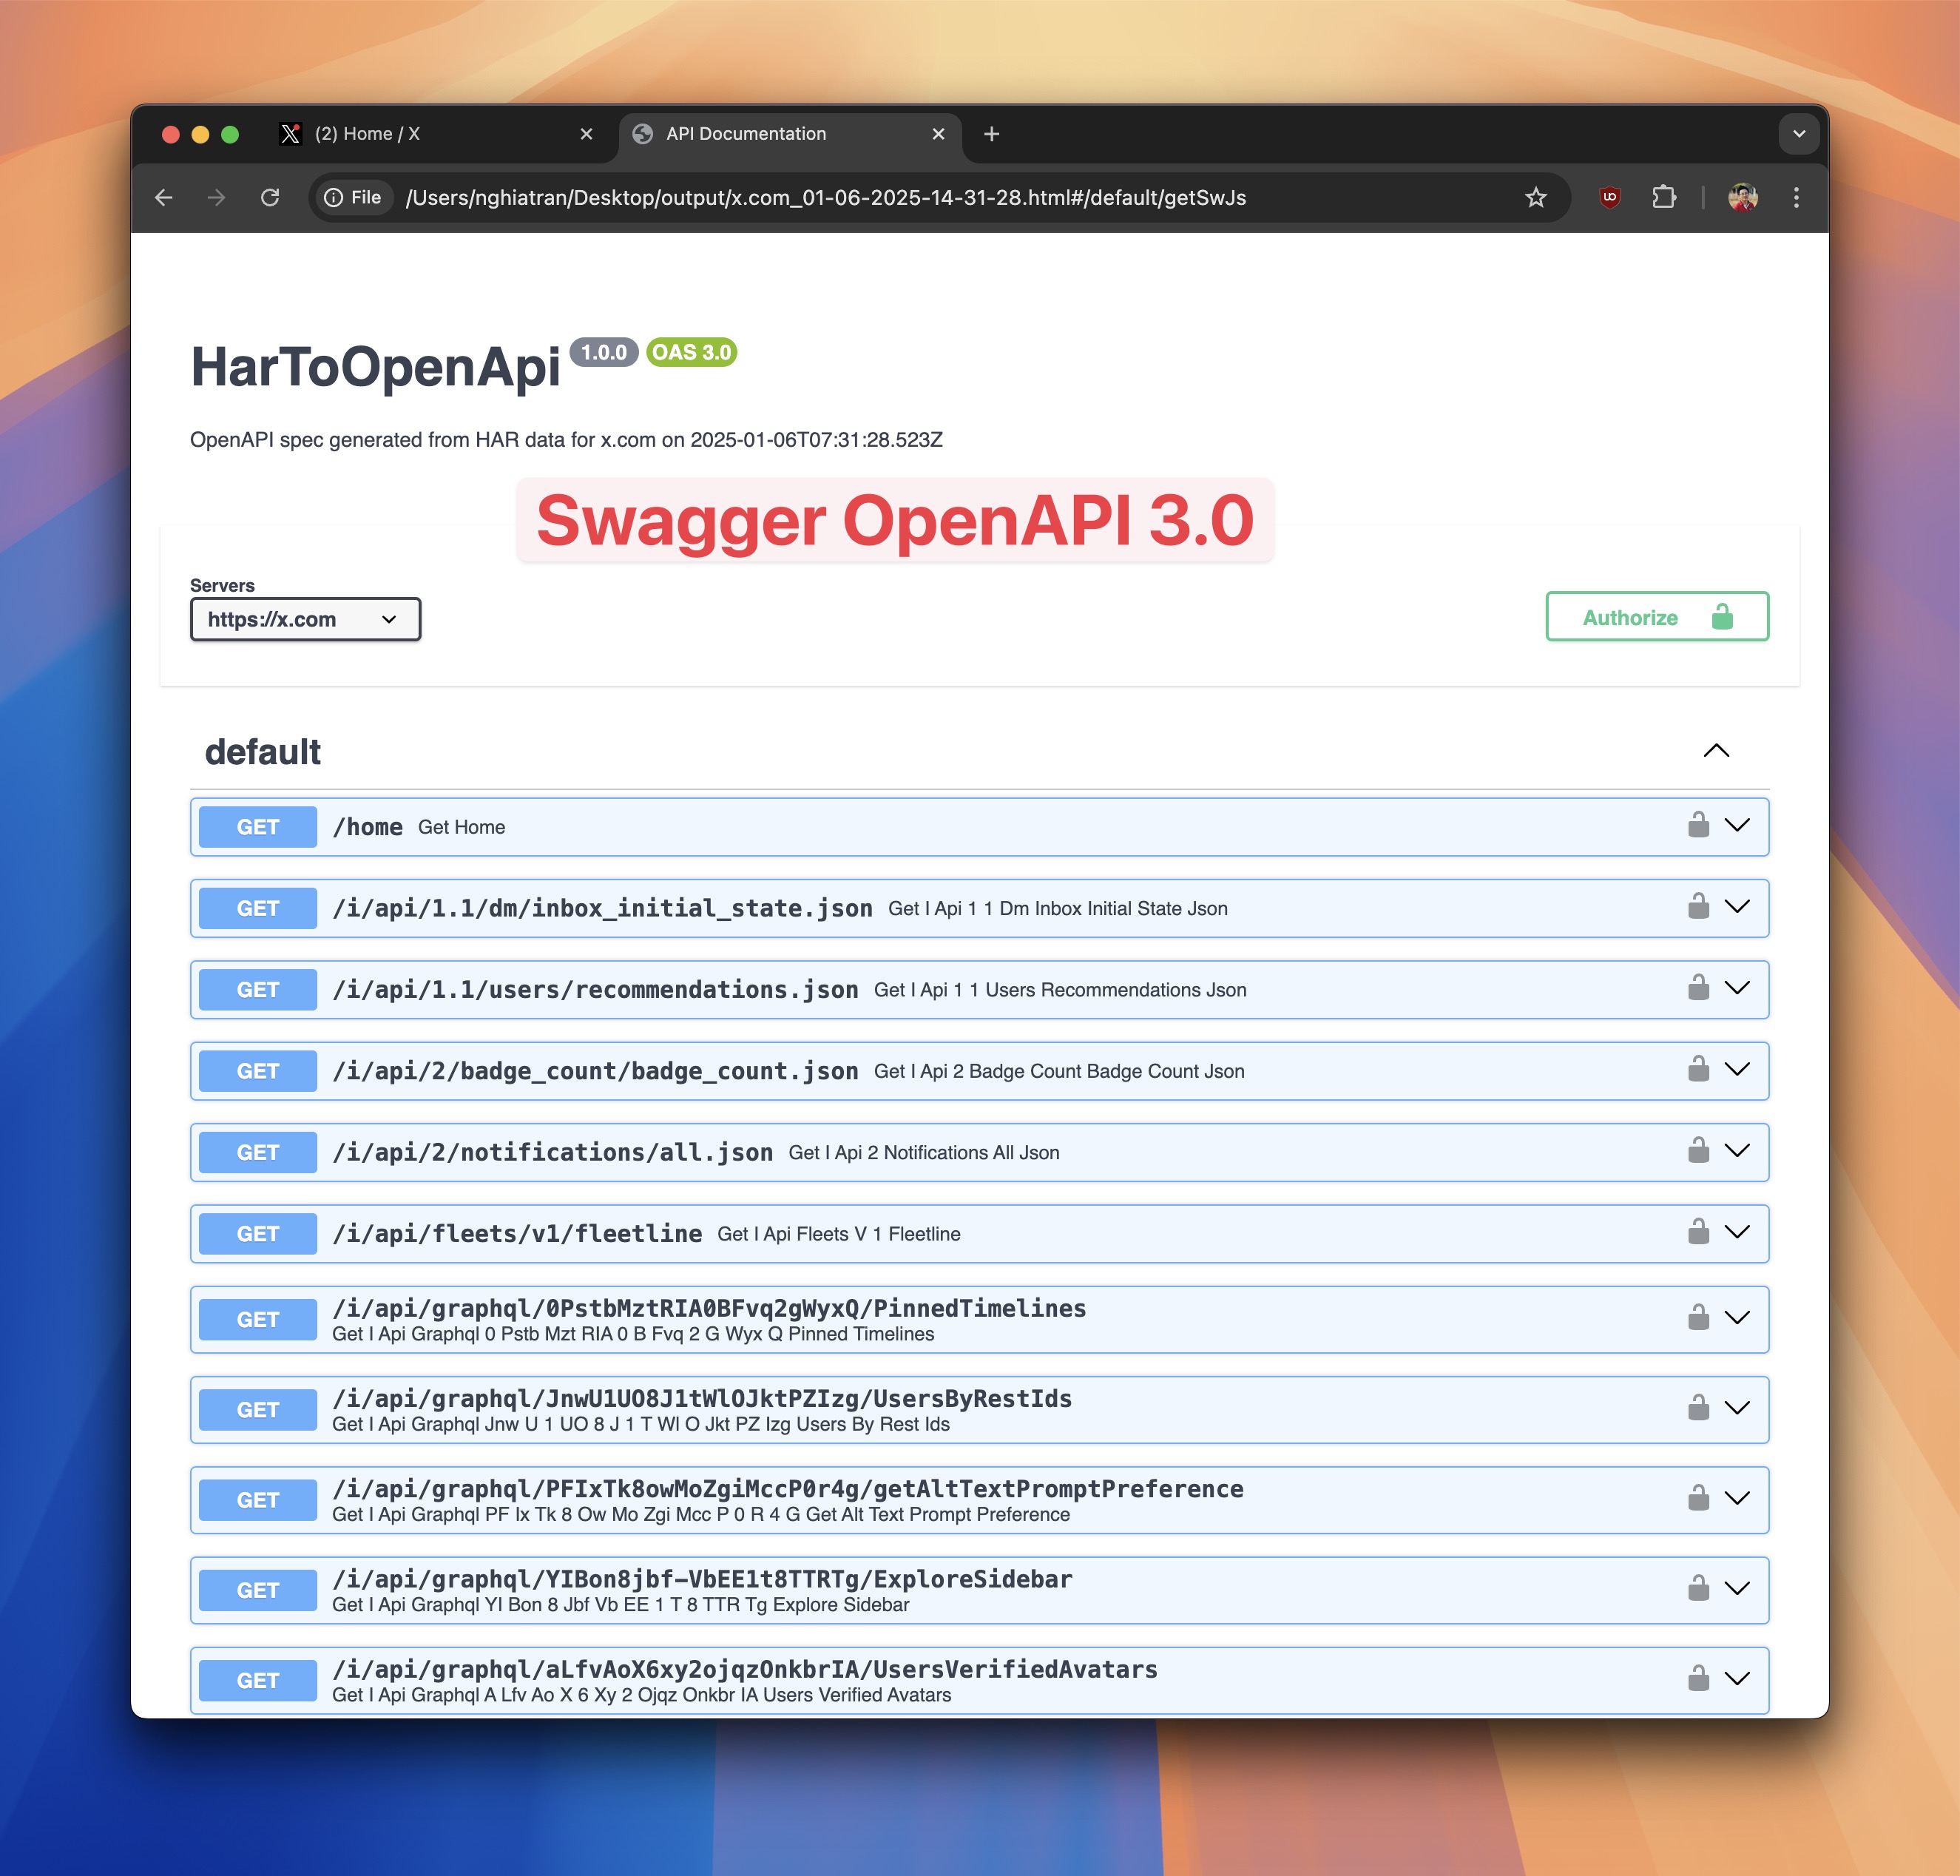
HTML is useful for a quick review or a private handoff. YAML is better when you plan to edit the document, validate it, or use it with other OpenAPI tools.
Proxyman vs mitmproxy for OpenAPI
| Task | mitmproxy workflow | Proxyman workflow |
|---|---|---|
| Capture HTTPS traffic | Built in | Built in |
| Choose requests visually | Available in interactive interfaces | Select rows in the main table |
| Generate OpenAPI | Separate community tool | Built into Proxyman |
| Setup | Proxy plus Python converter | Proxyman app |
| Process | Capture, save, run first pass, edit, run again | Capture, select, export |
| Output | OpenAPI YAML | OpenAPI YAML or HTML |
| Best fit | Automation and command-line workflows | Fast visual work by developers and QA |
mitmproxy remains a strong tool. If you already automate traffic capture with Python, its workflow may fit your project well. Proxyman is helpful when you want to inspect a session and create a useful document without building a command-line process first.
Check the generated document before sharing
Whichever tool you use, review these points:
- Remove secrets. Search for tokens, cookies, passwords, private headers, email addresses, and personal data.
- Check path parameters. A path such as
/users/123may need to become/users/{id}. - Add missing responses. Your capture may include
200but not400,401,404, or500. - Check required fields. One example cannot prove that every field is required.
- Check data types. A value that looks like a number in one response may really be a string ID.
- Add authentication details. Describe the expected authentication without copying a real secret.
- Use clear names and descriptions. Generated schemas still need human explanations.
- Validate the file. Open it in an OpenAPI editor and fix any warnings.
Conclusion
Generating OpenAPI from traffic can save a lot of time, especially when the original documentation is missing. mitmproxy can support this job through a separate converter and a command-line workflow. That approach is flexible, but it asks the user to manage more steps.
Proxyman keeps the basic workflow in one place: capture the requests, select the useful rows, and export OpenAPI YAML or HTML. It is a friendly starting point for developers and QA teams who want a document quickly and plan to review it afterward.
What's next?
- Read the Proxyman OpenAPI export documentation
- Follow the detailed Generate OpenAPI YAML tutorial
- Learn how to capture HTTPS traffic from an iPhone or iPad
- Learn how to capture HTTPS traffic from an Android Emulator
- Read the mitmproxy2swagger project guide