Proxyman vs mitmproxy: Decode Protobuf WebSocket Messages
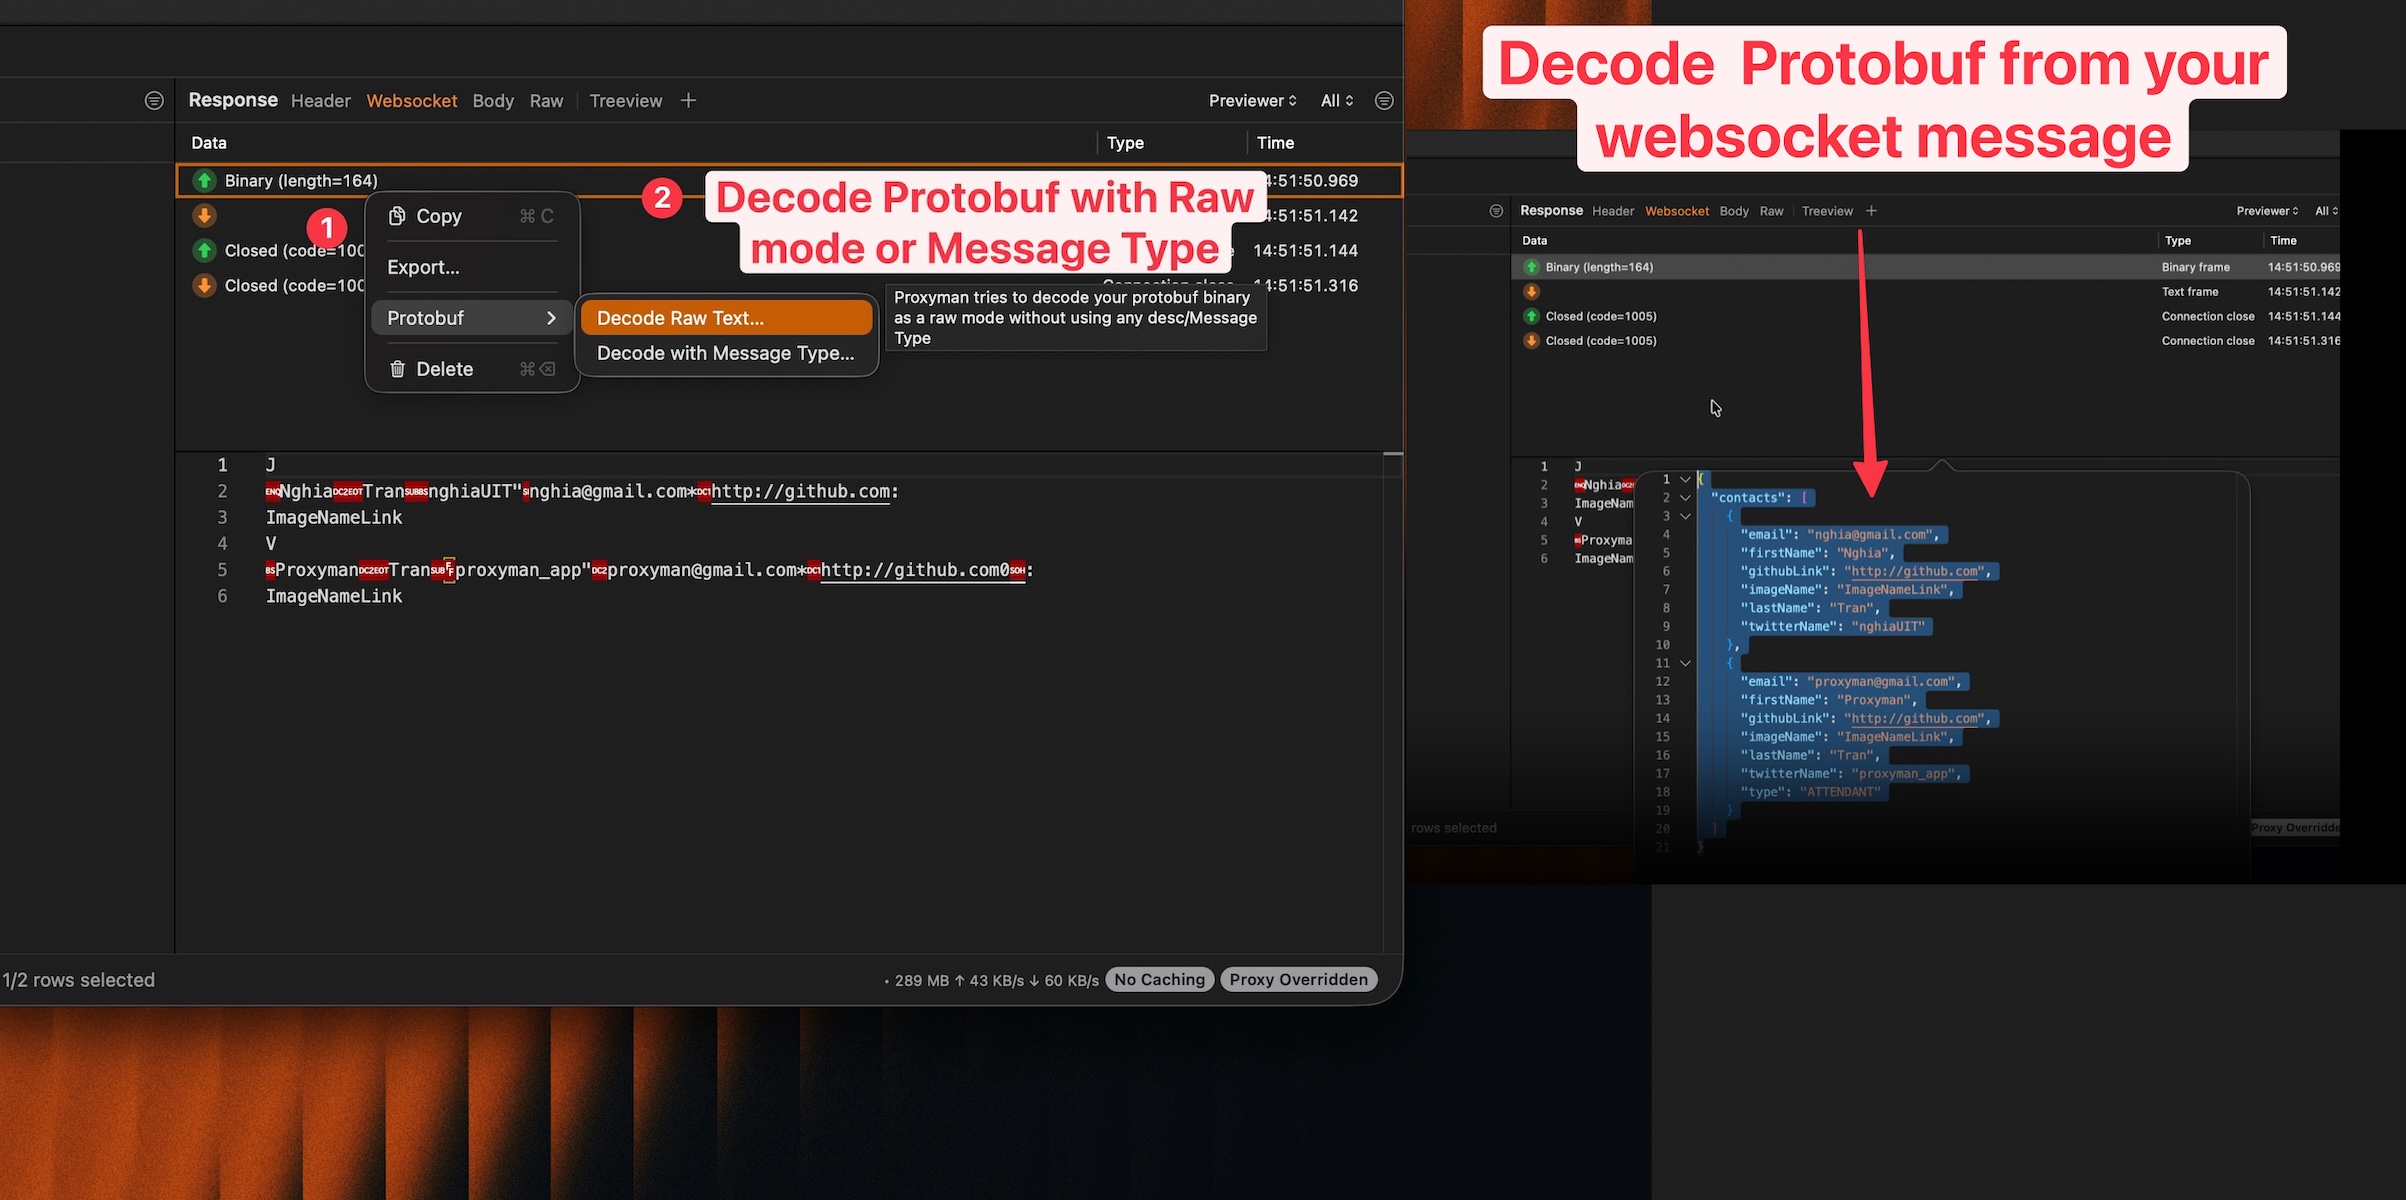
You captured a WebSocket connection, but its messages look like random binary data. You know the app is receiving useful information, yet you cannot read the values in your debugging tool.
The message may use Protocol Buffers, usually called Protobuf. Protobuf is fast and small, but it is not designed to be readable like JSON.
Both mitmproxy and Proxyman can help decode Protobuf WebSocket messages. mitmproxy provides a Protobuf content view and accepts a .proto definition file. Proxyman provides a visual message list, a quick Raw Mode, and descriptor-based decoding inside the macOS app.
In this guide, you will learn:
- What WebSocket and Protobuf are
- Why a Protobuf message looks unreadable
- How the current mitmproxy solution works
- How to decode a message in Proxyman with or without a schema
- How to fix common decoding problems
What is a WebSocket?
Normal HTTP often follows a simple pattern:
- The app sends a request.
- The server sends a response.
- The exchange ends.
A WebSocket keeps one connection open. The app and server can send messages to each other at any time.
WebSockets are useful for:
- Chat messages
- Live prices
- Game events
- Delivery or ride updates
- Notifications
- Collaborative editing
- Live dashboards
When debugging a WebSocket, you usually want to see the connection and then read each sent and received message in order.
What is Protobuf?
Protobuf is a binary data format created by Google. It stores structured data in fewer bytes than a normal text format such as JSON.
A JSON message may look like this:
{
  "userId": 123,
  "name": "Taylor",
  "online": true
}
The same data encoded with Protobuf is binary. When you open it as text, you may see boxes, strange symbols, or a long list of bytes.
This does not mean the message is broken. Your debugging tool needs to decode it with the Protobuf rules.
Why is Protobuf difficult to read?
A Protobuf message stores field numbers and values. The friendly field names usually live in a separate schema.
For example, the schema may say:
message UserStatus {
  int64 user_id = 1;
  string name = 2;
  bool online = 3;
}
The binary message may contain fields 1, 2, and 3, but it does not need to repeat the words user_id, name, and online every time.
That design makes the message small. It also creates a debugging problem: without the correct schema, a tool can often show field numbers and possible value types, but it cannot reliably know the original field names.
The current solution with mitmproxy
mitmproxy supports WebSocket traffic. It also includes a Protobuf content view that can format binary data.
For named fields, mitmproxy provides the protobuf_definitions option. You set it to the path of a .proto file:
mitmweb --set protobuf_definitions=/path/to/messages.proto
After traffic is captured, you find the WebSocket flow, open a message, and choose the Protobuf content view when it is not selected automatically.
This is a real built-in capability. You do not need to write a custom Python addon for normal Protobuf viewing.
mitmproxy is a good fit when:
- You already use mitmproxy for your traffic
- You are comfortable with terminal options
- You keep
.protofiles in your development project - You want to automate or script more of the workflow
- You need a free and open-source proxy
What can be difficult in the mitmproxy workflow?
The main challenge for a beginner is connecting all the pieces.
1. The WebSocket message is separate from its schema
Capturing the bytes is only the first step. You also need the correct .proto definition when you want real field names.
Large projects may have many .proto files, imports, packages, and message types. A schema can also change while an old app version still sends the older format.
2. Setup uses options and content views
You need to know the option name, provide the correct file path, find the WebSocket message, and select the right content view.
That is efficient after you learn it. A developer who is new to network debugging may prefer a visible menu that starts from the message they are already looking at.
3. Finding one message can take time
A busy WebSocket may send hundreds or thousands of messages. The useful data is mixed with heartbeats, status updates, and other event types.
A clear sent-and-received message timeline helps you connect one action in the app to one binary message.
4. The schema may be missing
Sometimes you are allowed to debug the app but do not have its .proto source files nearby. In that case, you still need a safe way to inspect the basic field numbers and values.
Raw decoding cannot restore the original names, but it can tell you whether the payload is probably Protobuf and help you locate the value you need.
The visual solution with Proxyman
Proxyman macOS 6.5.0 or later can decode Protobuf payloads from WebSocket messages.
There are two useful modes:
- Raw Mode works without a descriptor file. It shows field numbers and inferred values.
- Message Type uses an imported
.descdescriptor file. It can show the field names and types defined by your schema.
This lets you start with the captured message, then choose how much schema information you have.
Step 1: Capture the WebSocket connection
Download and set up Proxyman for macOS. Install and trust the certificate when you need to decrypt a secure wss:// connection.
For a WebSocket opened by Google Chrome, start Proxyman and then open the website. Proxyman can capture normal production WebSocket traffic from Chrome automatically.
Perform the action that sends the message. For example, send one chat message or change one live setting. Keeping the test small makes the matching frame easier to find.
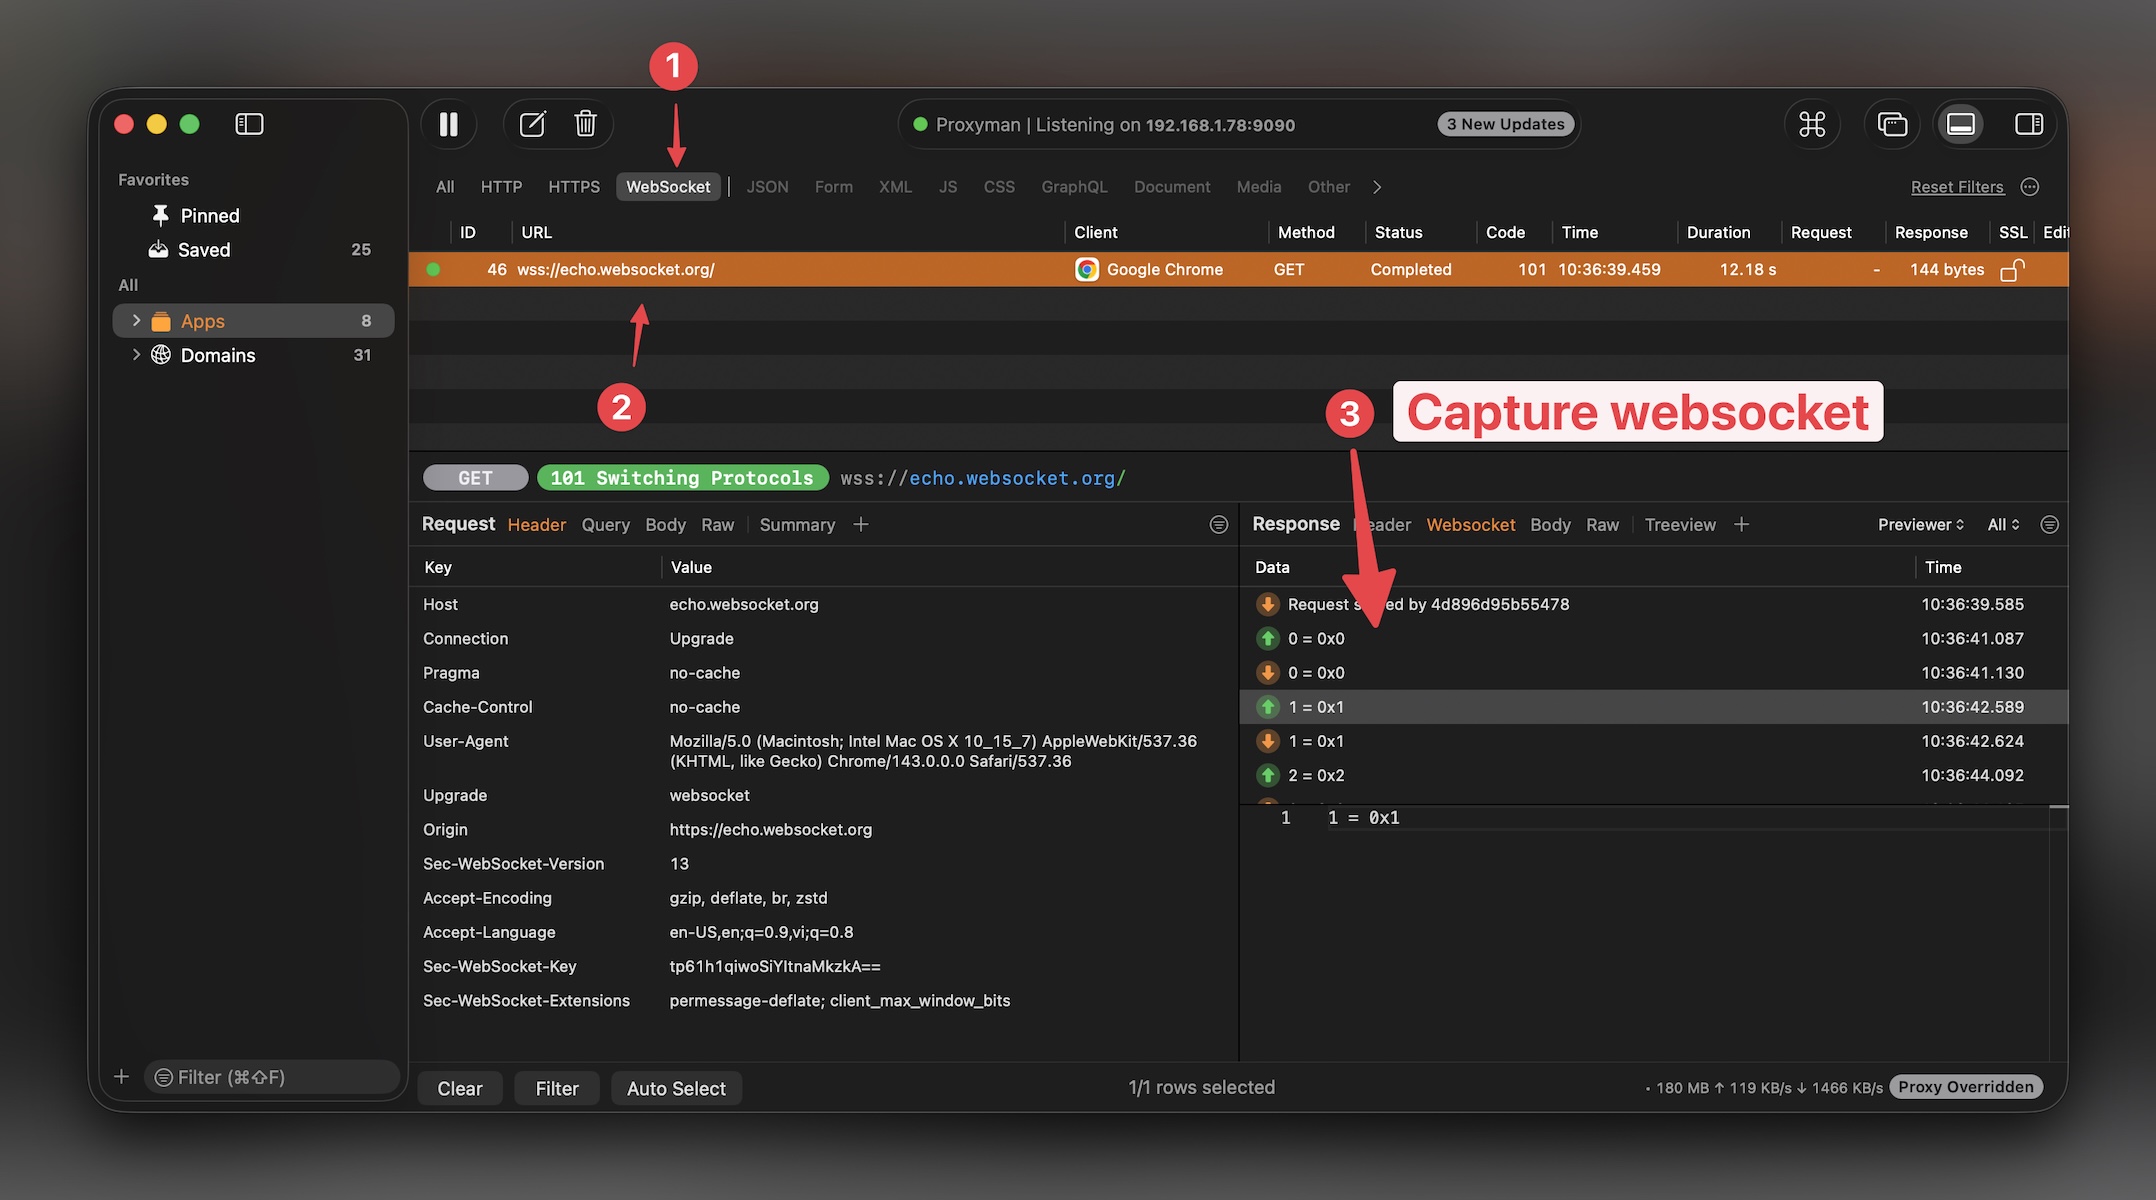
Select the WebSocket flow. In the WebSocket tab, you can see messages sent by the client and messages received from the server.
Only inspect WebSocket traffic that you are allowed to test. Messages may contain account details, session tokens, personal data, or private business information.
Step 2: Try Raw Mode without a schema
Raw Mode is the fastest way to check a message when you do not have a Protobuf descriptor.
- Select the WebSocket message.
- Right-click the message.
- Choose
Protobuf→Decode. - Select
Raw Mode.
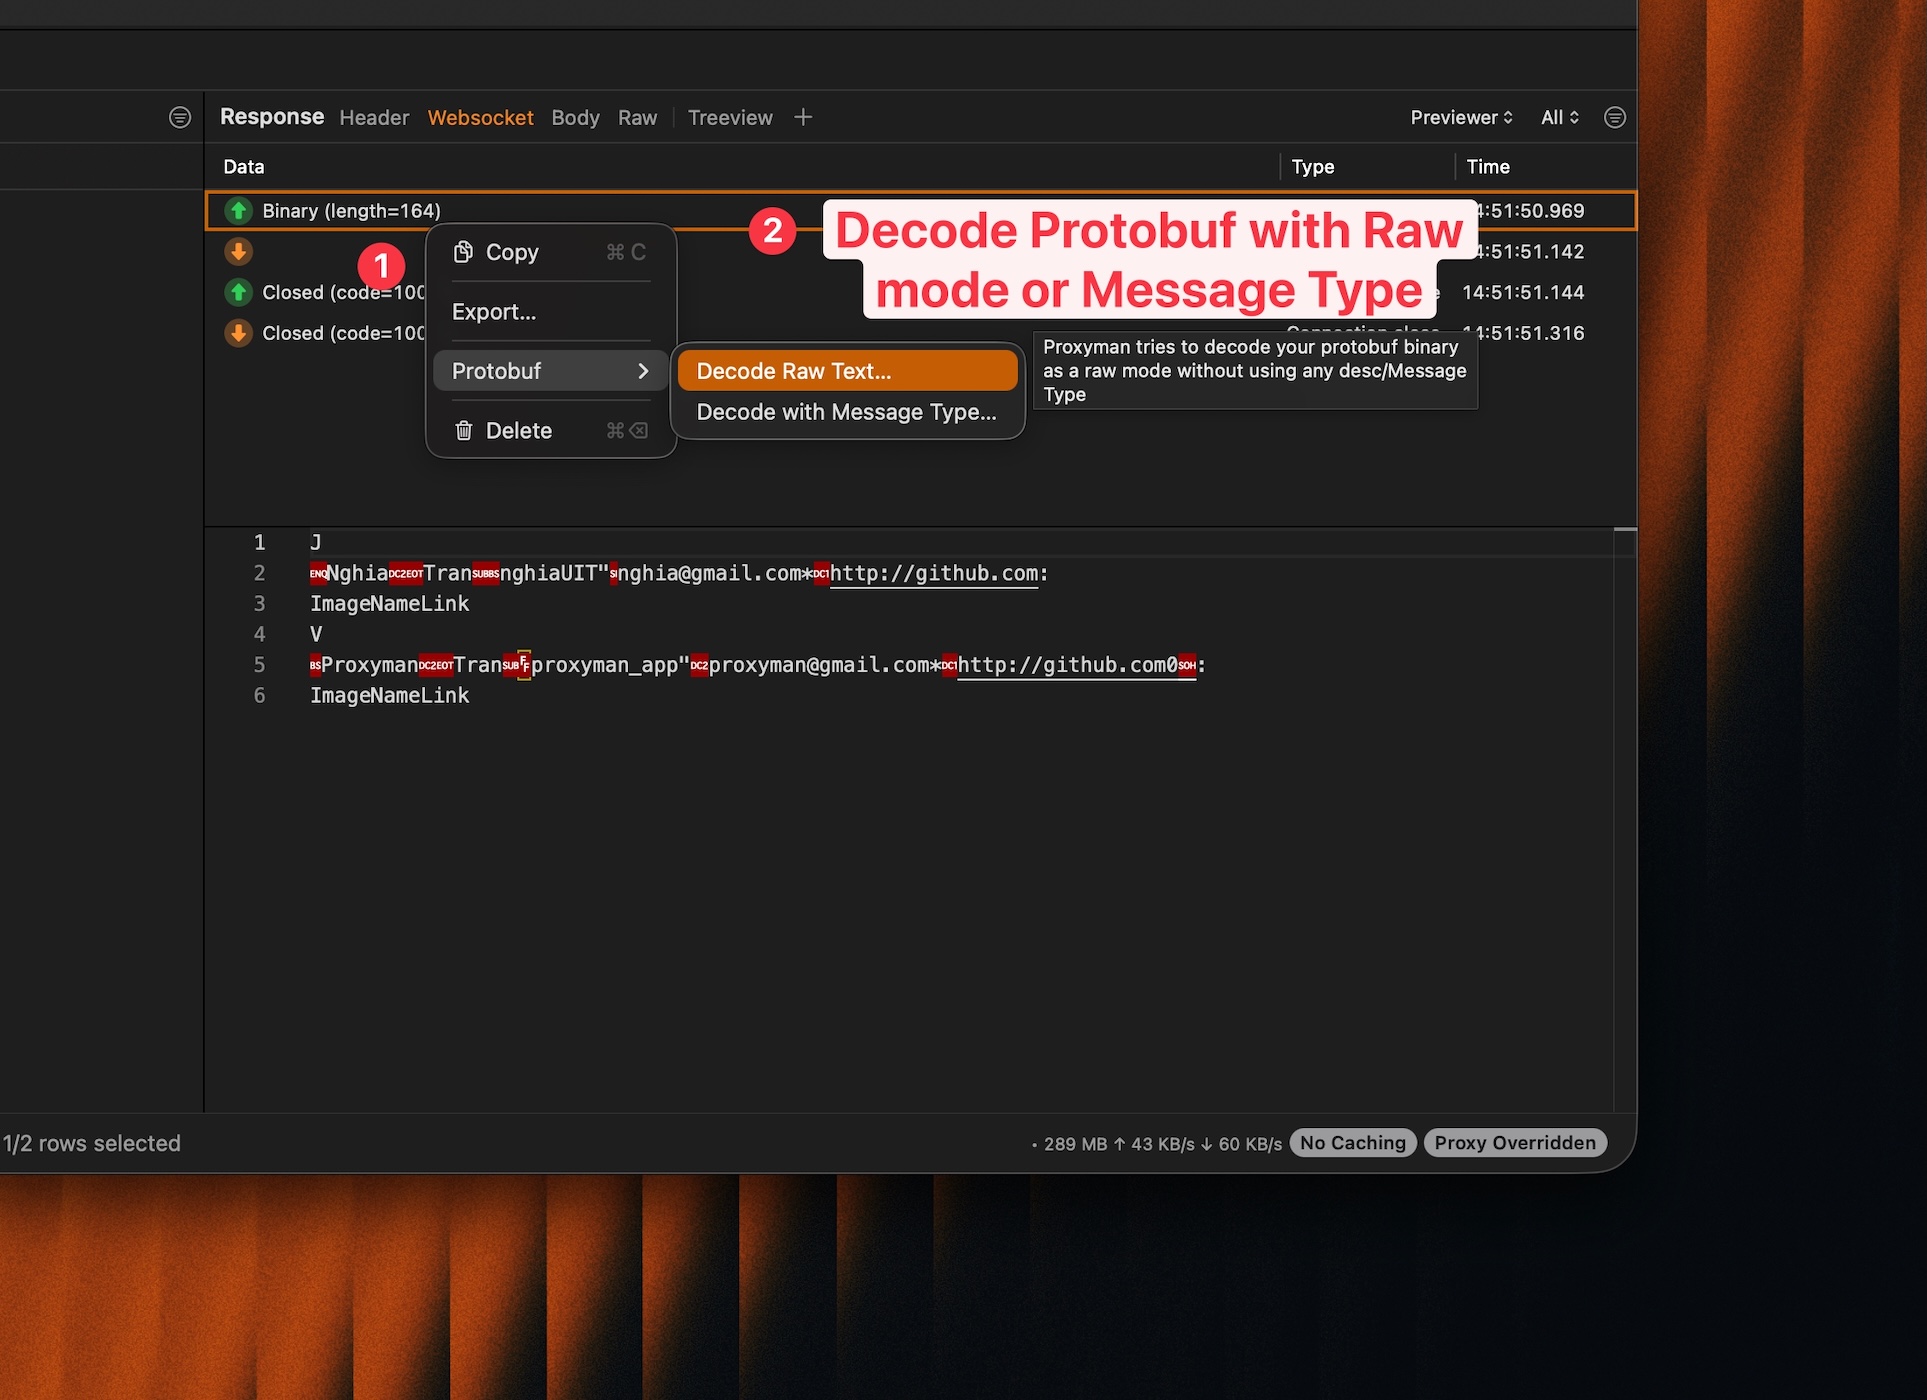
Proxyman reads the binary payload and displays the fields it can infer.
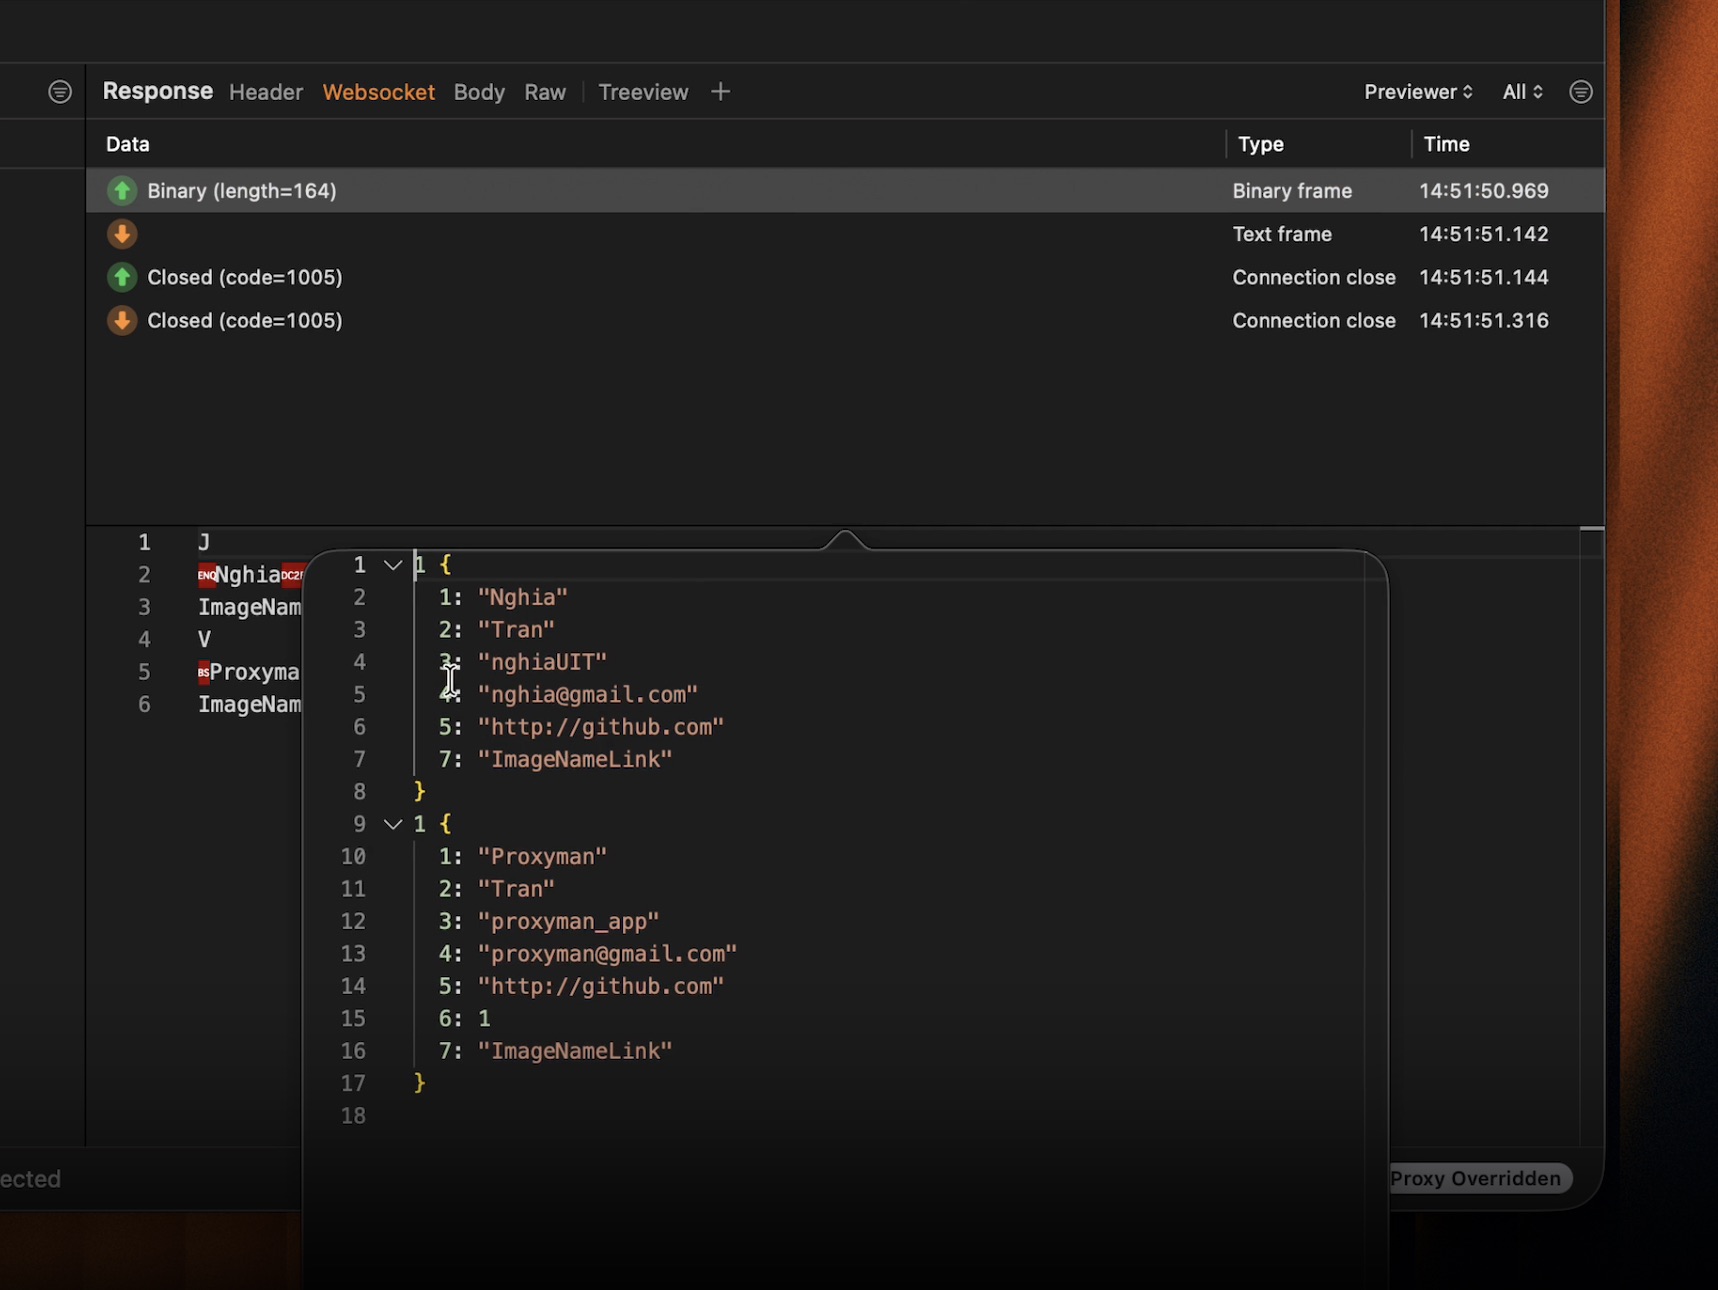
Raw Mode can help you see:
- Field numbers
- Numbers
- Text values
- Boolean-like values
- Nested binary values
Raw Mode cannot know a field was originally named user_id or message_text. For those names, you need the schema.
Step 3: Prepare a descriptor for full field names
Proxyman uses a Protobuf File Descriptor with the .desc extension. A descriptor contains the compiled schema information that the decoder needs.
The easiest option is to ask the backend or app team for the current descriptor file.
If you have the .proto source files, use protoc to create one descriptor. This example includes imported definitions:
protoc \
  --descriptor_set_out=output.desc \
  --include_imports \
  -I=/path/to/proto/files \
  /path/to/proto/files/*.proto
If protoc is not installed on macOS, install the Protobuf command-line tools first:
brew install protobuf
Keep the descriptor in a safe development folder. A schema may reveal internal message names and data structures, so do not publish it unless your team allows that.
Step 4: Import the descriptor into Proxyman
Open:
Tools → Protobuf Schema
Click the + button and choose your .desc file. Proxyman reads the available package names and message types.
You can also start from the WebSocket message, choose Protobuf → Decode → Message Type, and use the import button when the expected type is missing.
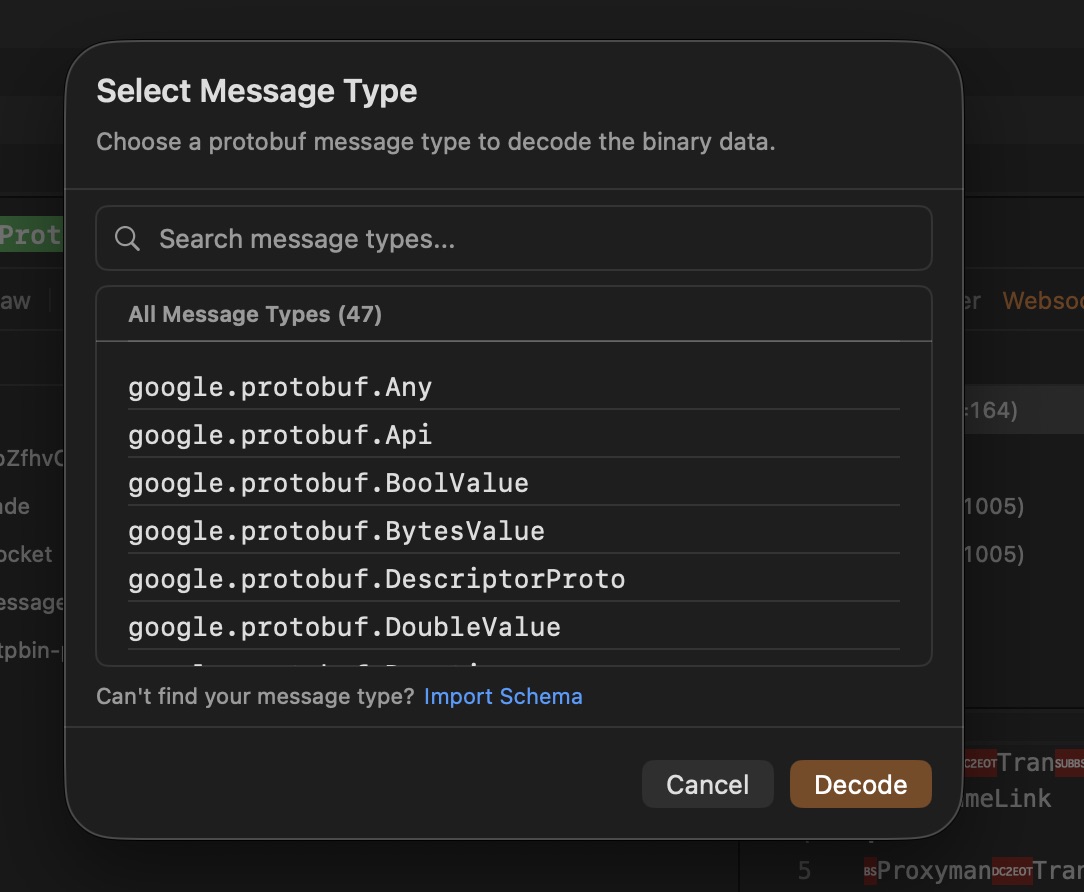
Step 5: Choose the correct message type
Select the root message type used by the payload. Include its package name when the schema defines one.
For example:
chat.events.NewMessage
After you select the correct type, Proxyman decodes the payload with its field names.
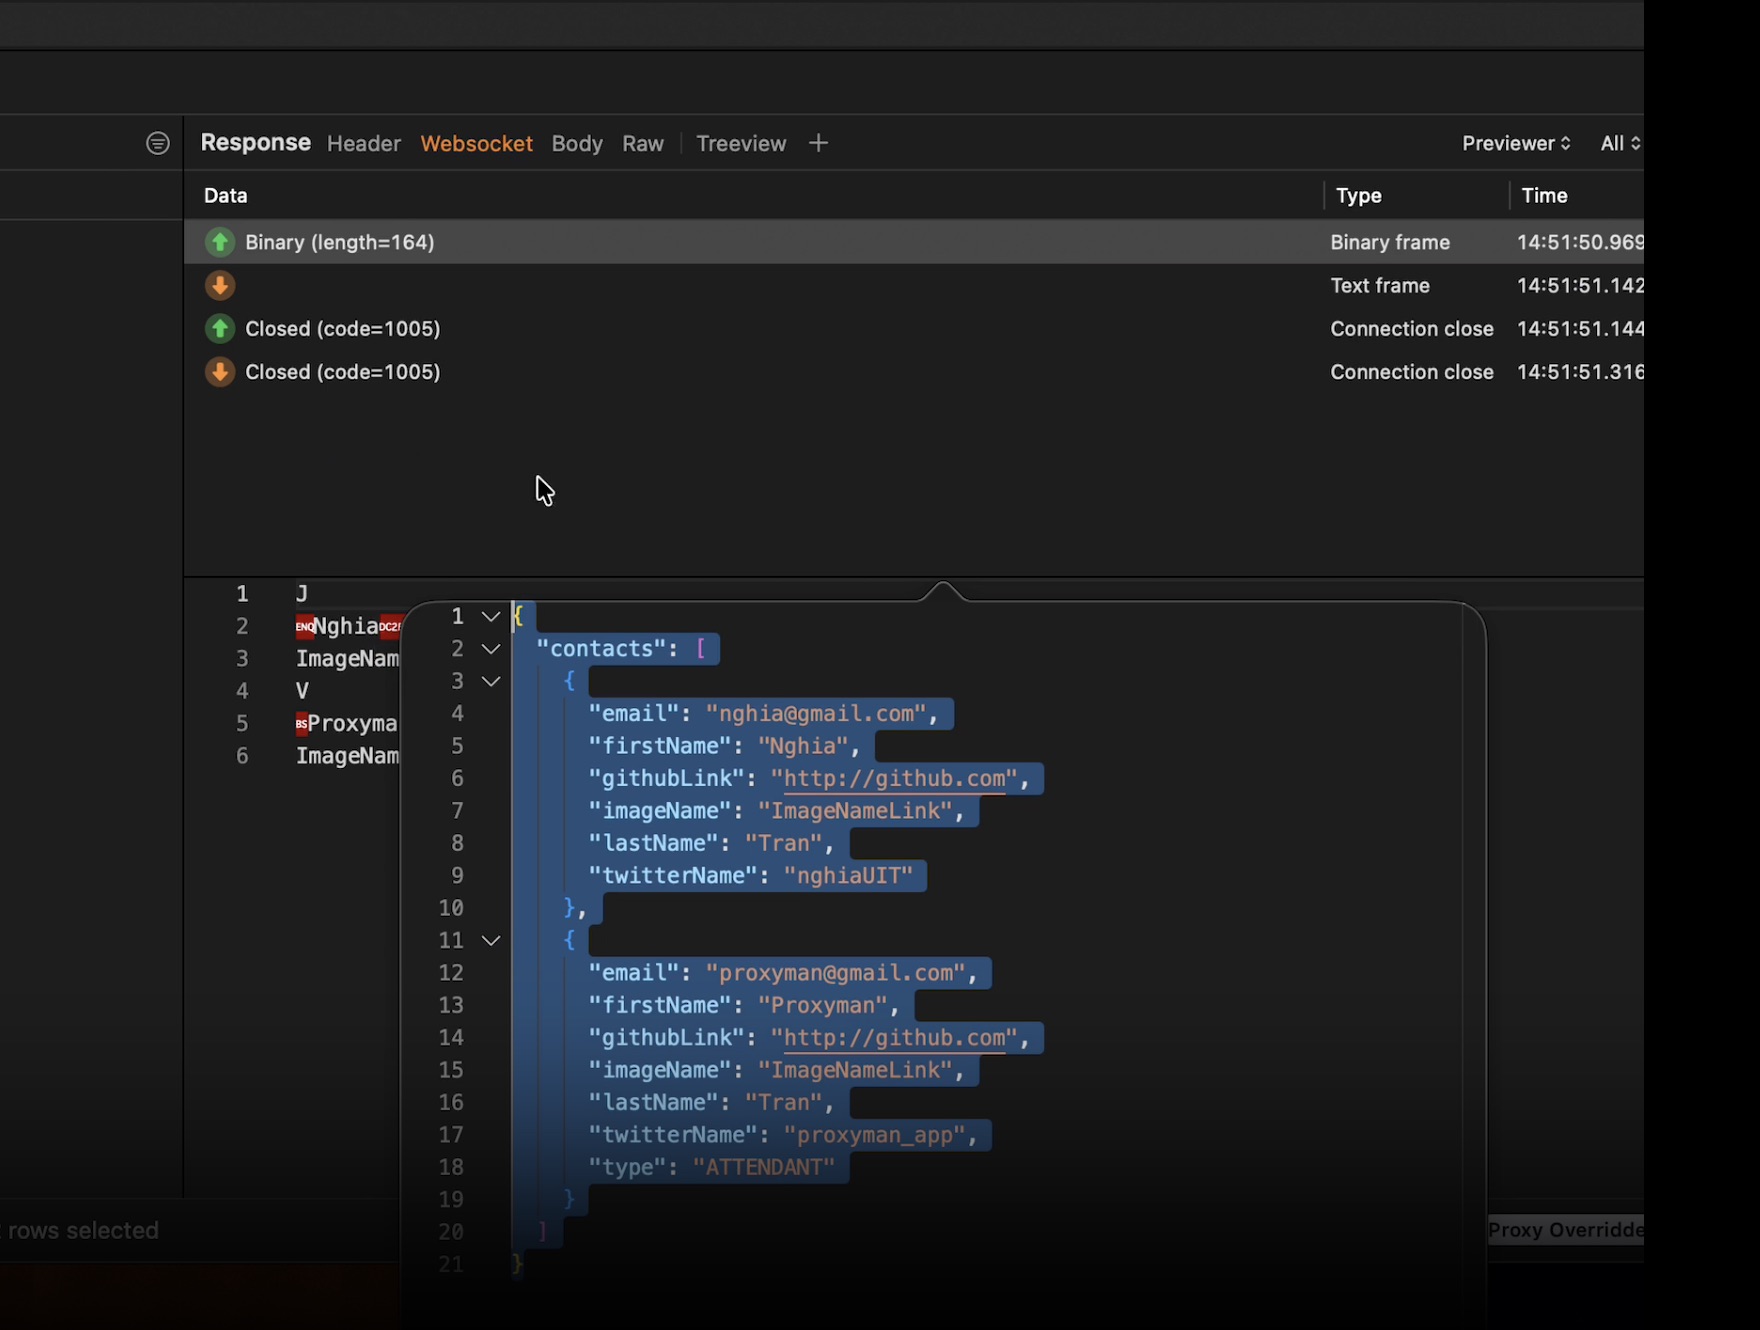
Now you can connect the binary values to your app's behavior. You may see IDs, timestamps, enum values, nested messages, and text fields that were hidden in the raw bytes.
Proxyman vs mitmproxy for Protobuf WebSocket messages
| Task | mitmproxy | Proxyman |
|---|---|---|
| Capture WebSocket traffic | Yes | Yes |
| Built-in Protobuf view | Yes | Yes |
| Inspect without a schema | Protobuf content view can show raw fields | Raw Mode from the message menu |
| Schema format | .proto file | Compiled .desc descriptor |
| Setup style | Option and content-view workflow | Visual menu and schema manager |
| Message inspection | Console or mitmweb interface | Native sent/received message list |
| Best fit | Terminal, open-source, and automated workflows | Interactive debugging on macOS |
The choice is not about one tool supporting Protobuf and the other one not supporting it. Both support it. The difference is the workflow.
mitmproxy is a strong choice for developers who already work in its terminal or web interface. Proxyman is useful when you want to click a captured frame, try Raw Mode, and then add a descriptor without leaving the message timeline.
Common problems and how to fix them
I can see the connection but not readable messages
First, confirm that SSL Proxying is enabled for the WebSocket host. Reconnect after enabling it because an existing secure connection may still be encrypted.
Then confirm the payload really uses Protobuf. Binary WebSocket data can also be compressed, encrypted, or use another format such as MessagePack.
Raw Mode shows numbers but no field names
This is expected. Protobuf does not include the original field names in every binary message. Import the current .desc file and choose the correct Message Type.
The decoded values look wrong
The selected root message type may be wrong. Try the type used for that exact event. A client-to-server message and server-to-client message may use different types.
The payload may also contain a custom wrapper before the Protobuf bytes. Check with the app team if the first bytes describe message length, event type, or compression.
Some fields are missing
Your descriptor may be older than the app or server. Remove the old schema, generate a new .desc file from the current .proto files, and import it again.
Remember that Protobuf does not send fields that hold their default values. A missing optional field may be valid.
I cannot capture the WebSocket from an iOS app
Some iOS WebSocket APIs do not follow the normal HTTP proxy settings. If your app uses URLSessionWebSocketTask, follow the Proxyman SOCKS Proxy guide or use the debug-only Atlantis framework for an app you develop.
The message list is too busy
Clear the session and repeat one action. Note the time of the action, then inspect nearby sent and received messages. Small tests are much easier than recording several minutes of live traffic.
Conclusion
WebSocket keeps messages moving in real time, while Protobuf keeps those messages small. Together they are great for an app, but the captured binary data can be hard to understand.
mitmproxy can decode Protobuf with its content view and a .proto definition. It is powerful for developers who like terminal options and automated workflows.
Proxyman gives macOS developers a visual path from the live WebSocket message to the decoded values. Start with Raw Mode when you do not have a schema. Import a .desc descriptor and select the correct Message Type when you need full field names.
What's next?
- Read the Proxyman WebSocket documentation
- Read the Proxyman Protobuf documentation
- Follow the detailed Decode Protobuf WebSocket Messages tutorial
- Learn how to capture WebSocket traffic from iOS simulators and devices
- Review the mitmproxy Protobuf option
- Review the mitmproxy WebSocket limitations